No, that's not the sound of my foot making contact with the ground because I'm having a hissy fit. (Believe it or not, mum, I've finally grown out of that behaviour!)
I've recently come across a few stamp stores that I love, and simply wanted to get your attention so that I can share them with you.
First of all, Stampotique Originals. I am in awe of and in love with the artwork of Daniel Torrente & Jill Penney. Go check them out! The other day I saw on the lovely Carmen's blog an amazingly evocative snowman stamp, and desperately want it for myself.
Second, Bombshell Stamps produce images that are right up my street at the moment. Even if I wouldn't really know how to incorporate them into my art, I still love them for what they are. Plus they're having a giveaway contest on their blog at the moment, so go check them out too.
I suppose I have to mention that I also really quite like Tim Holtz's stamps. No need to link to anywhere here. But I think they will remain out of reach for me, price-wise, for a long time (*pine*).
Finally, there is a German shop, LaBlanche (yes, with a French name) which sells very finely detailed stamps. A lot of them aren't to my taste, but the skull stamp I used here was from there, and I've got a lovely Christmas scene one to show you soon too.
To round everything off, I have to give special mention to my recent purchase of grey ink - Versa Colour 'Cement' - because it is awesome. I am especially liking it for snowflakes at the moment.
So, share time - what are your favourite stamps? Tell me everything! I am having a stamp-obsessed week and must see more!

Stamp it, cut it, bake it, make it, paint it, stick it, sew and wear it. Snap it, sketch it, pin it, write it, play it, ply it, stop: re-write it. Try it, test it, learn it, link it, plan it, think it, pen and ink it. Share it, give it, show it, grow it, keep it, wrap it, pack and send it.
Tuesday, 30 November 2010
Sunday, 28 November 2010
Watching Things Unfold
Over at Scrapbook Challenges this week's sketch challenge looked like this:

I rarely respond to sketch challenges, because I don't have time, but mainly because I already have my own ideas (I usually think about layouts for weeks in advance. That's why it's annoying when they don't always turn out the way I thought they would. Although sometimes actually it's a nice suprise when they turn out better!).
This time, though, a lot of things coincided perfectly and I was able to make a fairly spontaneous layout. It's a little record of the fun we had taking photos for our Save the Date cards. There were lots of photos we didn't think were up to scratch, including this one below (I vetoed it because of my expression. Otherwise it definitely would have made the cut!):

Anyway, here is my take on the sketch, just a little record of how we're getting on. It'll be interesting to look back on and see how things unfolded...


Thursday, 25 November 2010
Decorating Christmas
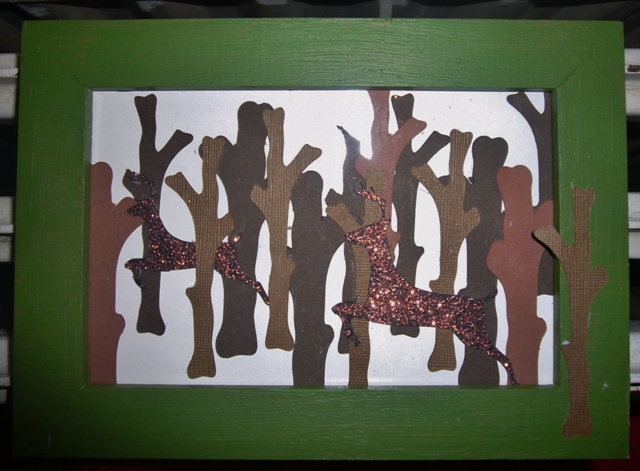
Right now I'm working on a Christmas shadow box that on Sunday I'll be teaching to a group of teenagers. It's not ready yet, though, so instead I've got a smaller, less shadowy frame to show you.
It's a simple, cheap, wooden Ikea number, painted in a matte green. I cut a lot of trees using the Cricut, and I messed around in Inkscape for ages making the beautiful jumping deer (also eventually cut using the Cricut). Then I stuck everything together.

Simple, but quite cute, I think.
It's a simple, cheap, wooden Ikea number, painted in a matte green. I cut a lot of trees using the Cricut, and I messed around in Inkscape for ages making the beautiful jumping deer (also eventually cut using the Cricut). Then I stuck everything together.
Simple, but quite cute, I think.
Tuesday, 23 November 2010
Asking for Help
Something I'm not very good at is asking for help. I tend to want to do things myself, my own way. But recently I've learned that asking for help can really reap rewards.
Our wedding date is booked and a lot of things are already in motion. One of the first things to tick of the list was our Save the Date cards. I'd had a few ideas, but when I mentioned them to my fiance, we were suddenly brainstorming and designing and having a ball. I'm amazed at the effort he's put in - at least 50% of the final product is down to him - and his interest. If I hadn't asked for his help, he may well have sat back and not said anything, knowing me and how I like to do things myself. But without him we wouldn't have such a brilliant product.
So. A little peek of something I'll show you in a week or two... a joint effort between me and my fiance.

Sunday, 21 November 2010
Better Not Shout
As I mentioned last week, I've been making a few cards lately. The ones I've been preparing most manically are Christmas cards - I've had orders which so far have amounted to 65 cards, you see... I am pleased to report that I can still say I'm not sick of making cards. I've just packaged and sent 60 of them off to customers, and am feeling quite pleased - and, I guess, relieved.
I appreciate, though, that I'd better not shout, or blow my own trumpet, too much, because I still have a long way to go before my Christmas card-making duties are over for this year. Pride comes before a fall, and all that. So, in a very meek and modest manner, I'd like to show you my designs from this latest (but not the first) batch.


Thanks for looking. If you want more, there will be more. It's more than a promise - it's an obligation.
Thursday, 18 November 2010
Pure Indulgence
November has turned out to be a super busy month for me, which is why I've been quite quiet in the blog world. Yes, I've still managed to update my blog, but my comments on everyone else's blogs have been few and far between. Once December rolls around, believe it or not, I'll be back - not to the future, and not with a vengeance, just... back.
So there really hasn't been much time to sleep this month, unlike for some...

Pure indulgence it was, then, that I made a cake. Granted, it was for my sister-in-law's birthday - it's not like I'm sitting at home eating it all by myself - but it was nevertheless quite indulgent. Because it was made up of 3 types of chocolate. Because the recipe made too much for the sized pans I have and I had to make 3 layers. And because it took me a whole morning, which I probably should have spent working instead.

Sunday, 14 November 2010
Card Frenzy
On top of the mass orders of Christmas cards this year (which I'll show you soon), and on top even of the first wave of wedding stationery we've been making (I'll show you these soon too, and yes, I did say 'we'), I happen to know a lot of people whose birthdays fall in November, so I've been making other cards as well. I might be in some kind of frenzy. I'm certainly bordering on having flu. But I'm not yet sick of making cards.
Anyway, here's what I've been up to. Loving stars and bunting at the moment.


Anyway, here's what I've been up to. Loving stars and bunting at the moment.


Thursday, 11 November 2010
Lipstick Chick November Challenge: Ideal Home
For November's challenge on the True XOXO Girls blog, I created a layout inspired by the colours of the outside of my dream home. The Lipstick Chicks have really gone to town with their layouts, and there is so much inspiration there this month that you'll be stuck for which Chick to scraplift. But scraplift you must, to be in with a chance of winning this bunch of goodness from Scrap Attack Scrapbooking:

There are some cute Crate Paper Christmas papers in there amongst other things. So get scraplifting!
Here is my submission:

I used a light grey/brown cardstock background for natural stone, dark brown accents for wood, and variations on a sagey green for the window frames and front door.
I started off by stamping and making some patterns on the page with ink and Cosmic Shimmer Mist:
 Then, using some paper from Basic Grey's Wander collection, cut out and added some houses, and drew my own with a black pen:

I stuck the ripped paper, from Kaisercraft and October Afternoon, on in a fairly random fashion:

And then got embellishing:


With Thickers (yay!). The photo I made with the freely downloadable Poladroid app.
Anyway, get on over to the blog and take your pick of which layout to lift. Don't forget, there's a great prize for the winner!

There are some cute Crate Paper Christmas papers in there amongst other things. So get scraplifting!
Here is my submission:

I used a light grey/brown cardstock background for natural stone, dark brown accents for wood, and variations on a sagey green for the window frames and front door.
I started off by stamping and making some patterns on the page with ink and Cosmic Shimmer Mist:


I stuck the ripped paper, from Kaisercraft and October Afternoon, on in a fairly random fashion:

And then got embellishing:


With Thickers (yay!). The photo I made with the freely downloadable Poladroid app.
Anyway, get on over to the blog and take your pick of which layout to lift. Don't forget, there's a great prize for the winner!
Sunday, 7 November 2010
Twig by Twig, Feather by Feather
Well, it's Sunday morning, so grab a cup of tea and settle in for a nice long post full of sumptuous photos. But watch out for an embellishment overload!

Back in September one of the things I bought from the craft fair was a Basic Grey Chocolate Chip mini chipboard album. I don’t normally buy things like this, preferring to make the structure myself, but it was on sale, and I already seemed to have an idea in my head, as well as the colour scheme, which was inspired by the GORGEOUS American Crafts ribbons I had just picked up:

Back in September one of the things I bought from the craft fair was a Basic Grey Chocolate Chip mini chipboard album. I don’t normally buy things like this, preferring to make the structure myself, but it was on sale, and I already seemed to have an idea in my head, as well as the colour scheme, which was inspired by the GORGEOUS American Crafts ribbons I had just picked up:

This little apartment in Belgium has been our home for around a year now, but it's only over the last few months that I've really felt settled. The mini, made to capture the feeling of finally finding where home is, contains only one photo. Instead of pasting in pictures, I made use of lots of my materials – journalling shapes, tags, ribbons, stamps, paints, and more – to embody the homeliness I'm experiencing right now.

I mainly used Basic Grey's Pyrus and Marrakech and Kaisercraft's Up, Up and Away paper, because the neutral tones really made the colours of the ribbon pop:


I painstakingly outlined every page with stitching using a white pen - I did it first on the front cover and thought it looked so good that I just carried on.
On each page there is a little bit of hidden journalling; I wanted to keep it private, yet still show off the sentiment:

I got to use one of my new 7gypsies transparencies:

I also used an old clothing label and a business card from my most recent tattooist:


And generally, lots of stamping, stickers, rubons and paint and ink splodges:


I really love these American Crafts ribbons. I love the colours they've inspired me to use. They are my new favourite thing, for a little while. How about you - is there one little product or group of products that has led to total inspiration for a while?
Thursday, 4 November 2010
A Little Lady for a Little Lady
A very close friend's daughter is soon to turn 1. She's already quite the poser, always smiling for the camera, and will definitely grow up to have very discerning fashion tastes, if her mummy is anything to go by. My friend likes a lot of things oriental, and I'm sure when baby grows up she'll appreciate the beauty on that side of the world too. As a tiny pre-emption of this discovery she'll make, I've fashioned for her a bookmark with a little kimono-clad lady on. It's not quite origami (there's glue involved), but there was some folding, and some very amusing english translations of the instructions in the otherwise Japanese-oriented kit.

Isn't the paper gorgeous? It's all textured and a little bit foamy around the edges of the flowers. I love Japanese paper.
Oh, and I know it's a bookmark, and she's only turning 1, but she's already taken her first step and she'll be intelligent beyond her years, I know it. Plus mummy will enjoy reading to her.
Tuesday, 2 November 2010
Making an Impression
As promised on Sunday, today I'll show you the noisy technique for making impressions of shapes on cardboard - which I used in the skull card.

I saw it in a magazine, a French one called Histoires de Pages. They used fancy Melody Ross tools and chipboard, of which I had none, so I improvised.
First of all, take your cardboard shape (I used the cardboard that backs a pad of paper), and lightly wet it by going over it with a wet brush or sponge, or mist it with a spray bottle. Then take your tools - you'll need a hammer, a board on which to hammer, and something to make an impression with. Melody Ross has some steel stamps which give a deep deboss, but as I had nothing like this that was suitable for the skull card I went with an emboss by using what I think is a backing sheet for sequins (that is, it's thick foil and has tiny shapes punched out of it, and I'm assuming these shapes became sequins).

Start hammering. This was the noisy part: I really went to town to get a deep impression. My table is inlaid with tiles which began to ring slightly with the impact, and a combination of no carpets and very high ceilings topped it off by echoing and amplifying the sound. Sorry, neighbours! This is what it looked like as it started to dry:

The next step is to paint LIGHTLY and haphazardly over the cardboard with gesso. You can see how I used the area that wasn't going to be on show (the middle section) to unload my brush to the desired point before going over the shapes. The key is to really only highlight the embossed parts and not cover the debossed parts too much. If my example had been made with Melody Ross's tools or anything else to get the deboss effect, I'd be aiming to keep the stars relatively free of paint. But as I was embossing, I was trying to keep the negative space empty.
 Then mix a paint or ink colour, and when the gesso is dry, paint over the cardboard in the same way as before. It doesn't matter if the white still shows through - that's the look we're going for.

After this layer has dried, mix 50/50 a dark paint or ink with some kind of varnish. In the magazine they used Mod Podge, but I don't have any of that fancy stuff, so I used PVA glue. Cover the whole piece of cardboard with this paint/varnish mix and allow to dry thoroughly.

When it's dry, you may need to sit it under some heavy books for a while to flatten it again. Leave it overnight, and it'll be ready to use the next day.
This technique was really fast, and looks really good. If you make something with it, let me know - I'd love to see what you come up with. Thanks for looking!

I saw it in a magazine, a French one called Histoires de Pages. They used fancy Melody Ross tools and chipboard, of which I had none, so I improvised.
First of all, take your cardboard shape (I used the cardboard that backs a pad of paper), and lightly wet it by going over it with a wet brush or sponge, or mist it with a spray bottle. Then take your tools - you'll need a hammer, a board on which to hammer, and something to make an impression with. Melody Ross has some steel stamps which give a deep deboss, but as I had nothing like this that was suitable for the skull card I went with an emboss by using what I think is a backing sheet for sequins (that is, it's thick foil and has tiny shapes punched out of it, and I'm assuming these shapes became sequins).

Start hammering. This was the noisy part: I really went to town to get a deep impression. My table is inlaid with tiles which began to ring slightly with the impact, and a combination of no carpets and very high ceilings topped it off by echoing and amplifying the sound. Sorry, neighbours! This is what it looked like as it started to dry:

The next step is to paint LIGHTLY and haphazardly over the cardboard with gesso. You can see how I used the area that wasn't going to be on show (the middle section) to unload my brush to the desired point before going over the shapes. The key is to really only highlight the embossed parts and not cover the debossed parts too much. If my example had been made with Melody Ross's tools or anything else to get the deboss effect, I'd be aiming to keep the stars relatively free of paint. But as I was embossing, I was trying to keep the negative space empty.


After this layer has dried, mix 50/50 a dark paint or ink with some kind of varnish. In the magazine they used Mod Podge, but I don't have any of that fancy stuff, so I used PVA glue. Cover the whole piece of cardboard with this paint/varnish mix and allow to dry thoroughly.

When it's dry, you may need to sit it under some heavy books for a while to flatten it again. Leave it overnight, and it'll be ready to use the next day.
This technique was really fast, and looks really good. If you make something with it, let me know - I'd love to see what you come up with. Thanks for looking!
Subscribe to:
Posts (Atom)