Sunday 31 October 2010

Halloween 2010: A Brief Encounter

Shocking. I LOVE Halloween. And how much time have I had to craftily spend on it? Not much. Not much at all. Certainly not enough.

I'm so grateful, then, that one of my friends, whose surprise birthday party it was last night, is a punky-metally kinda girl. I used my new skull stamp to make her a card, and a bit of halloweeny inspiration to make her a photo frame. And then I liked the frame so much that I made one for us too. And put the skull in it. So OK, maybe I had a teeny bit of time to make one small Halloween decoration. Ahhhh - that's better.


For the card, I added a small blue heart gem to one of the eyes. I love that. Looks a bit piratey, a bit evil, and a bit lovely too. I also used a very noisy embossing technique - which I'll show you on Tuesday.

I did the same for the skull I put in the frame. 
For the frame, I sprayed some Cosmic Shimmer Mist over some star masks and then stamped a couple of images on in grey ink. And I stamped a couple of other images in glue and covered them with flock.


And of course, I made cookies. I couldn't resist. They went into the spidery bowl for the trick or treaters who have just left - and left me with nothing but crumbs.
And finally, I found a first use for the birdcage...


 I hope everyone had a very happy halloween!
 

Thursday 28 October 2010

I've Become a Lipstick Chick

Thanks a lot to Lynette for seeking me out, I've become a Lipstick Chick for the True XOXO Girls blog! This blog is a scraplifting inspiration blog, where a design team works to come up with many different creations each month, in many different styles, to inspire their many followers.
My new blinkie on the left confirms that as of November, I'll be coming up with a monthly layout, card, ATC, or anything else that I think will inspire followers.  And if that's not enough, there's a prize for the lifter who gets voted the winner, which is donated by different sponsors each month.
So, be sure to check out the blog and look out here on my blog for the first challenge, to be posted soon!

Oh, and just because I can't keep it to myself, here's a little something I found at a reclamation warehouse the other day:

Tuesday 26 October 2010

...by the Layers on my Tinny-Tin-Tin

Over at Scrap, Laugh, Love there is a challenge going on to alter a tin.

I got my tin from the flea market around the corner a few weeks ago, but I had to make sure I didn't like it too much as I was going to have to alter it. It's the little round one at the front:


Here's what I did:

 And here's how I did it:


After covering the tin with a dark layer of acrylic paint, I used masking tape to section off stripes and decopatched bits of a magazine on in two colours.

I cut a wine cork (actually, a beer cork) into 3 to use as feet. And then got to decorating. The challenge required that we use at least one butterfly on the project... I used lots, in an upward spiral pattern around the tin:


And used a big journalling shape and lots of embies to round it all off.

Thursday 21 October 2010

Art for Art's Sake

I love the circular nature of art.

In December we visited the Magritte museum here in Brussels, and I gained a lot of insight into this man's mind, whom I had only known previously for a hat, an apple and a pipe (or not a pipe, if you prefer).

In July, during the National Day celebrations, we witnessed a group of drama students interpreting Magritte and his work. My talented fiance took a photograph which subsequently inspired me to make this album (during the super-rainy August we had). But I knew there was more. I just had to wait for it to come out.

And this is what came out:


A tribute to Magritte, to Brussels, to Belgium, to art. Here are the 'don't be afraid' splodges:

 
 I used bubble wrap and a plastic cup to imprint the patterns on the canvas. And added some French newspaper and raindrops.
 I cut out the words with the Cricut, purely because I got to choose my exact font that way.


And there you go. That's my homage to Magritte. 

Tuesday 19 October 2010

Texturally Speaking...

A lot of what I'm doing lately in my scrap runs deeper than paper. Most recently, it's been about getting over fears. No change today. Inspired by the 'child's style' used by Chocodeline in this project we did together, I've been playing around with acrylic paint - and lots of it.

Gone is the fear of just slapping it on. Worry about a finger smudge? - Gone. Concern over the thick blobs that will take ages to dry? - Gone. Hesitation over using 'different' methods? - Gone.

Here's a little peek at what I've been doing:


I'll show you the finished article on Thursday. Thanks for looking!

Sunday 17 October 2010

As a kid, my mum would always tell me when I was bored that the only way to solve the boredom was to make yourself do something, even though getting yourself up and at 'em was the last thing you wanted to do.

This past week has been such a frustrating one - not caused by boredom, but by lack of inspiration. There is such a strong will in me to create, but sometimes there's a block... and nothing happens, except that I get increasingly frustrated.

Fortunately for me, I was sought out by one of my mother-in-law's friends to make a special 85th birthday card for her mother. I jumped at the chance. I figured that, with provided parameters, I could create something. Because it was for someone else, I could get on with the task without agonising over the whys and wherefores. So I got to work.


It's an easel card, in some nice winey colours, and with a little bit of a vintage/travel theme going on, some hand-stitching, a butterfly cut using the Cricut, and some Cuttlebug-embossed card. It's the first time I've made an easel card, but it was very easy. What I love about it is that it's still fairly unusual in appearance, compared to regular cards, and the way it stands up really says 'hey, look at me!'

Thursday 14 October 2010

Fruits and Things in 3D

Because I totally love the little 3D pumpkin and pear, I wanted to make some more shapes. Really, the possibilities are endless. I want cherries, hot air balloons, christmas baubles...

My mum (so sweet of her) sent me these toadstools cut from the Cindy Loo Cricut cartridge the other day.


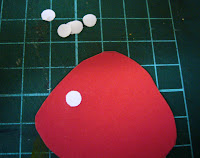
They are too good. So I made a 3D toadstool in their image.


 Here's a little explanation of how.
1. Cut out your shape, making sure it's as symmetrical as possible. Using it as a template, trace a further 6 shapes (giving you 7 in total).
2. For the toadstool, trace around the stem onto a different colour paper and cut those out, too.
3. Add the spots.
4. Do the same for all 7 shapes.
5. Start to fold the shapes in half vertically. I used quite thick card, so to help fold neatly I scored the toadstools first.

6. Now you can start glueing them all together.

7. Once you've stuck them all together, fan out the sections and you'll have your 3D shape.
I also tried an autumn tree:
For the tree, I roughly mixed a little green and ochre paint and dabbed onto the paper, trying not to cover too much of the trunk (because I had traced the shape with all the trunks facing outwards, I knew just to stick to the middle section when painting).

When it was dry I cut out the shapes as before, and started to fold and stick as before.
This time I added a length of string during the sticking phase, so that the shape can be hung up somewhere. It's easier to to this at this stage, rather than trying to thread it through once the shape is complete.
And here's my tree:


I know that some of you want to make some more of these... when you do, tell me because I really want to see what people come up with! 

Sunday 10 October 2010

Pumpkins and Pears: MBA Design Team October Challenge

Thank you all for hanging on since my sneak peek last week. I can now bring you the full feature... drum roll please...
My Pumpkins and Pears project for the Mini Book Anonymous design team comes with a tutorial (below) and a video (I made a video!), as well as a dashing of versatility in the actual structure of the mini (you can use it for recipe cards, a stationery set, an address book, a card gift set...).

Pumpkins and Pears

Materials Needed:
  • 2 x smaller* cardboard rectangles (for centre 'spine'), glued together for strength
  • 4 x larger* cardboard rectangles (for front and back covers) - stick 2 together to give 2 covers
  • enough fabric to cover
  • 6 x sheets of plain card
  • 1 x sheet of patterned card
  • embellishments of your choice, including other patterned paper/card
  • a 1 metre cord or ribbon
  • supplies: glue, ruler, scissors, sewing machine, etc
* My measurements were 2 x 5cm x 21cm (i.e. a strip the width of an A4 sheet) and 4 x 14.85cm x 21cm (i.e. an A5 sheet). All subsequent measurements shown are to fit a book this size.

I made the entire structure from scratch. So first up, I'll show you some pictures of that:

1) Line up the cardboard rectangles on the fabric and cut fabric to size. Leave enough room to create a hem all the way around.
2) Cover the spine with fabric, using glue or double-sided tape, and stitch to finish.
 
3) Line up rectangles again, then pin, press and hem edges of fabric.


4) Fold and press edges over the cardboard. Stick down with glue or double-sided tape. Fold in corners and stick down.


Now for decorating your book:

5) Cut the patterned card to size so that it covers the inside (bare) cardboard.
6) Make two trays (click on the first image to enlarge for measurements), line them up on the inside of your book so that they don't come into contact with each other when the book closes, and stick down with glue or double-sided tape.
 
  
7) Cut the plain card to size so that it fits into the trays, and decorate one side with your choice of patterned paper.


8) Now you're free to embellish as you please! 


The pumpkin and pear embellishments are so cute and so fun to make. Today, though, I've run out of time, so I'll settle for a few photos now, and then I'll come back on Tuesday with a more in-depth tutorial on how to make these fun little shapes:

9) Once you've got your shapes...
...fix them to the cord or ribbon. Then double up your cord so the two shapes, at each end, meet, and loop it around the spine of the book. Fit the two shapes through the loop at the top and pull tight. This is a lanyard hitch (the type you use to fix labels to luggage).
 

I hope you've enjoyed seeing the creative process behind this mini. Go check out my video, and do come back here and let me know what you think. I know there's some improvement to be made (sound levels in particular) but it was only my first attempt....any feedback is most welcome! I also really recommend hopping over to Mini Book Anonymous to check out the other DT members' projects - they're amazingly creative, and each one is very different, providing LOTS of inspiration.