Showing posts with label video tutorial. Show all posts

Monday, 26 March 2012

Metal Breakdown

That mini album I made for Dublin – the one with no photos – gave rise to not one, not two, but three video tutorials for Gauche Alchemy. The first one showed the structure of the mini. I think we missed the second one, about getting messy with paint and textures of backgrounds. (You can see them all here.)

And then there’s the third, about how to achieve a faux metal look from foil paper:


The Gauche Alchemy team is riding high at the moment – there are lots of achievements, great techniques and fabulous little projects going on, so if you’re feeling stuck for inspiration or fancy trying something new, pop over to the GA blog.

That's all for now!

Tuesday, 28 February 2012

I Go Out Walking...

A little while ago I showed the sneakiest of peeks of a project I’m going to be working on all year. Well, today’s the day for the big reveal over at Gauche Alchemy!

I always knew I was collecting postcards for a reason. (Apparently I have a bit of a thing for them.) Turns out this is it. I used to have hundreds covering my bedrooms walls at university – you know, the kind they give out as flyers or adverts or art – but they were long gone, recycled in one of my fits of ruthless cleaning over the years. Now, each time we go to a bar or museum or someplace similar we pick up the interesting ones, and the collection was starting to add up again. So now is my chance to give them all a reason to exist! Read on…

My aim for this year is to make up a mini book, filled with 52 postcards, each of which is scrapped with a photo taken during a weekly walk, with each photo inspired by a weekly prompt. The idea’s not new, I know, but I did think that the Scrapbook Challenges forum could benefit from a year-long project like this, so that is where you can find the prompts and members’ responses to those prompts if you’re interested in playing along (some catching up will be required by now, but the load is not too much. Besides, the prompts are guaranteed to get you thinking!).

I WILL stick to this project
this Gauche Alchemy boot wasn’t made for walking, it was made for adorning my mini book

go out walking - you might find dinosaurs (or other exciting stuff)
I’ve been keeping to the programme on the photograph front, and I’m almost up to date on the scrapping, too. Here’s what I’ve done so far, photograph-wise:


Thanks to Gauche Alchemy and their eclectic array of products, I was able to pick and mix and create a cover for this mini book that was perfectly suited to the theme of going on walks and taking photos. Here’s how the cover came together:


Products I used (all from Gauche Alchemy)
Color Kits – It’s All Gravy, Blue Streak, Purple People Eater
PVC Punchinella
Ouchless Cardboard
Mail Art kit
Nearly Nekkid kit
Regular Punchinella

I can’t tell you strongly enough how easy it is to come up with projects from the GA Color Kits – with them, a project pretty much makes itself. For example, I’ve nearly used up the whole Banana Hammock kit (even though it’s a difficult colour for me), and I’ve got a project in the pipeline using the (peach?) kit which is a colour I NEVER thought I’d use. On top of everything they’re great value because you get a lot of bits and pieces and some really unusual items in them. (I’ll tell you a secret… when I applied to be part of the Gauche Alchemy DT, they asked me which of their products I liked the best. I spent a paragraph gushing about how inspiring these Color Kits were – and that was just from the product photos in the GA Artfire store! Now I’ve got my hands on them – wow. I have not been disappointed!)

Thursday, 26 January 2012

Bobbing and Weaving, Ducking and Diving, Picking and Choosing

What feels like a really long time ago I made this tray – for me. There was a second tray, destined for the husband’s lap, which never got altered.

Until now.

Over at Scrapbook Challenges it was my turn this month to post a technique challenge – so, thought I, the perfect opportunity to finish this two-part tray project!

My technique? Paper weaving. I thought about repeating the sunburst effect on his tray, but since good old checkers are really his thing, the paper weaving idea fit much better:

he loves the black and white
It's not finished - I need to add his name, laminate it and varnish the frame, so I'll post a nice picture when I've done all that.

But I liked it so much I did some more on a birthday card for our friend:

the birthday boy's gonna so totally, like, flip over this

If you want to see in-progress pictures of me weaving paper, get onto the Scrapbook Challenges forum!

***                   ***                   ***
In other news, the Gauche Alchemy mamas challenged me in December to make a video showing how to make a scrapbook layout with their mixed media products - for anyone who is stuck in mixed media canvas mode but wants to switch to layout mode and doesn't know where to start. Now, I want to add a little disclaimer here for the video quality: December was a tough month for me – it seems that I ate everything in my path, including all the hours in all the days, and I just couldn’t get to doing anything as properly as I wanted to. This project included. But to go with this GA blog post, here is the video nonetheless – and a promise that next month’s will be altogether more… together!


***                   ***                   ***
Finally, my trusty assistant, DJ the Dog, helped me pick out two winners for the SC blog hop RAKs here on AndHandmadeToo:


Winners, PM me your addresses – there’s a long-awaited trip to the post office I have to make anyway, so I may as well send all the packages in one go!

Thursday, 20 October 2011

The One Hundred

Have you ever expected something to be a really momentous occasion, and then realise that it totally passed you by?

I recently hit 100 followers on this here blog, and in the flurry of the True XOXO blog hop, I didn't even mention it. So here's to Christa (follower number 100) and everyone else for making me feel special and all warm and fuzzy inside.

Thank you to each and every one of you - loyal commenters, silent readers, shy sometimers, occasional dip-inners, and those who are too busy to do much at all. From the bottom of my heart, I am grateful and flattered at the way this blog has turned out - because of you. I am guilty myself of letting things slip, only sometimes skim-reading what I should instead eagerly jump on, even of neglecting those things I truly want to read and comment on but in reality look at the clock when everything else is done and see that it says 'bedtime'. I know it's hard to keep up in this environment of ever-increasing social platforms (I'm struggling, for sure). So, thank you all for being you and keeping my blog alive with your comments that make me laugh, think, want to have a conversation with you, send me off to look at your blog, inspire and more.


Now, I had planned a giveaway to mark this grand event, but I have been in a state of disorganisation lately, one that I am finding it hard to shake off. So, instead, I am going to share with you a few ideas for the future of my blog, and ask for your thoughts in return. And to one of those thoughts' owners, I will send a little handmade something to brighten their day and make them revel in the amazingness that is the online crafting community.

Before the year is out, I'd like to:
  • revamp the design of the blog
  • tell you more about my creative process - what happens before and around a creation
  • include more tutorials
Please let me know if you agree or disagree with any of these, or if you want to see more or less of something here, or if there is something else not here that you'd like to see more or less of. I'd like to work to make this blog more readable for you, the readers. What piques your interest, whets your appetite, gets your creative juices flowing?

Sunday, 16 October 2011

The Wedding of Awesomeness: Part 3

This is the only photograph of all 6 bouquets together, so feast your eyes for a while.


You recognise mine, of course, from my excited wedding day post and my Gauche Alchemy video tutorial.

The 4 bouquets of yellowed music score roses were for the bridesmaids. Those roses... I started making them in January, at which time I made about 10 (there are about 20 in each bouquet). Then I had a 'break' for 6 months (I couldn't face going back to them, because I was scared of running out of paper. But instead of acting soon and finding out with enough time to choose an alternative path if necessary, I put it to the back of my mind. Great forward planning skills. I was lucky I got away with it). In July I came back to them and blitzed the music score paper supply, ending up making too many roses in the end. But they are beautiful, so I don't care.

And the cute red gingham bouquet was for the flower girl, my husband's niece. My mum put it together, as well as making all the flowers (she was much more organised than me - she finished them all by May).

By now they are all home somewhere with their respective owners. None of them were caught, because none of them were thrown. There was NO way I was throwing mine. Hell, I even winced when the photographer told me to rest it on the trunk of the caddy (there's a teaser for a photo I'm waiting on!).

Tuesday, 27 September 2011

Finding the Vintage

Looking back, it's fascinating to see how ideas for our wedding developed into realities. It all started with a shape:


Then the music we were listening to began to change. We started taking dance lessons. I finally sang to his guitar. I tried to do different things with my hair.

And after I braved the red lipstick, there was no turning back.

My interpretation of Scrapbook Challenges' final September sketch, here:


...took on a distinctly vintage theme, using some fabulous 4heures37 paper and a Crafty Secrets Creative Scraps embellishment. It features a picture of me looking distinctly vintage too. Gauche Alchemy brought me the heart stamp in the top left corner and the famous ouchless cardboard, and I'm sure you can spot the Cosmo Cricket Circa 1934 paper in there too.
 

In other news, my mail art video tutorial is now available. A little snapshot of our trip to Copenhagen. Coming soon: wedding stuff. I promise!

Wednesday, 21 September 2011

Time Travel

Hop in. I'm going on a short journey back to May, before we got married, before we (and by 'we' I really mean 'I') lost the plot and spun off into a crazed wedding-planning-induced stress, before my bout of blog neglect, and before I'd even considered the issue of identity and name being, somehow, inextricably interlinked.

A calm before the storm, you might say. (We did actually have a storm on our wedding day. It was forecast for the afternoon, but because I obviously didn't have the time that morning to check a weather report, I didn't have anything to worry about. I woke up to bright blue skies, and as far as I knew it, that was all there would be. All day. Ah, the power of positive thinking. The skies remained bright blue until they turned dark blue, and it wasn't until most people were inside and the band was playing that the heavens opened and the lightning forked and the thunder crashed, although not as loud as the drummer in the band drummed his drums.)

Anyway, in May we took a short trip to Copenhagen. Not the best of weather, and not the lightest on the pocket, but it was a welcome break and we had a mad 'quick, let's fit in as much touristy stuff as we can' weekend to bring the trip to an end. So there were lots of nice photos that made it look like we were there for 8 nights, not 4.

I knew from the moment I flicked through the photos on the way home that I wanted to make a mail art-inspired album to put them in. I also knew I wouldn't have time to do it until after the wedding. Meaning I had a lot of time to think about it, and that anything could happen in the meantime.

So what did happen in the meantime? Well (*grins*)... I made this awesome video, and became a video tutorialist for Gauch Alchemy, who then released a mail art kit called Going Postal (new this month!), and only went and sent it to me to play with, and the rest, as they say, is history.


Look out for the video tutorial for this album on the Gauche Alchemy blog soon!

Tuesday, 19 July 2011

It Must be Alchemy

I have some great, great news to share!

I'm getting married!

....oh, wait, we already knew that. For, like, three years.

So what is it then?

***

We-ell... a little while ago I made a video tutorial as a job application:


and I got the job!

From September, I'm going to be one of Gauche Alchemy's two video tutorial masters! You can read all about their new DT here. I am so excited to be an Alchemist, to work with all those talented artists, and to be able to display this badge on my blog:


Here is a still of the layout that was the product of the video:


From September, look out for more awesome video tutorials from me which will feature lots of yummy products from the Gauche Alchemy store!

Thursday, 3 February 2011

Folds and Feathers

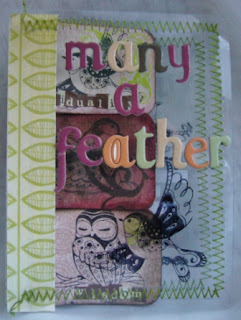
My final assignment for the Mini Book Anonymous DT was to create a mini book on the theme of 'Folds and Feathers'. After 3 months of thinking, thinking, thinking, I finally stumbled across the perfect idea.


An accordion spine book, with...not feathers, but birds. The cards inside each feature a facet of me and fit the mini's title of 'Many a Feather' (like 'many a string to my bow').


I created another video for this mini - and yes, this time I tried to make and talk on film! Check me out! Feedback as always is most welcome. For now, though, I'm going to depart as I've been up ALL NIGHT working and I am a little delirious. I'll just say a big thank you to the MBA team for giving the DT such inspiring challenges and giving me reason to push my boundaries. I would never have done these things without you!

Thursday, 2 December 2010

Paris, Here I Come! (One Day...)

The December challenge for the Mini Book Anonymous DT was titled 'Cream, Blue and Paris, Too'.

I LOVED this challenge as soon as I heard about it. I was excited about the possibilities - it was the perfect opportunity for my first visit to Paris! Especially now we live quite close, there really wasn't an excuse not to go.


Well, after one thing, and another thing, we didn't end up going to Paris. Instead I made a mini book - without photos - filled with my impressions of Paris and a sense of hope that one day we will go there. (Incidentally, instead of going to Paris, we went to Brighton, where I happened to find my wedding dress, and get my dad to buy it for me. So it ain't all bad.)


My snapshots of Paris come in the form of tiny shadow boxes, glued to the inside of my mini - little windows into the Parisian soul. With two on the right-hand side of one page, and one on the left-hand side of the other page, when you close the book, they slot together nicely.


Oh, and I made another video. Those of you who watch it - please bear with me! It's only my second video attempt. This time I tried the 'make and speak at the same time' technique. I'm not great at coordination or multi-tasking, but I think I did OK. The only problem is I'm a bit slow, and take up too much time talking, so the video is just a snapshot of some of the aspects of my mini book, not a step-by-step from start to finish. Maybe I need to focus less on the music and graphics and more on the content? Feedback welcome!


Don't forget to head over to the Mini Book Anonymous blog soon to check out all the other DT projects!

PS thanks Mum for those Paris rubons you got me many years ago. They finally achieved their intended purpose!

Sunday, 10 October 2010

Pumpkins and Pears: MBA Design Team October Challenge

Thank you all for hanging on since my sneak peek last week. I can now bring you the full feature... drum roll please...
My Pumpkins and Pears project for the Mini Book Anonymous design team comes with a tutorial (below) and a video (I made a video!), as well as a dashing of versatility in the actual structure of the mini (you can use it for recipe cards, a stationery set, an address book, a card gift set...).

Pumpkins and Pears

Materials Needed:
  • 2 x smaller* cardboard rectangles (for centre 'spine'), glued together for strength
  • 4 x larger* cardboard rectangles (for front and back covers) - stick 2 together to give 2 covers
  • enough fabric to cover
  • 6 x sheets of plain card
  • 1 x sheet of patterned card
  • embellishments of your choice, including other patterned paper/card
  • a 1 metre cord or ribbon
  • supplies: glue, ruler, scissors, sewing machine, etc
* My measurements were 2 x 5cm x 21cm (i.e. a strip the width of an A4 sheet) and 4 x 14.85cm x 21cm (i.e. an A5 sheet). All subsequent measurements shown are to fit a book this size.

I made the entire structure from scratch. So first up, I'll show you some pictures of that:

1) Line up the cardboard rectangles on the fabric and cut fabric to size. Leave enough room to create a hem all the way around.
2) Cover the spine with fabric, using glue or double-sided tape, and stitch to finish.
 
3) Line up rectangles again, then pin, press and hem edges of fabric.


4) Fold and press edges over the cardboard. Stick down with glue or double-sided tape. Fold in corners and stick down.


Now for decorating your book:

5) Cut the patterned card to size so that it covers the inside (bare) cardboard.
6) Make two trays (click on the first image to enlarge for measurements), line them up on the inside of your book so that they don't come into contact with each other when the book closes, and stick down with glue or double-sided tape.
 
  
7) Cut the plain card to size so that it fits into the trays, and decorate one side with your choice of patterned paper.


8) Now you're free to embellish as you please! 


The pumpkin and pear embellishments are so cute and so fun to make. Today, though, I've run out of time, so I'll settle for a few photos now, and then I'll come back on Tuesday with a more in-depth tutorial on how to make these fun little shapes:

9) Once you've got your shapes...
...fix them to the cord or ribbon. Then double up your cord so the two shapes, at each end, meet, and loop it around the spine of the book. Fit the two shapes through the loop at the top and pull tight. This is a lanyard hitch (the type you use to fix labels to luggage).
 

I hope you've enjoyed seeing the creative process behind this mini. Go check out my video, and do come back here and let me know what you think. I know there's some improvement to be made (sound levels in particular) but it was only my first attempt....any feedback is most welcome! I also really recommend hopping over to Mini Book Anonymous to check out the other DT members' projects - they're amazingly creative, and each one is very different, providing LOTS of inspiration.