Stamp it, cut it, bake it, make it,
paint it, stick it, sew and wear it. Snap it, sketch it, pin it, write it,
play it, ply it, stop: re-write it. Try it, test it, learn it, link it, plan it, think it, pen and ink it.
Share it, give it, show it, grow it,
keep it, wrap it, pack and send it.
I might be getting back into the swing of
things. Going out into the blog world and reading that many, many other
people struggle with time is reassuring. Especially when I take into
account the fact that the time is being used to house-hunt.
I’m not going to go on about it much more – I promise!
My super-special team-mates at Gauche Alchemy
are always sharing stuff they find online. Last week, Michelle found this, and we all had a discussion about how expensive the pens are, and
whether there wasn’t another way.
Confession time: my watercolour pencils have sat
long and neglected on the shelf for one most shameful reason: I
couldn’t find the pencil sharpener. Anywhere. I’m talking like two
years. The odd drawing pencil is fine to sharpen with my
Leatherman, but not 40 watercolour pencils. In the end, spurred on by
this beautiful, colourful idea, I consented to using my make-up pencil
sharpener for the watercolours. And I got to work on my version of the
project. Ah, the joy of objects fulfilling their
purpose after a period of neglect!
I forgot how lovely watercolours are. I'm so happy too that the project works with watercolours as well as the
pens. Go us and our money-saving ways!
That's what life feels like, at the moment. House hunting in a competitive market is an emotional business. As a result, I've not been blogging much, because I've not been crafting much.
It's frustrating when so many things come at once and you can't devote as much time to any of them as you would like to, or even give attention to all of them. Certain things get left on the kerb while we walk around property after property. It's not even like I'm in a creative rut. My mind is still sparking.
In the last few weeks, our boiler rusted its pipes open, flooding the boiler room. My craft room/study/our walk-in wardrobe/laundry room/etc is right next door to that. Before the men could work on replacing the boiler we had to move everything out, find somewhere for it all, and then we sat and waited for the job to be done. Which, of course, dragged on because one problem after another was found. "I can't craft like this!" I screamed, near to tearing my hair out. "And exactly when were you planning to?" mocked the calendar, while the clocks tickled quietly with laughter in the background.
But enough! I have business to do. A wedding invitation order is in progress, a baby/marriage/engagement/birthday order is in the wings, and an order for one of my colleagues has just been completed, turning this upside-down house momentarily into a house of cards.
Anyone got any advice for when it all just gets a bit too much? Breathe, right?
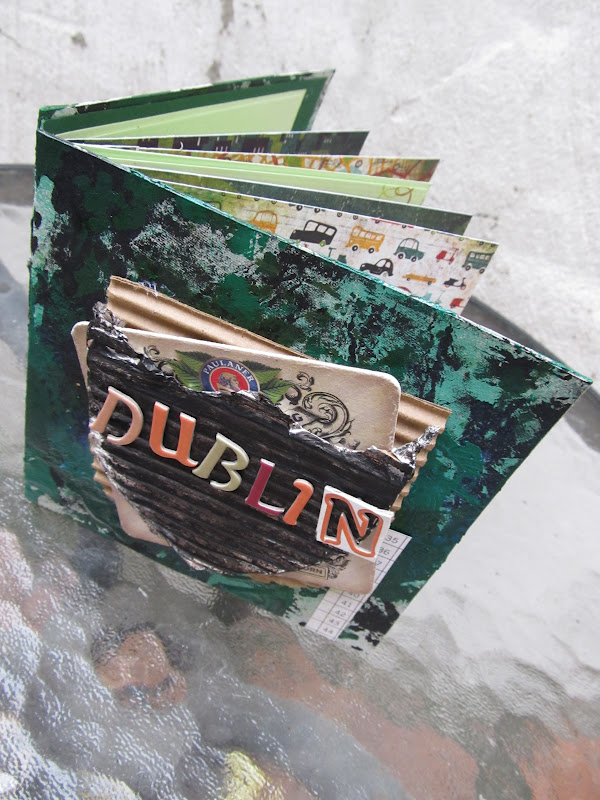
...nope, not in a mini, just in mini. In a mini album, in a mini weekend, in a minimally tourist and maximally family visiting kind of way.
I fancied folding some pieces of card to make a mini album of all the fantastic photos I was gonna take when we went to visit Dublin... but then I got ill, spent the whole of the Thursday in bed in the hotel, and then most Friday and Saturday with family. Plus my SD card decided that no, the nice photos I took on my solitary stroll around on Friday morning were not good enough, and converted them into randomly gigantic encrypted messes. It was easier to try to recreate the stroll and the photos than to work out how to save them from my evil SD card.
So the result is a mini album so far empty of photos but eagerly waiting. I happened to film the process for Gauche Alchemy, and you can also find the video on the 'my videos' page on this here blog of mine.
There are two more videos to go along with this one. They show specific techniques used in the making of this mini - but you'll have to wait! They'll be out later this month. For now, a little taster of the mini album:
I spy Gauche Alchemy products!
See that ouchless cardboard? The coaster? The foil paper? All GA, baby! Go have a look at the GA blog and shop, and at my video too. And do let me know if you've had any annoying or even heart-wrenching experiences with digital images, cameras and SD cards. In my experience sharing is cathartic (plus it'll make me feel a little better to know I'm not the only sufferer).
Cards for Boys
...are not soooo difficult, I have found lately:
that's a special birthday, that is
To get the pennants - which are stickers from Echo Park - to stand up, I first stuck them onto some paper, just up to the point where I wanted to curl them away from the card, and then adhered them by the remaining sticky part.
just like they're fluttering in the breeze
And I employed the old paper-weaving technique again for a friend's birthday card. A friend who plays the bass in a band. A hippy living, reggae loving friend.
that's another quite special birthday
Paper Piecing
Just a quick share of something I worked on for a certain wedding anniversary last year:
Stuff Going On
Don't forget the Gauche Alchemy DT Call, running till the end of the month. And don't forget the March Madness at Scrapbook Challenges - we're taking bets now, and the competition starts tomorrow! You gotta be in it to win it!
Intelligent Product Packaging
I really appreciate it when a manufacturer thinks about their packaging. Check out this freebie I got from Revlie's class:
ooh, canvas flowers!
And then you look closely, and see that they've also given you a nice thick acetate sheet with beautiful white doily patterns on:
I like acetate with patterns on. A lot.
Has anyone else come across really intelligent packaging of scrapbooking products? I want to hear about them! And why do you like them? Because they're green? Because you can reuse them? Do share!
I recently made another card solely from my Gauche Alchemy stash, and this time* I managed to save the photo before my temperamental SD card deleted it:
a his n hers kinda card
After I’d made it, I staged it, and stepped back, camera at the ready… and stopped for a moment to admire it. Yep, I actually admired one of my own cards. Over the last year, my fingers have worked hard at scrapbooking, but neglected card making to the extent that I have now lost confidence in the art. But this Gauche card, to congratulate a Gauche kind of couple on their engagement, was a doddle. And I realised that it was the nature of the products that made it so easy: I hadn’t worried about composition, balance or the message; I’d just done. The process was so enjoyable because I hadn’t had all of this worry hanging over me and my fingers were free to do as they felt. It came together in less than 20 minutes, and is perfect for the recipients.
The great news is that throughout March, in honour of National Craft Month, Gauche Alchemy is offering 10% off everything** in their store – so drop by, browse and splash out!
What news could possibly beat that? Actually, this might: if you already love Gauche Alchemy and want it to be a bigger part of your life, check out their Design Team call. It runs until the end of March so make sure you get your application in by then! The Gauche Alchemy mamas are a feisty but caring & sharing group of driven yet fun-loving ladies, and the DT are a superbly creative and active bunch. You will feel welcome from day one, will be challenged and stimulated daily, and will without doubt feel proud to be part of this growing company.
I’ve got lots of Gauche stuff planned this month so while you’re browsing, buying or applying I’ll be working at reducing my GA stash. Enjoy National Craft Month, everyone!
* I have created a few other great GA cards in the past, using various Color Kits, and the Nearly Nekkid and Acme kits, but I’d put them in the post box before my SD card did the evil deed, and the recipients haven’t managed to take photos for me yet.
** Acme subscription kits are not included in this offer.
It was the height of the summer holidays, and a blazing hot, thirst-making kind of day. I was perhaps eight years old, and playing in the street with my friends, at the outskirts of the small town on the edge of farmland where my family spent a few years living the country life.
At some point that day, I came inside for a cold glass of refreshing lemonade, or maybe it was an ice-pop, and found my mum in the living room, listening to Kool & the Gang, knelt over a spread of fabric. There were chalk lines and scissors, pin cushions and thread, and panels ready to make up a dress for a little girl.
I can’t remember if she asked me to stop in for a while so that she could measure me; but I do remember the fabric: it was white, with large neon orange polka dots, and it was pretty much the same shape as the dress I’m wearing today:
Cheryl's cherry dress #2
And why am I wearing such a dress today?
Today is a very special day, because a very special lady is having a very special birthday.
Last night she was surprised by an unexpected visit from us, and today she is showing us her new craft room and opening cards and presents. She also doesn’t know that this afternoon we’re going to take her out for tea.
I made her a card, naturally:
Happy Birthday, Mum!
But I also made her a little something to hang on the wall of her new craft room:
that's right. Ain't no one else's craft room.
She loves Webster’s Pages, and things in the style of Cath Kidston and East of India, so I hope this little wall decoration will meet her tastes and match her craft room. The image you can see inside is from Crafty Secrets, and I chose it because, more than scrapbooking, cardmaking, flower arranging and baking, the strongest memory I have of my mum is of her at her sewing machine.
Cute, huh? All those little sewing elements are actually buttons. I just set to work on them with my glue gun and suddenly there was a miniature sewing basket fit for a doll’s house.
Having taken direction from All Things Thrifty, I spray painted this box instead of using acrylic paint and a brush:
the finish is much smoother. Now I feel confident to move on to big pieces of furniture!
About a year ago, we started trying to decide on a song for our first dance. We didn’t necessarily want a first dance, but as we’d been taking swing dancing lessons (Lindy Hop, to be exact), we admitted that we were certainly going to dance, and that one of the dances would naturally have to be the first one. So we threw ourselves full swing (hehe) into the search.
Now, between us we have a lot of music. And when I say a lot, I mean a lot. Not just in sheer volume, but also in the range of eras, genres, levels of fame and success, and sources and styles. Choosing from that seemed an impossible task. In total we were searching for 5 songs – 1 for our first dance, 3 for the town hall ceremony (entrance, signing and exit), and 1 for our own personal ceremony after dinner. The song for the first dance we thought we’d decided on by the time May came around (the others were finally settled on during the week before the wedding…how that stressed me out I can’t tell you). And it is the little story behind this song that helped me make my valentine’s card this year.
My parents came to visit at the end of May and, naturally, we told them about the song. We talked a bit about the artists and how we’d come to know them, and then practised our dance a little.
Cut to the moment on our wedding day after our first dance, when we were called aside by my parents and given a very special gift: the album on which the song appeared, on original, unplayed vinyl – signed by the surviving female singer. This surprise was an even bigger one than seeing my parents jiving – Where? How? When? – of course, we were amazed.
They told us that at a vintage fair they’d gone to in July, Keely Smith had been there signing autographs. She was old, and frail following an illness, but she was there and full of the edge she showed when she performed on stage with Louis Prima. My parents headed for a record stall, looking for one thing only – and found it. She was happy to sign, apparently punching my dad on the arm for giving her a pen that didn’t quite work, and happy to hear that some ‘young people’ were still interested in her music. My parents went home triumphant and full of glee.
Since all the DT at Scrapbook Challenges have been challenged to incorporate a love song into their projects this month, I’ve made an easy decision and gone for this one.
first card I've been happy with in a loooong time!
Don't forget, if you haven't already, get on over to SC, sign up, and get your share of the scrappy love!
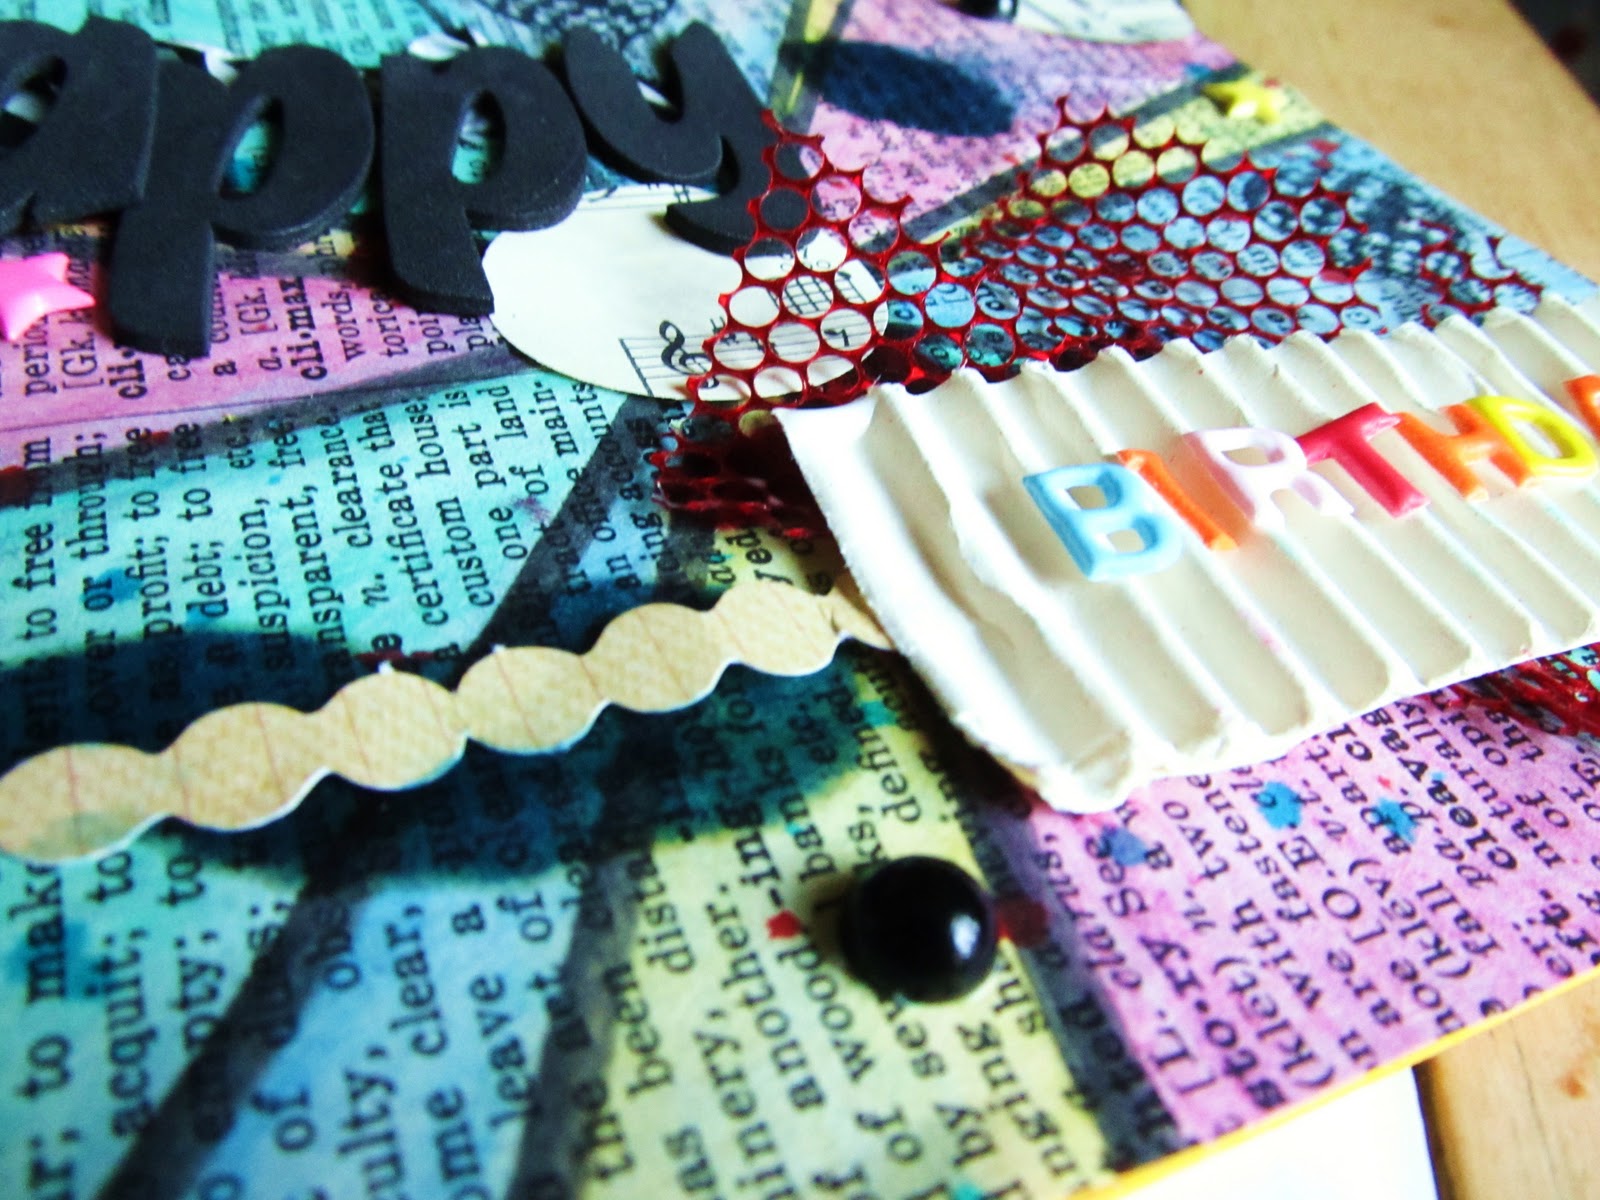
It's the husband's birthday weekend, and somehow it's turned into a four-day celebration. Lucky he took Monday and Tuesday off work. Unlucky for me: I'm ill, ill, ill.
His card this year is a good reflection of how I was feeling when I made it. I was just beginning to see a bit of colour again, but my head was all over the place: buzzy, frenetic, wishing my cold would fly away.
this is me, ill, in card form - could be worse, I suppose!
I used some Gauche Alchemy stuff of course - perfect for this kind of mood. New punchinella from India, ouchless cardboard and pages from an old dictionary and a music book. Most surprisingly of all, though, was the fact that I busted out my watercolour pencils after years of neglect - and I'm so glad I did. (Even if the red did turn out a bit pink - sorry, husband!)
watercolours, oil paint and Cosmic Shimmer Mist make up this eclectic background
I sealed it all together with a home-made envelope:
The flurry of post-wedding sorting, tidying, organising and documenting has only just started to calm down, and I find myself half-buried under an avalanche of card-making materials.
But it's the life I signed up for, I guess! Actually, this year, without a wedding looming in the near distance I feel very relaxed about Christmas preparations. Good thing, too, since I have nearly 100 cards to make for customers! The first batch has already gone, and I'm working on the second next week.
rolled paper scraps make a great Christmas tree
and give such interesting dimension to a card
the brief was traditional, but I like to add my own twist
again, great dimension from these baubles
and reusing last year's gift tags? genius!
How about you? Have you started with Christmas yet?
I've had a few questions lately about my creative process, so I wanted to talk a little about that today. I've been asked whether I plan everything on a page or just go with the flow. I'll focus on layouts today.
Usually these days I start off with a sketch - Scrapbook Challenges and Punky Scraps DT duties provide me with most of them, but I also like to look at Creative Scrappers and others that come up along the way.
Punky Scraps Challenge 34 sketch
my take
Then I spend a good few days thinking about the theme of the layout - I'm finding I like to tell a story on a page, but not necessarily with words. My journalling is usually on the back of the page these days, or hidden in an envelope or pocket somewhere on the page. So I think about the story, and which embellishments I have that can help me tell that story. Gauche Alchemy kits are great for finding the right bits and pieces.
I'll usually re-draw the sketch myself, adding notes about layers, embellishments, techniques and so on.
Next - and I find this Absolutely Important - I select the Most Appropriate background paper (I'm making 12x12 and A4 layouts at the moment). This is the true beginning. I have often made the wrong selection. I rarely go back and redo a page if I've already finished it. But if I haven't yet begun, or have only just begun, I will go back and select the right paper.
From this, the colours and textures will start to flow. Keeping the sketch in mind, I think about the page layer by layer - do I want the rub-on under the paint? Should I mist and mask the base paper? Can I stamp over that series of paper strips? Can I stamp over that stamp already there?
And then I get started. I roughly follow the sketch, but don't get panicked if things start to go off course. It's an organic process, and a page may turn out looking very different to a sketch in the end. I make mistakes, and accept them. I commit.
I've made a few 'test' pages, practising techniques and so on, but I've never been happy with them. I seem to be happier experimenting as I go. And it's this experimenting that is helping me develop my skills and broaden my repertoire.
Take, for example, the punchinella that comes from Gauche Alchemy. There has to be more to it than just layering it underneath something, right? Play with it! Test it! Push it to its limits! There are LOADS of things you can do. See for yourself:
And a bonus this month:
the card I made with the punchinella resist technique
Experimenting is so important for the creative process. You can decide what you like doing, what you don't like doing, what you're better at, what you want to investigate more.
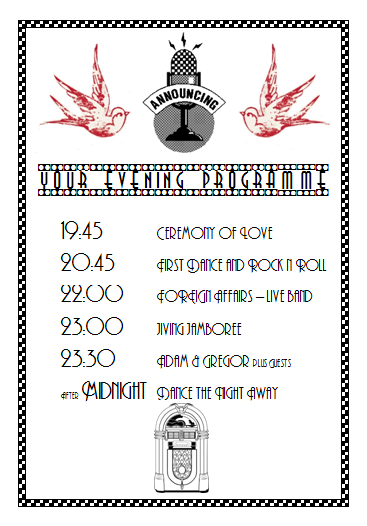
Two big reasons behind the handmade nature of our wedding were the desire to express ourselves precisely, and having a small budget. The table decorations we pulled together show both of these:
I spy nautical stars again
The flowers, as you know, were handmade from paper. The vase was a coffee tin covered with punchinella (look out very soon for a video tutorial on using punchinella); the candle holder was a jar that once held gherkins. I designed the labels on the jar and candle myself.
We kept it simple and understated - just us. No frilly froofiness, no swan-shaped napkins, no bows on backs of chairs. There were a couple of other things that formed the table centrepieces - a quiz, again completely designed by me to look like a old diner menu, and the evening programme:
I totally love that microphone image
Once again those beautiful swallows made an appearance. I am planning something else for these swallows, something that I hope will happen this year.... to be continued....
As a Gauche Alchemist, I am lucky enough to have received a package of goodies from them - a package which kept on spilling more and more goodies as I sifted through its contents.
I have been using Gauche Alchemy products in almost all of my creations since then - you'll remember My Bouquet, the Copenhagen Album, and the Skullies Box - but I've just made a (very almost) solely GA creation, and it was so easy. They basically provided me with everything I needed to put this card together - all I added was the spray mist, the ink and a Tim Holtz stamp.
a card without an obvious message - there were too many things to say
So, the card came in September's Going Postal Kit, along with the bakers' twine, the shiny orange circle stickers, the 'Comprehensive Guide' punch and the 'Congrats' fake stamp punch. The button came with the Scarlet Fever Mixed Media Color Kit. The map and the foreign text and the labels can be found in various kits and the ouchless cardboards is plentiful and varied and can be bought to suit your needs.
I got the look I wanted with the splashy flicky paint splatter look: I took the tube out of the mist spray bottle and dripped onto the card, and then blew with a straw so they spread out. I used Versamark ink to give a watermark stamped effect with the Tim Holtz sunray stamp at the top of the card. And then I just layered and layered and layered.
For more inspiration on what to do with GA goodies, check out the Gauche Alchemy SNR event later tonight - 7pm EST at Scrapbook News and Review. The SNR design team were given a bunch of GA products to work their own alchemy with. Pop in and see what they've been up to!
The 4 bouquets of yellowed music score roses were for the bridesmaids. Those roses... I started making them in January, at which time I made about 10 (there are about 20 in each bouquet). Then I had a 'break' for 6 months (I couldn't face going back to them, because I was scared of running out of paper. But instead of acting soon and finding out with enough time to choose an alternative path if necessary, I put it to the back of my mind. Great forward planning skills. I was lucky I got away with it). In July I came back to them and blitzed the music score paper supply, ending up making too many roses in the end. But they are beautiful, so I don't care.
And the cute red gingham bouquet was for the flower girl, my husband's niece. My mum put it together, as well as making all the flowers (she was much more organised than me - she finished them all by May).
By now they are all home somewhere with their respective owners. None of them were caught, because none of them were thrown. There was NO way I was throwing mine. Hell, I even winced when the photographer told me to rest it on the trunk of the caddy (there's a teaser for a photo I'm waiting on!).
It feels really weird to write this, but there were more than two hearts at our wedding.
What you saw when you looked up
Those hanging paper hearts are, and have been, all over the internet and especially Etsy for some time. But I still had to have them. I made them back in February, and I was damned if I wasn't going to use them! Cherry paper and everything!
The magical bunting was a labour of starchy love. My mum made over 50 metres of it, having chosen a whole range of fabrics that would match with the outfits and colours and styles of the wedding. I don't have the precise data, but I think it took a good couple of days to starch all of those triangles.
And the nautical stars - well... I made those a couple of weeks before the wedding, deciding one day that there was not enough nautical star in the whole picture. After the little star on the invitations, there had to be more!
These little ones were fiddly to put together
The hanging stars are 3D. I can tell you how I made them, if you like. It's quite easy.
1. I printed a large star template, and added tabs onto each outer line in pen. Then I used the template to cut out two stars from a piece of card, complete with tabs. I drew all the inner lines on in pencil with a ruler, including the ones separating the tabs from the main body of the star, and then scored along all the lines.
2. I manipulated each star so that the long lines coming from the centre to the points were mountain folds, and the shorter ones coming from the centre to the dips were valley folds. I folded all the tabs inwards.
3. This is where you decorate the star as you wish. I used the folds and lines to measure and cut out contrasting half-points to give it that nautical look.
4. Then I used PVA glue to stick the tabs of each star to each other. This was quite slow, as I needed to pinch and hold each part so that it adhered fully and began to dry before I could move onto the next part.
5. Once dry, the star - if you've made it, like I did, from thick card - is very sturdy, and holds up to more manipulation. Squash it down a bit, to make the folds and valleys really pop and dip.
6. Finally, hammer an eyelet through the top point and string it up.
They're equally good for Christmas... and that's just around the corner!
I'll leave you with a picture of me and my family.
I might have mentioned here that there would soon be a plethora of grey-plus-a-colour pages on my blog. Scrapbook Challenges' sketches are helping me create layouts right now, which is good because there's no time to think up sketches of my own. Here is this week's:
I'm counting down to the big day, and it's already a lot closer than when I made this layout.
Look! I used pink AND hearts! I'm really pushing my boundaries!
That dotty, puffy heart above is from a Gauche Alchemy Color Kit - you'll see lots more products in the coming months!
My fiance's best man (well, one of them) - in fact, the one who was the first person we told face-to-face that we'd gotten engaged - had a 'saw this and thought of you' moment recently. He sent me this present:
It's a collection of hand-carved wooden stamps in paisley designs. I can't wait to use them!
A quick post as I'm off for a long weekend with my bridesmaids. More wedding decorations under the belt - this time, I've decorated wooden letters for our initials.
The cork ampersand was particularly fun to do. Give it a try - it looks amazing!
...it is around here, anyway. Today we're off to a Leo Party with about 40 others. We're all wishing for sun. But in the event that he doesn't put his hat on and come out to play... actually, there is no back up plan. We'll just have to wish really hard.
I've made a softly coloured card this year for my fiance's mum, who is a Leo like me. I've used my not-so-new but newly favourite technique of cutting lots of strips of paper and fanning them out across the canvas. It was inspired by this week's challenge at the Play Date Cafe, which looks like this:
And my card looks like this:
I'm off to the Leo Party. Have a great weekend everyone!
Wedding flowers, beautiful wedding flowers. Beautiful handmade wedding flowers. I've just made the bouquets for the bridesmaids, and I can't wait any longer (I can't wait at all, it seems) to share them with you.
I was so unsure for so long how I wanted the bouquets to turn out... I had one idea, then another, then went back to the first, then had a third, a fourth, and so on. Then we changed our minds about the bridesmaids' dresses, and that totally threw all bouquet plans up in the air.
But a late April visit to bluebell-carpeted woods convinced me that uniformity would be most visually impressive. And so I got to work. The result is a simple, understated and elegant little bouquet which should hold up pretty nicely against the bridesmaids' dresses.
Now just to solve the problem of my own bouquet...


