Showing posts with label stamping. Show all posts

Saturday, 19 May 2012

The Swing of Things

I might be getting back into the swing of things. Going out into the blog world and reading that many, many other people struggle with time is reassuring. Especially when I take into account the fact that the time is being used to house-hunt. I’m not going to go on about it much more – I promise!

My super-special team-mates at Gauche Alchemy are always sharing stuff they find online. Last week, Michelle found this, and we all had a discussion about how expensive the pens are, and whether there wasn’t another way.

Confession time: my watercolour pencils have sat long and neglected on the shelf for one most shameful reason: I couldn’t find the pencil sharpener. Anywhere. I’m talking like two years. The odd drawing pencil is fine to sharpen with my Leatherman, but not 40 watercolour pencils. In the end, spurred on by this beautiful, colourful idea, I consented to using my make-up pencil sharpener for the watercolours. And I got to work on my version of the project. Ah, the joy of objects fulfilling their purpose after a period of neglect!


I forgot how lovely watercolours are. I'm so happy too that the project works with watercolours as well as the pens. Go us and our money-saving ways!


Sunday, 22 January 2012

Guest Creative Scrapper

And so for the exciting news!

Kristine at Creative Scrappers contacted me last year to see if I wanted to be a guest on their blog... and of course I said yes. Why would I say no when the blog is just about my favourite source of sketch and layout inspiration?

You can read my guest post on the Creative Scrappers blog but I'll show you what I made with sketch #192 here:

Creative Scrappers sketch #192
Our first engagement photoshoot was uncomfortable for me. I am not great at posing and really needed to be directed more strongly. Out of 500 photos there were about 50 I liked, and about 30 made it into the final collection. Which all makes me more happy that we got this one - full of attitude, looking totally comfortable and acting quite the poseurs.

rockabilly say yes!


The page is a memory of our discussion about props: he had his hat, I had my handbag... and then at the last minute I said 'Bring your guitar!'.

me and him, in object form
Echo Park collections make up the majority of this layout - I seem to have kept scraps from Life is Good and For the Record which match well with Happy Days. You'll also find some Lily Bee, Crate and Jenni Bowlin in there. Credit also has to go to Basic Grey for their postal stamp... don't you just love the black on black of the heat embossed postmark?

I'll be using this technique again
A big thanks to Kristine for asking me to be part of the Creative Scrappers scene! If you haven't heard of them already, you should go check them out now. They are really very, very good.

Thursday, 19 January 2012

Boxes... and Skulls... Again

While I'm working on something very exciting and waiting on something else very exciting (I'll share this very soon), I've got a very tiny thing to show you today.
Like I did here, I've gone and made another skull box. 
lots of skulls....yeah!
(Sharing time: I have a possibly unhealthy obsession with boxes. Boxes, tins, and the like. I like to collect them. Even if they may not have any future potential use. I like to stack them inside each other. I like to find the precise right one to store things in. (Boy do I love to store things.) I like to decorate them as giftboxes. I like to incorporate them into scrapping projects. I like to make myself them and...etc)
I used a heat embossing technique and Inkadinkado stamps borrowed from my mum to get this super smart look:
love how oily and grungy it looks
Did I mention I like boxes? This one was used to house a gift voucher at Christmas - and now it holds cufflinks. The gift voucher wasn't for cufflinks, but cunning box reuse is evidently one of my husband's traits too.

Tuesday, 17 January 2012

Hold On Tight

Well I hope everyone enjoyed the SC Blog Hop - there were certainly a lot of you hopping around and leaving comments! More Scrapbook Challenges today - I have sketch #278 to share with you.

Participating in the weekly sketch challenges can earn you the title of Pick of the Week or even win you a prize. Most importantly, the sketch itself and the layouts made by the DT can go a long way to nudging you out of a creative rut or giving you the confidence to try something new.

If you've been hanging around here for a while, you'll remember my horror story about my wedding hair. I won't go over that again (if only to avoid the pain of recounting it) - at least not entirely. But now I've made a layout about it, it's kind of hard not to retell this aspect of the wedding day.

I think my hair and make-up girl fainted when she heard the driver of the caddy say 'since we're running late, we'll have to take the big roads' - big roads being the inner city ring, which dips up and down and in and out of tunnels, and is two, three and sometimes four lanes wide. She assured me the style would hold (what else could she say?) but I think it was the major disruption to traffic flow caused by the beer festival that saved my curls: after we got off the ring, every road we turned down was blocked, leading us onto progressively smaller and slower roads. Going slower meant less wind, and less wind meant precious moments more of preserving my carefully curled wedding hair.

The photographers followed behind us in the car and sneaked this shot of me and my mum holding on for dear life:

Scrapbook Challenges sketch #278

I used Echo Park's Happy Days collection primarily for this layout, but you'll find some Crate (Restoration), Lily Bee (This & That), Melody Ross and American Crafts in there as well.

love that AC ribbon

This is the sketch - create to your heart's content and upload to the SC gallery - but always remember to hold on to your hair!


Friday, 18 November 2011

Punky Recipe - the Star of the Show

It's time for another Punky Scraps challenge! Don't try to resist, because this one is too good to miss.

Make a page from the following ingredients:
  • Stars
  • No patterned paper
  • Masking
  • Staples
  • Exposed cardboard
  • Book page
  • Bottle cap
  • Washi tape
Credits can only go to Inkadinkado and Tim Holtz for the star stamps
Not using any patterned paper was the biggest challenge for me - the biggest to date. (At least I know the need to use patterned paper will prevent my stash from ever getting out of control.)

I used everything on the list EXCEPT for the bottle cap because I FORGOT it. I had a Newcastle Brown Ale bottle cap somewhere (it has a star on it - perfect) but I only remembered it after I finished the page.

Love stars? Love ripping up cardboard? Look no further...
Again, as I mentioned in my previous post, I spent a LOT of time thinking about this page. I left it till the very last minute, and then woke up on the last day before deadline with the idea in my head. This time, the ingredients were decided for me; it was the laying out of the page that was taking time to come into focus.

I would LOVE to see people playing along with this challenge especially, so please pop over to Punky Scraps and check out the inspiration from the DT.


Monday, 14 November 2011

Happy Days

We'd already been planning our wedding for a long time when Echo Park's Happy Days collection came out. To be honest, I was so consumed with making wedding decorations that I hadn't really thought ahead to what the post-wedding scrapbooking would be like. Echo Park saved me the trouble, in the end. More than that - it was a match made in heaven.

Of course, recently I've been getting stuck in to that post-wedding scrapping, recording our happy day.

This layout you've already seen:

Materials used: American Crafts Thickers (Rainboots in Aqua Glitter Foam); Bazzill White cardstock; Echo Park: Dots and Stripes in Concrete, Happy Days chipboard accents, Happy Days element stickers, Happy Days journalling cards, Happy Days paper (Checker Board, Little Flowers reverse side); My Mind's Eye paper (Lost and Found Union Square Perfect "Happy"); Tim Holtz Bitty Grunge stamp set.
{Scrapbook Challenges Sketch #271}

I stitched and stamped before sticking down the paper strips. Then I added a printed swallow, a Cricut-cut nautical star and an RSVP - all from the wedding invitations - as extra memories. Finishing off with Happy Days chipboard shapes and Thickers was a doddle.

Why so easy? Well, Echo Park has pretty much decided my theme for me - I still want to be quite free and 'different', but I do want to have some main colours and motifs running through the pages. And Happy Days is perfect - you've seen the photos of the wedding. It should help me reach that subtle theming I'm after.

I made another Happy Days layout last week - taking into account this layout too, do you think I've achieved continuity?

Materials used: Bazzill Dragonfly cardstock; Echo Park: Dots and Stripes in Concrete, Happy Days alpha stickers, Happy Days element stickers, Happy Days journalling cards, Happy Days paper (Checker Board reverse side); Gauche Alchemy Punchinella;Tim Holtz Bitty Grunge stamp set; Toga alphas; vellum.
{Creative Scrappers sketch #181}

For the border, I cut up the remains of this chequered vellum I've had for years and machine-stictched it on, then drew a couple of extra outer lines with a black pen. To make the chevrons, I cut a strip of the reverse side of Happy Days Checker Board paper, and then cut this strip into squares. Keeping the squares in a line, turning every other square 90 degrees gave the rough pattern; then it was just a question of lining the stripes up and trimming the edges. I did the same with the Dots and Stripes paper.

yummy!

Since we went for cupcakes as the wedding cake, the Happy Days element stickers had to be used: cupcakes, layer cakes and sundaes - yummy! I cut around the cake on the journalling card a little so it could stick out over the photo. Then the title - punchinella, more chevrons, and lovely pure alphas.

And finally, my piece de resistance this month...


....take one deep photo frame from a well-known supermarket chain, take it apart, and make it your own!

Materials used: Echo Park: Happy Days alpha stickers, Happy Days chipboard accents, Happy Days element stickers, Happy Days paper (Ads, Retro both sides); Gauche Alchemy Punchinella and various Mixed Media Color Kits elements.

The frame comes with a super-thick inner mount that is quite wide, providing a great working surface. I drew around the mount directly onto the patterned paper and then simply cut out the shape I wanted to partially cover the mount. I did a teensy bit of fussy cutting to get the Retro flowers; glued some GA elements onto some thin wire and stuck them down behind the big chipboard title; and then just layered the rest up.

because the frame is so deep you can really go to town on the layering

on the subject of matches made in heaven... look at this Echo Park Happy Days chipboard accent with a vintage mini film negative from a Gauche Alchemy Mixed Media Color Kit


Tuesday, 25 October 2011

Caddy Love

Lily Bee Designs are starting to offer sketches for inspiration - and they're good.

I joined in with the first one by creating the second ever page of my wedding album. This was the sketch:


For over two years we had known which car we wanted for our wedding. And for over a year it had been booked. It was a 1956 Cadillac Sedan de Ville... this 1956 Sedan de Ville:

*sigh*

Why the sigh? Because at midday on the day of our wedding, I received a phone call from the car company, saying that the Sedan de Ville wouldn't start.


look! look how calm I am!

I went into Seriouser than Serious mode. The company offered me, instead, a Rolls Royce in silver or a Jaguar in British racing green. There was no way I was letting this slip away from me - the car was a big part of our vision, and my underlying desire was always only for everything to be coherent - so of course, I simply said that no, neither of those options were any good. That's when the company told me that they might have another Cadillac... it was from 1960, just about on the edge of what would work for me. It was also from the higher price range, but they would provide it at no extra cost. Naturally, I said. Then I heard the word 'tailfins' in my ear, and I was sold. Relieved, too.

Less than an hour later, the Caddy turned up. It was only at this point - while I am having my hair painstakingly put in place - that we discovered it had no roof. Now, I can look back and laugh at how I've always liked the windswept look. But on that day, at that moment, the journey to the Town Hall (we were running late, and there was an annual Beer Festival taking place which meant road blocks and diversions on top of that) was the most stressful of my life* because the wind in your hair is nice and all, but not what you want on your wedding day.

Anyway, back to the layout. I wanted to stitch on my page. I've cleared the way to the sewing machine again so I can stitch on my pages once more. But for me, to stitch the circles would've been too obvious. So I brushed on some acrylic paint, didn't like the look of it, and smudged it with a cotton wool pad. And then I was happy.


see them circles and stars again...
I used some paper and stickers from Lily Bee's Picket Fence collection, and combined them with Echo Park Happy Days bits and pieces, with some sparkly Thickers thrown in and Tim Holtz stamps.

still loving those nautical stars I made for the invitations
I didn't win the sketch competition, but the sketch was a great starting point for a layout that I'm happy with. 

The official photos have arrived now so I'm planning, planning, planning... how many pages can you fit into a post-bound album?

*coming in a close second is the one on which we transported my fish in their bowl from Norwich to Brussels by car. They learned about tidal pull that day; not to mention a little surfing. One of them was so traumatised it jumped right out of the bowl that evening after we'd arrived and went to fishy heaven (which was either somewhere under the sofa or in the doggie's stomach).


Saturday, 24 September 2011

Watching the Seasons

The final September challenge over at Punky Scraps is up and running - and it's a beauty. Team B picked an element each and Team A had to make a page up from this list.

Michelle - Use canvas (anything canvas)
Nat - use this picture to inspire you:
Elin - use chipboard
Camilla - use 3 staples
Mandy - B&W photo or image
Maureen - make it monochromatic

 For the canvas I used part of a Pink Paislee canvas number border; I used chipboard letters; 3 staples in the top right-hand corner; a sepia-tone photo for the B&W; and tried my hardest to make it monochromatic whilst still being inspired by the image.


The photo on this page is a picture of a watercolour painted by my mum. In the envelope is a story about how I come to have a photograph of this painting.

So what did I do on this page? Because there's a hell of a lot going on! Well... I stamped some Inkadinkadoo leaves onto a page from an old book and cut them out so that I could layer them up. I mixed a little water with acrylic paint and let it run down the page. I coated the inside of an embossing folder with texturised paint and ran a piece of plain paper inside it through the Big Shot to achieve the woodgrain effect (still LOVING woodgrain!). 


 And I used lots of bits and pieces - from Echo Park's For the Record, from Webster's Pages, from October Afternoon, Graphic 45 and Artemio.

Go join in - there's still a week to take part!


Sunday, 14 August 2011

Gifts from the Heart

My fiance's best man (well, one of them) - in fact, the one who was the first person we told face-to-face that we'd gotten engaged - had a 'saw this and thought of you' moment recently. He sent me this present:


It's a collection of hand-carved wooden stamps in paisley designs. I can't wait to use them!

Sunday, 19 June 2011

Punky Scraps Challenge 20: 5,4,3,2,1...


Challenge number 20 is up at Punky Scraps: to create a page using the following:

5 photos
4 alphas
3 patterned papers
2 colours of mists/pain
1 stamp
and also incorporate the colour blue.

My layout for this challenge looks like this:


Five photos - yes! I've been collecting these over the years and so badly wanted to use them on a page but am scared these days of using too many photos on a page. Perfect timing the challenge! Four alphas - yes, if you count either a different colour (white and black Thickers) or my own handwriting. Three patterned papers - yes: the background and two little flags on the right. Two colours - well, I used a blue home-made paint mist (and it worked!) and some white gesso. One stamp - that's the little star imprint in the gesso.

Oh, and blue - well, yes :-). The little piece of ephemera is actually a part of the most awesome event leaflet I've ever seen. It's a few pages full of really old circus-style adverts for events going on at one of our favourite local venues, aptly named (for this layout) 'Magic Mirrors'. It's where we go dancing - it has a proper wooden dance floor and a glass dome in the ceiling that splits sunlight into rainbows on the inside - no need for a glitterball in the summer when it's still light at 10.30pm.

My home-made paint spray. Proud!


I actually used a Scrapbook Challenges sketch for this one: number 256, which looks like this:


Go and get Punky at Punky Scraps by joining in the challenge. You know you want to!

Tuesday, 3 May 2011

Just for the Record: I'm Lifting Again

Look at that. I'm getting good at this headline-creating business.

It's layout time. More specifically, it's gorgeous spring yellow, For the Record time.

A blogospherical friend of mine who is rather good at making layouts (not to mention dresses, and cards, and mini albums) made a page a while ago that I kept thinking about. In creating my most recent layout I managed to lift her and use masses of the amazing collection that is For the Record. It's so versatile, with so many different potential 'looks' - I can't stop praising it.


What I'm loving about this page, other than For the Record: clouds, journalling, masking tape and Versamark stars. Thanks to Sabr for the inspiration!

Tuesday, 1 March 2011

Thoughts on Trees

Trees are pretty incredible, if you stop to think about them. I rarely have time to pause and appreciate their beauty, strength and resilience, let alone their place in time and in the cultural history of humanity. Even less so their calming, quieting effect. But here I find a brief moment of tranquillity, as we begin a new month, to wonder and to be awed by them.

At the weekend we went to the forest again - a favourite place for us and for our dog. It's actually an arboretum, so we get to admire trees from all over the world as we hike around. It's the place we've always been able to wedding plan without the stress or distractions of external factors. At the weekend we needed to get away from these stresses and distractions a little more than usual. A few hours later, we were back home for lunch with lightened hearts and a solution.

So my postcard this week was a built from this - a little collage of a tree made from a leaflet that was advertising a wedding show.


An addendum: even though the arboretum is impressive, the most breathtaking tree that I've seen lately lives in a park just down the road from us.


Each time I see it I'm struck by its massiveness. How old it must be! This one really is an incontrovertible symbol of life. And just to put it into perspective:


It's got me to thinking how we'd both love to incorporate The Tree as a symbol into our wedding. Watch this space...

Sunday, 20 February 2011

Tester Page

OK - this is a tester page. It's a layout using many different techniques and styles - a horrible mish-mash of things. I don't like it, but I wanted to try a lot of different approaches and I'd rather have one whole page I'm not happy with than seven pages which I mostly like but contain little bits I'm not happy with.


Some thingsI tried were mixing (if not matching) paper patterns, masking/misting, covering doilies with Cosmic Shimmer Mist, making flags with ribbon and sticks...


 ... heavy embossing on white-backed paper...


 ... lots of paper layering...


... building up layers on nice bought chipboard shapes (these ones from the Restoration collection)...


.... and painting and stamping on plain chipboard...


This page was a result of me editing a long document for many hours (days, in fact) and every now and then remembering this thing I once did called scrapbooking... and pining for a chance to stick and cut and stamp and paint, and then going totally overboard once I finished working on the document. Like a kid in a candy shop, you might say. So, I'm not happy with it (I didn't even give it a title), but I'm sharing it to show how important to me planning and spending time thinking about a page is. I actually made another layout straight afterwards, but it was one that had been brewing for a few weeks, and I'm infinitely happier with it. I'll share it in a fortnight or so, when the XOXO March challenge is up and running.

Thursday, 3 February 2011

Folds and Feathers

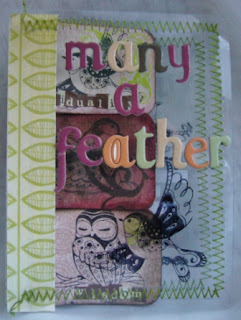
My final assignment for the Mini Book Anonymous DT was to create a mini book on the theme of 'Folds and Feathers'. After 3 months of thinking, thinking, thinking, I finally stumbled across the perfect idea.


An accordion spine book, with...not feathers, but birds. The cards inside each feature a facet of me and fit the mini's title of 'Many a Feather' (like 'many a string to my bow').


I created another video for this mini - and yes, this time I tried to make and talk on film! Check me out! Feedback as always is most welcome. For now, though, I'm going to depart as I've been up ALL NIGHT working and I am a little delirious. I'll just say a big thank you to the MBA team for giving the DT such inspiring challenges and giving me reason to push my boundaries. I would never have done these things without you!