Wednesday 28 July 2010

Layers and Layers of Love

There's a shelf in my cupboard dedicated to projects on the go, or projects which I know pretty much what I want to do with but haven't got round to actually doing yet.

Every now and then I hear piteous little cries emanating from this location, to the tune of 'make me!...please!...decorate me beautifully!' It's a lot worse when I open the cupboard door: like an angry mob, only instead of angry, they're sad and ignored. 'You had such good intentions for me!...Why are you leaving me until last?...What could be better than altering me?' the voices cry.

Guilt overcomes me; I usually take something out, fiddle around for a bit, and then put it away again, distracted. Imagine, then, the enormous sense of satisfaction I get when I actually finish something from this 3D to do list. Never again will you go back on that shelf, my pretty creation!

One of the items on this shelf was a frame from Paperchase, bought in the sales for 50p seven months ago. I'd been meaning to paint it and make it look distressed; I also wanted to stamp on it, but I wasn't sure whether it would look good. I ended up painting the frame with lots of layers of different coloured paint, finishing with a white coat, which I then sanded down a bit. Then I started to stamp onto it, just randomly really, sometimes sanding afterwards.


I also had another go at the layering I mentioned in an earlier post. It's a frame - it's gotta go around something, and I thought a photo would be too... normal! I used lots of different scraps of paper, some gems, some pins... all sorts of things. It was fun, and helped me get over the fear of using lovely patterned paper only to cover most of it up!

So, all together:

Monday 26 July 2010

Un Grand Merci

Recently a trip to the B&Q equivalent here ('Brico') gave me a big surprise. Don't get me wrong, I love going to these huge shops - there's always so much to look at... not to mention things to purloin, like paint samples, colour cards, wallpaper samples and so on! But this time, once I was bored of the garden section and the door handles section and the paint section, I found, tucked away in the far corner, a little artists'/crafters' section! No way!

This is where I found these stamps... they're Royal Brush, the 'Journey' and 'Viva France' sets. I love them!

I got inventive with them immediately, starting from scratch with some white linen cardstock cut to postcard size. I just started inking, stamping, and was so pleased with the result:


To finish off the postcard with a sentiment, I cut the word 'Merci' using the Cricut and then used the outline as a stencil to dab paint into.

Saturday 24 July 2010

Ghosts of the Past

A few weeks ago we visited an antique and reclamation store, hoping to find something special. Everything was too expensive, but I did find a pile of old photos on a table in one corner of the shop. It was fascinating, and a little creepy, to look at all these people, long gone and forgotten, in their 1920s or even 1890s suits and dresses.

My mum has been tracing our family tree for a few years now, so she has lots of old photographs of our ancestors, already scrapped on beautiful heritage-style pages. But the anonymity, the forgotten-ness of these people, moved me almost as much. I picked out three photos, with the intention of scrapping about them and testing out the heritage style.

This is what I came up with. I worked on a piece of K&Company paper (Blue Awning Ivory Medallion Swirls), cut to A4 size. I added my own stamping, inking and masking to it - the chandelier (Papermania), the corner pieces (Personal Impressions), the script (Artemio) and the keys (Royal Brush) are all my additions, as is the faint pattern in the bottom left corner area.

I've seen a lot of layering lately (for example, here, here and here) and I love it, so thought I'd try it myself:


The other day I finally went to a junk shop in the middle of touristville that is usually closed (!), and found it to be a treasure trove of old... well, junk. But some of us are looking for junk, and I picked out a couple of old keys:

... and some old tram tickets:


I am quite haunted by these photos. Not in a bad way; they just make me feel very mortal. Funny then that I've 'immortalised' these strangers on a page.

Thursday 22 July 2010

Problem Solved

I'm sure I'm not alone in this, but my fiance takes a while to get things done - things about the house, like putting up a shelf. If I ask, it won't usually happen until the week after, or the week after that. The other day we had a little 'discussion' about this issue, and the outcome was that instead of me asking, I should write a list. 'Men like lists!' he said, rather heatedly.

So I went away and made him a To Do List. I used a little wooden board that I bought months ago with no exact plan in mind as the base. It's ready-drilled to hang on the wall and looks more like a mini chopping board or cheese board. I decorated it like this:


I used chipboard letters from Artemio, and the paper was... well, actually, I've forgotten. That's really bad!
I used real tools on this one (not a little lady hammer and little lady nails) and hammered in two nails. Then I cut a stack of paper to size and added two eyelets at the same width as the nails:

I had some really fun stickers from Paperchase which kind of contributed to the air of 'getting things done':

And enjoyed layering up the little corner embellishment with various stickers (Paperchase, EK Success and Cosmo Cricket) and other collected items:

I wrote a little message on the back: 'To stop nagging, to avoid arguments, and to get things done'. I'm pleased to report that two things on the list have already been scratched off. Here's hoping it always works!

Tuesday 20 July 2010

Sweet Summertime Card Tutorial

I recently received an Echo Park paper set from Sandra at Gotta Craft and it has inspired me to make some really summery birthday cards. The beautiful summer weather has also inspired me... to stay indoors and make cards where the breeze doesn't blow my stash away!

The intention was to make a set of unisex cards for kids, but I think they're pretty universal actually, especially when the sun is shining this much!

The set 'Sweet Summertime' features a lot of pinwheels, which inspired me to make this card:

It contains two great sticker sheets, with loads of letters, bunting and borders. One sticker says 'Let's Go Fly a Kite', which inspired me to make this card:

The sticker sheets also feature a big hot air balloon, which inspired me to make the final card in the set... for which I've also done a little tutorial.

What you'll need is:
  • Some cards. You can use pre-made cards or cut your own (I'm running low on the former so I cut my own from some cardstock)
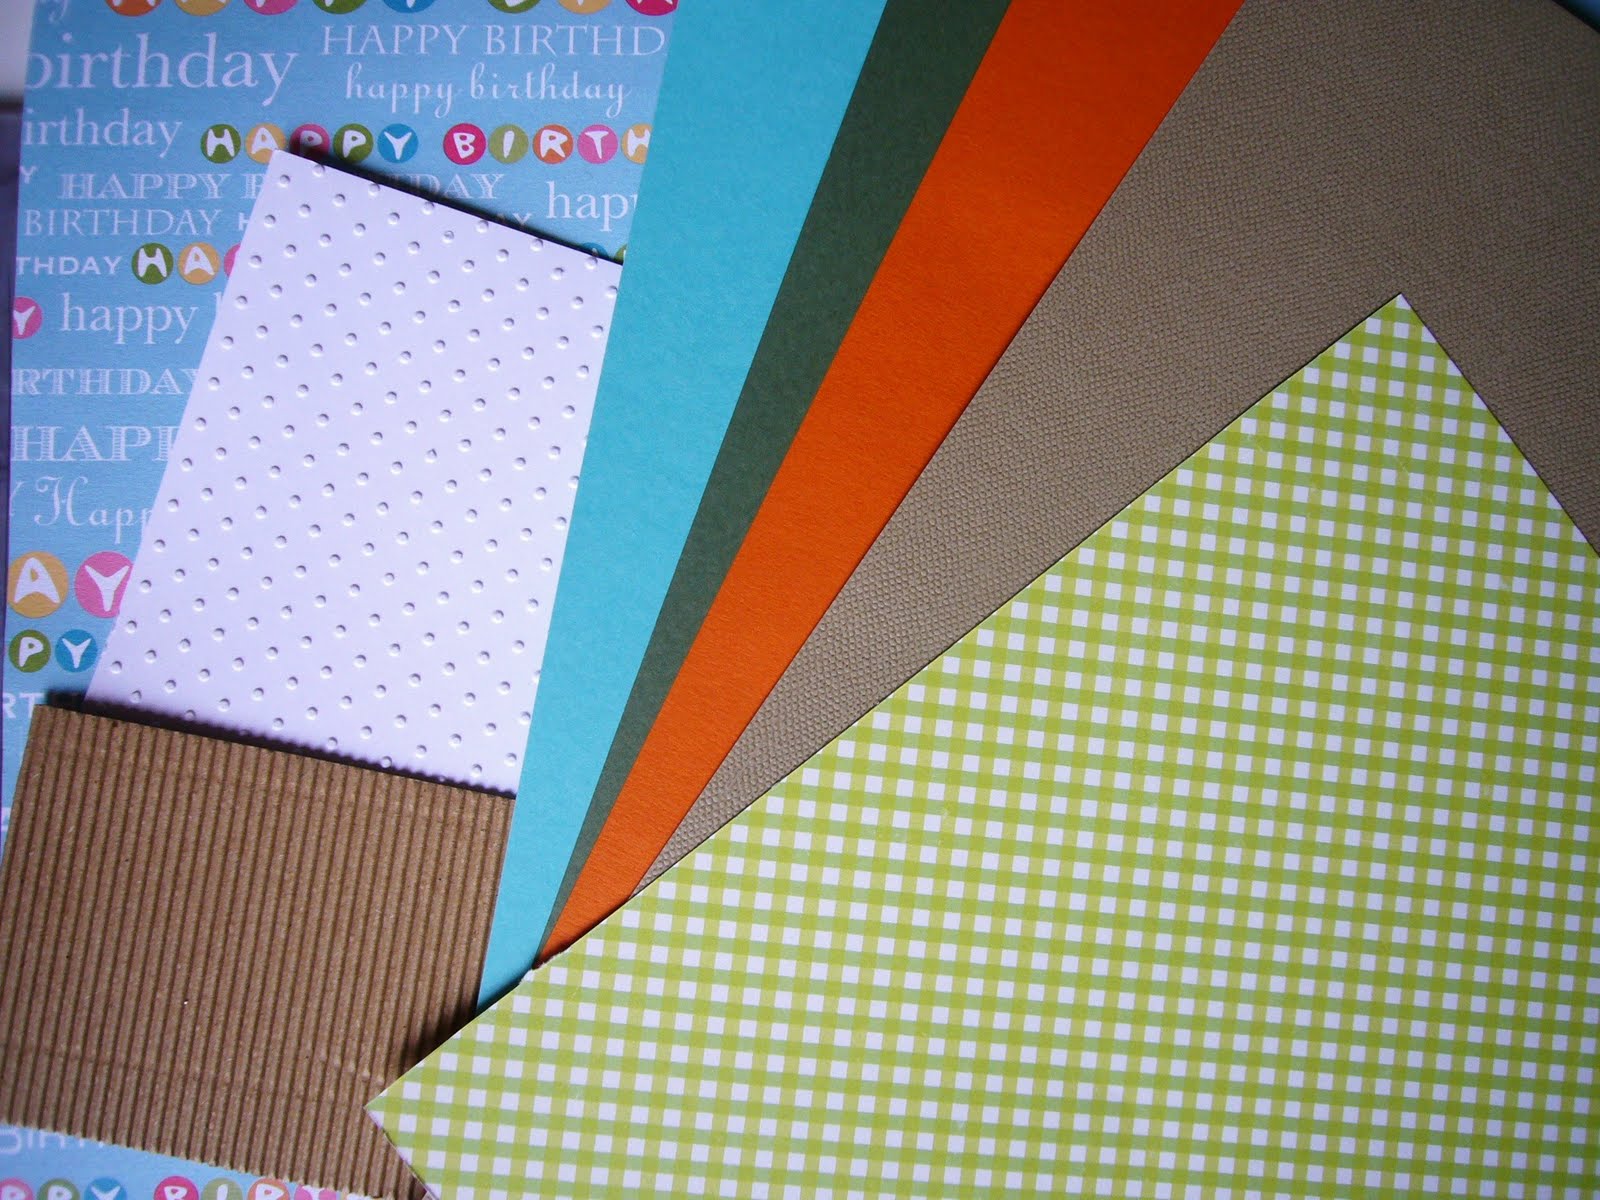
  • A selection of patterned and plain paper (2 patterns and 6 plains)
  • Button and string
  • Birthday message stamp (mine is from Woodware) and cloud stamps (mine are from Sassafras Lass)
  • Round corner punch and scalloped border punch
  • Some old-fashioned ticket embellishments
  • Glue, glue dots, ink, scissors, craft knife, etc
Take a selection of coordinating papers. I've used some paper and card from The Paper Mill Shop and a patterned freebie (the Happy Birthday paper) in addition to the Echo Park paper (used here for the balloons).

Preparation:
  • Cut strips of brown, orange and green to about 3cm thick, and as wide as the card base you're using (mine was 10.5cm wide).
  • Cut rectangles of the 'Happy Birthday' paper and the plain blue paper: again, as wide as the card base you're using, and at 7.5cm and 7cm respectively.
  • Round the bottom corners of your card
Cut out the clouds and the hot air balloons. As you can see from the uniformity I cut my clouds with the Cricut and then ran them through the Cuttlebug (to put Swiss Dots on them). The balloons were printed onto the patterned paper and then cut out by hand:

Punch the coloured strips of paper to make the scalloped borders:

Punch the bottom corners of the patterned paper to round them:


Glue the scalloped borders together, and then glue them to the patterned paper:

Then glue the bottom half to the top half to make the base of the whole topper.

Now it's time to add the stamped images. First, stamp the message at the top of the card. I've used Memento Ink (Tuxedo Black).

Then draw some lines, with an ink pen, running on from the stamped writing to form a frame at the top of the card:
Next, stamp the clouds onto the 'sky'. I experimented with black and white ink, but preferred the white, because it's a lot more subtle (and realistic!), even if it is faint. It's not the best photo but I'll include it anyway:
Take the string and wrap it around the entire card topper, lining it up with where the scalloped borders meet the 'sky'. Thread the button and pull tight, securing the button with a glue dot if it doesn't want to stay in place. Tie a bow.

Put some glue on the back of your ticket and stick it in place, at an angle, just under the button and string:
Finally, stick on the cloud and the hot air balloon. Cut a tiny basket shape from the corrugated cardstock and stick on to the bottom of the balloon:

Then stick the whole card topper onto the card, lining up with the lines you've drawn out from the stamp at the top. And the finished card, one more time:

Saturday 17 July 2010

Good News!

This week I received some excellent news: I've been selected for the design team at Mini Books Anonymous! I'd like to say a big thank you to Roselyn and Rashida for giving me this opportunity. I'm so excited about creating mini books and working with the rest of the DT - Crystal, Jenna, Melody, Wirda, Lida, Sandra, Raquel, here's to the next 6 months! Go take a look at their blogs and see the creativity :-)

To celebrate, and to give a taster for the future, I'd like to share with you an ongoing project of mine, a mini book. If you remember, a few weeks ago I made the structure of a mini album. Back then, I had the intention of using it as an album for photos from our visit to the UK. But while there, my mum got me a little kit of goodies AND an Echo Park set from Sandra at GottaCraft and the contents were so lovely my plans for the mini totally changed. The change was probably also due a little to the wake-up call being back in the UK gave me. The mini book is now going to be photo-free, and instead contain mini collages of things that are important to me - not physical things as such, but more abstract things. Here are a few photos to show you what I've done so far:


Thursday 15 July 2010

Oh, Cindy Lou

There's a SWEET new Cricut cartridge out called 'Cindy Loo', which in my opinion has the most usable shapes of any cartridge they've released. C'mon, it even has cupcake wrappers! I don't own the cartridge, but my mum does, and she let me use it when we were visiting the UK the other week. As ever, time slips away and Cricut time was limited in the end to one afternoon. There was so much more I wanted to cut! The mushrooms, the birdhouses, the russian dolls... but I did manage to take away a few shapes, and this is what I did with them.

I cut a wreath - the one with trees, a squirrel and a deer - in the biggest size possible (with the Cricut Expression's 'Fit to Page' feature this was 11.5 inches), in green. I also cut another two, the same size, in grey and pink. I used Bazzill cardstock for all of them. I can't show you what things look like at this point because the picture I took is way too blurry.

Anyway, I cut certain parts from the grey wreath - the tree branches -and certain parts from the pink wreath - the tree leaves - and stuck the pieces onto the green wreath:


I then cut the squirrel and the deer shapes from one of the 'spare' wreaths:


And I traced the outlines of the shapes onto the back of some patterned paper I had left over and cut them out:


After sticking those shapes in place, I hand-cut some butterflies from some other patterned paper scraps, and stuck them in place:


And the finished article (finished apart from a few small gems, some ribbon and a place to hang it):


How cute is that? There are so many possibilities with this cartridge, I'd love to own it myself!

Monday 12 July 2010

My First Customer

I put together the final card designs for my first paying customer, a good friend who, like me, strives to stave off all things Hallmark. While I combat the greetings card giant with a burning hot glue gun, blinding embossing powder, and scything pinking shears, my friend uses her extreme powers of investigation to find the almost-invisible independent craftspeople who can help her build up a forcefield of handmade stuff. The final two sets of cards I made were a female birthday set and a male blank set:

Once the collection was complete, I had great fun indulging my stationery-loving side by packaging all the sets in a Rather Agreeable Manner:

And because I'm such a nice, kind craftsperson and want to pledge my allegiance against the greetings card giant, I included a freebie for my friend:

I loved all that packaging up! And she loved all the unwrapping and finding delights! I think it's safe to say I have One Happy Customer, so that's a good 100% record for me so far.