Showing posts with label tutorial. Show all posts

Monday, 26 March 2012

Metal Breakdown

That mini album I made for Dublin – the one with no photos – gave rise to not one, not two, but three video tutorials for Gauche Alchemy. The first one showed the structure of the mini. I think we missed the second one, about getting messy with paint and textures of backgrounds. (You can see them all here.)

And then there’s the third, about how to achieve a faux metal look from foil paper:


The Gauche Alchemy team is riding high at the moment – there are lots of achievements, great techniques and fabulous little projects going on, so if you’re feeling stuck for inspiration or fancy trying something new, pop over to the GA blog.

That's all for now!

Tuesday, 28 February 2012

I Go Out Walking...

A little while ago I showed the sneakiest of peeks of a project I’m going to be working on all year. Well, today’s the day for the big reveal over at Gauche Alchemy!

I always knew I was collecting postcards for a reason. (Apparently I have a bit of a thing for them.) Turns out this is it. I used to have hundreds covering my bedrooms walls at university – you know, the kind they give out as flyers or adverts or art – but they were long gone, recycled in one of my fits of ruthless cleaning over the years. Now, each time we go to a bar or museum or someplace similar we pick up the interesting ones, and the collection was starting to add up again. So now is my chance to give them all a reason to exist! Read on…

My aim for this year is to make up a mini book, filled with 52 postcards, each of which is scrapped with a photo taken during a weekly walk, with each photo inspired by a weekly prompt. The idea’s not new, I know, but I did think that the Scrapbook Challenges forum could benefit from a year-long project like this, so that is where you can find the prompts and members’ responses to those prompts if you’re interested in playing along (some catching up will be required by now, but the load is not too much. Besides, the prompts are guaranteed to get you thinking!).

I WILL stick to this project
this Gauche Alchemy boot wasn’t made for walking, it was made for adorning my mini book

go out walking - you might find dinosaurs (or other exciting stuff)
I’ve been keeping to the programme on the photograph front, and I’m almost up to date on the scrapping, too. Here’s what I’ve done so far, photograph-wise:


Thanks to Gauche Alchemy and their eclectic array of products, I was able to pick and mix and create a cover for this mini book that was perfectly suited to the theme of going on walks and taking photos. Here’s how the cover came together:


Products I used (all from Gauche Alchemy)
Color Kits – It’s All Gravy, Blue Streak, Purple People Eater
PVC Punchinella
Ouchless Cardboard
Mail Art kit
Nearly Nekkid kit
Regular Punchinella

I can’t tell you strongly enough how easy it is to come up with projects from the GA Color Kits – with them, a project pretty much makes itself. For example, I’ve nearly used up the whole Banana Hammock kit (even though it’s a difficult colour for me), and I’ve got a project in the pipeline using the (peach?) kit which is a colour I NEVER thought I’d use. On top of everything they’re great value because you get a lot of bits and pieces and some really unusual items in them. (I’ll tell you a secret… when I applied to be part of the Gauche Alchemy DT, they asked me which of their products I liked the best. I spent a paragraph gushing about how inspiring these Color Kits were – and that was just from the product photos in the GA Artfire store! Now I’ve got my hands on them – wow. I have not been disappointed!)

Thursday, 26 January 2012

Bobbing and Weaving, Ducking and Diving, Picking and Choosing

What feels like a really long time ago I made this tray – for me. There was a second tray, destined for the husband’s lap, which never got altered.

Until now.

Over at Scrapbook Challenges it was my turn this month to post a technique challenge – so, thought I, the perfect opportunity to finish this two-part tray project!

My technique? Paper weaving. I thought about repeating the sunburst effect on his tray, but since good old checkers are really his thing, the paper weaving idea fit much better:

he loves the black and white
It's not finished - I need to add his name, laminate it and varnish the frame, so I'll post a nice picture when I've done all that.

But I liked it so much I did some more on a birthday card for our friend:

the birthday boy's gonna so totally, like, flip over this

If you want to see in-progress pictures of me weaving paper, get onto the Scrapbook Challenges forum!

***                   ***                   ***
In other news, the Gauche Alchemy mamas challenged me in December to make a video showing how to make a scrapbook layout with their mixed media products - for anyone who is stuck in mixed media canvas mode but wants to switch to layout mode and doesn't know where to start. Now, I want to add a little disclaimer here for the video quality: December was a tough month for me – it seems that I ate everything in my path, including all the hours in all the days, and I just couldn’t get to doing anything as properly as I wanted to. This project included. But to go with this GA blog post, here is the video nonetheless – and a promise that next month’s will be altogether more… together!


***                   ***                   ***
Finally, my trusty assistant, DJ the Dog, helped me pick out two winners for the SC blog hop RAKs here on AndHandmadeToo:


Winners, PM me your addresses – there’s a long-awaited trip to the post office I have to make anyway, so I may as well send all the packages in one go!

Monday, 14 November 2011

Happy Days

We'd already been planning our wedding for a long time when Echo Park's Happy Days collection came out. To be honest, I was so consumed with making wedding decorations that I hadn't really thought ahead to what the post-wedding scrapbooking would be like. Echo Park saved me the trouble, in the end. More than that - it was a match made in heaven.

Of course, recently I've been getting stuck in to that post-wedding scrapping, recording our happy day.

This layout you've already seen:

Materials used: American Crafts Thickers (Rainboots in Aqua Glitter Foam); Bazzill White cardstock; Echo Park: Dots and Stripes in Concrete, Happy Days chipboard accents, Happy Days element stickers, Happy Days journalling cards, Happy Days paper (Checker Board, Little Flowers reverse side); My Mind's Eye paper (Lost and Found Union Square Perfect "Happy"); Tim Holtz Bitty Grunge stamp set.
{Scrapbook Challenges Sketch #271}

I stitched and stamped before sticking down the paper strips. Then I added a printed swallow, a Cricut-cut nautical star and an RSVP - all from the wedding invitations - as extra memories. Finishing off with Happy Days chipboard shapes and Thickers was a doddle.

Why so easy? Well, Echo Park has pretty much decided my theme for me - I still want to be quite free and 'different', but I do want to have some main colours and motifs running through the pages. And Happy Days is perfect - you've seen the photos of the wedding. It should help me reach that subtle theming I'm after.

I made another Happy Days layout last week - taking into account this layout too, do you think I've achieved continuity?

Materials used: Bazzill Dragonfly cardstock; Echo Park: Dots and Stripes in Concrete, Happy Days alpha stickers, Happy Days element stickers, Happy Days journalling cards, Happy Days paper (Checker Board reverse side); Gauche Alchemy Punchinella;Tim Holtz Bitty Grunge stamp set; Toga alphas; vellum.
{Creative Scrappers sketch #181}

For the border, I cut up the remains of this chequered vellum I've had for years and machine-stictched it on, then drew a couple of extra outer lines with a black pen. To make the chevrons, I cut a strip of the reverse side of Happy Days Checker Board paper, and then cut this strip into squares. Keeping the squares in a line, turning every other square 90 degrees gave the rough pattern; then it was just a question of lining the stripes up and trimming the edges. I did the same with the Dots and Stripes paper.

yummy!

Since we went for cupcakes as the wedding cake, the Happy Days element stickers had to be used: cupcakes, layer cakes and sundaes - yummy! I cut around the cake on the journalling card a little so it could stick out over the photo. Then the title - punchinella, more chevrons, and lovely pure alphas.

And finally, my piece de resistance this month...


....take one deep photo frame from a well-known supermarket chain, take it apart, and make it your own!

Materials used: Echo Park: Happy Days alpha stickers, Happy Days chipboard accents, Happy Days element stickers, Happy Days paper (Ads, Retro both sides); Gauche Alchemy Punchinella and various Mixed Media Color Kits elements.

The frame comes with a super-thick inner mount that is quite wide, providing a great working surface. I drew around the mount directly onto the patterned paper and then simply cut out the shape I wanted to partially cover the mount. I did a teensy bit of fussy cutting to get the Retro flowers; glued some GA elements onto some thin wire and stuck them down behind the big chipboard title; and then just layered the rest up.

because the frame is so deep you can really go to town on the layering

on the subject of matches made in heaven... look at this Echo Park Happy Days chipboard accent with a vintage mini film negative from a Gauche Alchemy Mixed Media Color Kit


Thursday, 20 October 2011

The One Hundred

Have you ever expected something to be a really momentous occasion, and then realise that it totally passed you by?

I recently hit 100 followers on this here blog, and in the flurry of the True XOXO blog hop, I didn't even mention it. So here's to Christa (follower number 100) and everyone else for making me feel special and all warm and fuzzy inside.

Thank you to each and every one of you - loyal commenters, silent readers, shy sometimers, occasional dip-inners, and those who are too busy to do much at all. From the bottom of my heart, I am grateful and flattered at the way this blog has turned out - because of you. I am guilty myself of letting things slip, only sometimes skim-reading what I should instead eagerly jump on, even of neglecting those things I truly want to read and comment on but in reality look at the clock when everything else is done and see that it says 'bedtime'. I know it's hard to keep up in this environment of ever-increasing social platforms (I'm struggling, for sure). So, thank you all for being you and keeping my blog alive with your comments that make me laugh, think, want to have a conversation with you, send me off to look at your blog, inspire and more.


Now, I had planned a giveaway to mark this grand event, but I have been in a state of disorganisation lately, one that I am finding it hard to shake off. So, instead, I am going to share with you a few ideas for the future of my blog, and ask for your thoughts in return. And to one of those thoughts' owners, I will send a little handmade something to brighten their day and make them revel in the amazingness that is the online crafting community.

Before the year is out, I'd like to:
  • revamp the design of the blog
  • tell you more about my creative process - what happens before and around a creation
  • include more tutorials
Please let me know if you agree or disagree with any of these, or if you want to see more or less of something here, or if there is something else not here that you'd like to see more or less of. I'd like to work to make this blog more readable for you, the readers. What piques your interest, whets your appetite, gets your creative juices flowing?

Sunday, 16 October 2011

The Wedding of Awesomeness: Part 3

This is the only photograph of all 6 bouquets together, so feast your eyes for a while.


You recognise mine, of course, from my excited wedding day post and my Gauche Alchemy video tutorial.

The 4 bouquets of yellowed music score roses were for the bridesmaids. Those roses... I started making them in January, at which time I made about 10 (there are about 20 in each bouquet). Then I had a 'break' for 6 months (I couldn't face going back to them, because I was scared of running out of paper. But instead of acting soon and finding out with enough time to choose an alternative path if necessary, I put it to the back of my mind. Great forward planning skills. I was lucky I got away with it). In July I came back to them and blitzed the music score paper supply, ending up making too many roses in the end. But they are beautiful, so I don't care.

And the cute red gingham bouquet was for the flower girl, my husband's niece. My mum put it together, as well as making all the flowers (she was much more organised than me - she finished them all by May).

By now they are all home somewhere with their respective owners. None of them were caught, because none of them were thrown. There was NO way I was throwing mine. Hell, I even winced when the photographer told me to rest it on the trunk of the caddy (there's a teaser for a photo I'm waiting on!).

Tuesday, 27 September 2011

Finding the Vintage

Looking back, it's fascinating to see how ideas for our wedding developed into realities. It all started with a shape:


Then the music we were listening to began to change. We started taking dance lessons. I finally sang to his guitar. I tried to do different things with my hair.

And after I braved the red lipstick, there was no turning back.

My interpretation of Scrapbook Challenges' final September sketch, here:


...took on a distinctly vintage theme, using some fabulous 4heures37 paper and a Crafty Secrets Creative Scraps embellishment. It features a picture of me looking distinctly vintage too. Gauche Alchemy brought me the heart stamp in the top left corner and the famous ouchless cardboard, and I'm sure you can spot the Cosmo Cricket Circa 1934 paper in there too.
 

In other news, my mail art video tutorial is now available. A little snapshot of our trip to Copenhagen. Coming soon: wedding stuff. I promise!

Wednesday, 21 September 2011

Time Travel

Hop in. I'm going on a short journey back to May, before we got married, before we (and by 'we' I really mean 'I') lost the plot and spun off into a crazed wedding-planning-induced stress, before my bout of blog neglect, and before I'd even considered the issue of identity and name being, somehow, inextricably interlinked.

A calm before the storm, you might say. (We did actually have a storm on our wedding day. It was forecast for the afternoon, but because I obviously didn't have the time that morning to check a weather report, I didn't have anything to worry about. I woke up to bright blue skies, and as far as I knew it, that was all there would be. All day. Ah, the power of positive thinking. The skies remained bright blue until they turned dark blue, and it wasn't until most people were inside and the band was playing that the heavens opened and the lightning forked and the thunder crashed, although not as loud as the drummer in the band drummed his drums.)

Anyway, in May we took a short trip to Copenhagen. Not the best of weather, and not the lightest on the pocket, but it was a welcome break and we had a mad 'quick, let's fit in as much touristy stuff as we can' weekend to bring the trip to an end. So there were lots of nice photos that made it look like we were there for 8 nights, not 4.

I knew from the moment I flicked through the photos on the way home that I wanted to make a mail art-inspired album to put them in. I also knew I wouldn't have time to do it until after the wedding. Meaning I had a lot of time to think about it, and that anything could happen in the meantime.

So what did happen in the meantime? Well (*grins*)... I made this awesome video, and became a video tutorialist for Gauch Alchemy, who then released a mail art kit called Going Postal (new this month!), and only went and sent it to me to play with, and the rest, as they say, is history.


Look out for the video tutorial for this album on the Gauche Alchemy blog soon!

Tuesday, 19 July 2011

It Must be Alchemy

I have some great, great news to share!

I'm getting married!

....oh, wait, we already knew that. For, like, three years.

So what is it then?

***

We-ell... a little while ago I made a video tutorial as a job application:


and I got the job!

From September, I'm going to be one of Gauche Alchemy's two video tutorial masters! You can read all about their new DT here. I am so excited to be an Alchemist, to work with all those talented artists, and to be able to display this badge on my blog:


Here is a still of the layout that was the product of the video:


From September, look out for more awesome video tutorials from me which will feature lots of yummy products from the Gauche Alchemy store!

Thursday, 16 June 2011

My Heart Belongs To Daddy

Although I can't claim I ever was a daddy's girl (nor much of a mummy's girl, for that matter), I can say with certainty that as I've grown up my relationship with my dad has also grown. I now see him as full of wisdom, happy to give advice if I ask for it, supportive and then some, relaxed enough to trust my judgement on things, uncomplaining, and accepting of those traits I have which set me apart from the rest, and from him.

I know this post is kind of coming a few days early, but it's because I want to share a little tutorial for the card I made for this month's Scrapbook Challenges card feature and Fathers' Day.

I made a card that combines the fashionable accordion flower with the more old-fashioned rosette.

So, grab your materials: cardstock, concentrically sized circles, and a strip of paper to score into the accordian flower. I embossed the lighter blue cardstock with a woodgrain folder to give the card more masculinity.

 
Ink all the edges of all your shapes, fold the cardstock into a card and stick the embossed part onto the cardbase. Then start to make the flower.

Score the strip of paper (30cm in length; the width should measure half the diameter you want the flower to be) at 1cm intervals and then fold alternately (mountain and valley folds for origamists). Stick together with double-sided tape (this is what you see in the picture above).


Push one edge of the flower in towards the centre. This is really where the magic happened for me - the first time I made one, it all suddenly just popped  into place. Hold it down with one hand, and stick your largest circle on to hold it in place. I'd recommend using a hot glue gun for this.


Then stick on the medium circle and then the small circle. It's a good idea to punch an extra one to stick on the back so it's easy to stick the flower to the card.


Then cut two ribbon-shaped  strips (or, yes, use ribbon!) and stick them onto the back before sticking the flower onto the card (again, with a glue gun).


Finish off by cannibalising some wrapping paper, or using specific scrapbooking fathers' day embellishments.

A quick reminder: remember this page I made recently? Well, it's up for lifting on the True XOXO Girls blog - get your entries in in the next two weeks to be in with a chance of winning some goodies!

Oh, and before I go... check me out for getting featured on Paper Issues!

Thursday, 9 June 2011

Saving the Date: Waterfall Card Tutorial

As soon as I asked my husband-to-be if he'd prefer lollipop or filmstrip STDs, he immediately pricked up his ears. The plan was always that I was going to be making all the stationery and decorations myself,* but suddenly my man was offering assistance. It wasn't until we started making the STDs that I fully realised how grateful I was - and how good he is at doing stuff with paper ("It's just lady-tools, isn't it?").

* Later it turned out my mum would make a very large portion of the decorations too.


Anyway, we opted for a filmstrip-style design. But we wanted something a little different, a lot fun, and somewhat interactive. Here's what we came up with:


It's a postcard, a photo booth strip, and a waterfall, all in one. We received such awe-filled praise from our guests-to-be that, apart from feeling very pleased with ourselves, we want to share what we've done. So here's a little step-by-step on how to make a waterfall save the date postcard.

A few words of advice before you begin: decide on - and print - the final photos you want to use BEFORE cutting any card. It'll save you loads of time, stress and wastage. Even though you'll probably take some amazing photos that you love, you might have to let go of them and accept that they don't work. For this project the photos were portrait and roughly passport-sized (4.3cm x 5.6cm to be exact). All relevant measurements I give will relate to this size.

For the mechanics of the card:

1. Cut your card to size, and print your message on the back. (If you've chosen an image to print on the front, like we did, print this too now.) Our cards were postcard size - A6/C6.


2. Cut a strip of card that is as long as the postcard is wide and wide enough to be sturdy (2). Ours were 2.4cm wide by 10.5cm long.


3. Cut another strip that is as long as an A4 piece of paper, portrait-wise, and as wide as your photos (3). Ours were 4.3cm wide by 29.7cm long.

4. Measure where you want your small strip (4a) - about a fifth of the way up from the bottom of the card is good. Measure where the large strip needs to be folded - one end needs to join to the small strip (4b). And you don't want it to extend past the top of the postcard, so you'll need to make a fold there (4c).

Then fold and score the large strip like this:


so that the intervals between folds are half the height of your photos, except for the first one (the part where your large strip will join onto your small strip).

5. Fix the small strip across the postcard - with glue, double-sided tape, eyelets, brads, whatever you want. Just make sure you only fix it at the edges because the large strip needs to move underneath the small strip (5).

6. Fix the large strip to the small strip with glue or double-sided tape (4b again).

7. If you want to, back your photos with patterned paper:


- do this before sticking the photos down.

8. Then stick them down, the last photo in the sequence first (on top of the part that joins the small strip), by applying the glue or double-sided tape to the large strip and then putting the photo in place (it's much easier this way round, trust me!).

9. To make sure your recipients know what to do when they receive the card, give them a little instruction (9). Alternatively, you can punch a hole and add a ribbon if you prefer, or anything else you can think of.

Et voila!

It took us about 10 hours altogether to make 50 of these. That DOESN'T include the time we spent agonizing over the photos, which I don't really want to talk about! The chosen pics in the end were a compromise but we're essentially happy with them... except that we are a little gutted that this one had to be vetoed (yes, my fault, because I didn't like my expression):


Still, we had fun! I hope you like them!

Thursday, 10 February 2011

Let's Have a Little Heart-to-Heart

The February scraplift challenge on the True XOXO Girls blog is up, this month with this fantastic prize sponsored by Candy Shoppe Designs:


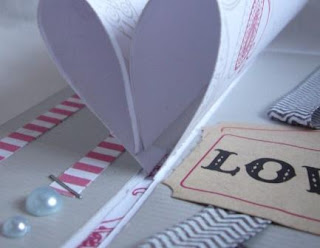
For February I decided to make something a little different. I gave you a little sneak here. I was playing around with paper and I thought, hey, since I won't be sending my valentine a card in the post (because I live with him), why not make a card that can absolutely not be posted? This is what I came up with:


And just because I was feeling like sharing the love, I made a little tutorial for this card so you can have a go yourself.

Step 1: Take a piece of card (not too thick) that is 30cm long and as tall as you wish (I think I went for about 18cm but it depends on how much 'heart' and how much 'flat' you want). Mark as below (in centimetres, at intervals of 7.5, 3.75, 7.5, 3.75 and 7.5).


Step 2: Cut where the dotted lines are and fold where the bold lines are, so you end up with this:


Step 3: Stamp on, or add patterned paper to, the middle part of the card. You will cover most of the pattern, but that's OK:


Step 4: Turn the card over and decorate the 'wings' (I stamped on mine because sticking another layer of paper would make them too bulky when it comes to the manipulation stage) and the sides of the card. The middle part should stay blank as this will be the card base:


Step 5: Roll up the corners:


Step 6: Turn the card back over and strategically position double sided tape, like this:


Peel off the backing tape and stick down, following the direction of the folds.

Step 7: Turn the card back over and add some double sided tape to the patterned edge of the wings, but don't peel off the backing just yet:


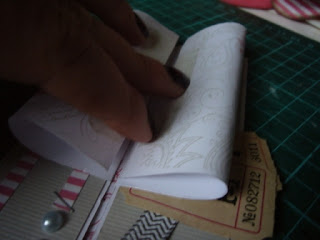
Step 8: Start to bend (NOT fold) the two wings, by bringing the edges together up high and then pushing down gently:


Step 9: Open the wings up again, add an a final strip of double sided tape along the inside middle of what is going be the heart:


At this point you'll need to take a little strip of card and roll it into a tight tube. I don't have a photo for this but you'll see why in step 11.

Step 10: Peel off the backing from the tape on the inside middle part of the card. Now fully bend the wings and push them down to make contact with the tape. It should be just enough to hold them in place while you take care of the rest:


Step 11: Peel the backing from the tape on the wings. Holding your little paper tube in place, bend the wings for a final time and stick them to each other, with the tube stuck in the middle. You'll need to reach inside the heart with your fingers and squeeze (ignore the disturbing metaphor there!):


Step 12: Make some hearts (I lost my photos for this). Add a length of floristry wire to each one (for the flat hearts I cut two of each and then stuck them together, thus concealing and holding in place the wire). You can then insert them into the little paper tube 'vase' stuck in the middle of the heart. If they're not too heavy, they'll stand up!


And that's it! If you do make this yourself, let me know because I'd love to see what people come up with. I'll be back on Sunday with more love. Until then, to borrow an apt phrase from a blogging friend of mine, scrap to your heart's desire!