Showing posts with label papercraft. Show all posts

Friday, 16 March 2012

Dublin in Mini

...nope, not in a mini, just in mini. In a mini album, in a mini weekend, in a minimally tourist and maximally family visiting kind of way.

I fancied folding some pieces of card to make a mini album of all the fantastic photos I was gonna take when we went to visit Dublin... but then I got ill, spent the whole of the Thursday in bed in the hotel, and then most Friday and Saturday with family. Plus my SD card decided that no, the nice photos I took on my solitary stroll around on Friday morning were not good enough, and converted them into randomly gigantic encrypted messes. It was easier to try to recreate the stroll and the photos than to work out how to save them from my evil SD card.

So the result is a mini album so far empty of photos but eagerly waiting. I happened to film the process for Gauche Alchemy, and you can also find the video on the 'my videos' page on this here blog of mine.

There are two more videos to go along with this one. They show specific techniques used in the making of this mini - but you'll have to wait! They'll be out later this month. For now, a little taster of the mini album:

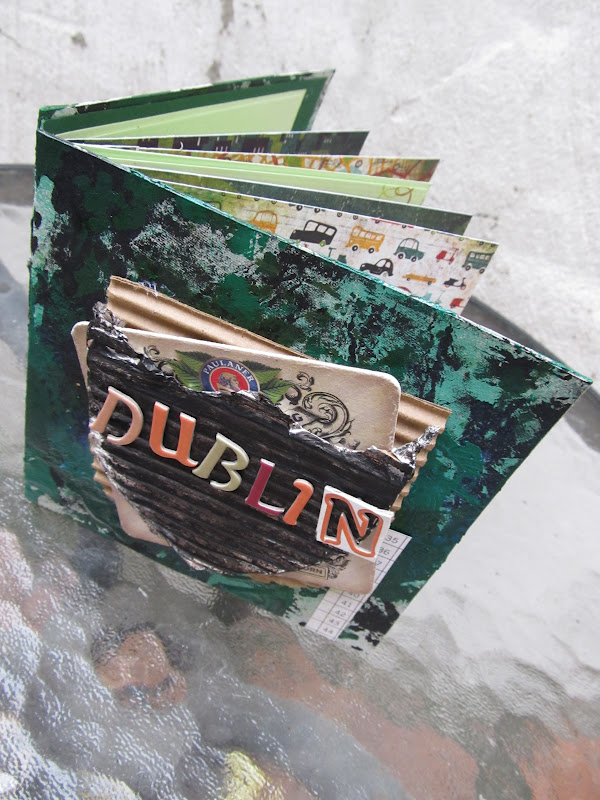
I spy Gauche Alchemy products!
See that ouchless cardboard? The coaster? The foil paper? All GA, baby! Go have a look at the GA blog and shop, and at my video too. And do let me know if you've had any annoying or even heart-wrenching experiences with digital images, cameras and SD cards. In my experience sharing is cathartic (plus it'll make me feel a little better to know I'm not the only sufferer).

Thursday, 15 March 2012

Roundup

Just a quick roundup of a few things today...

Cards for Boys
...are not soooo difficult, I have found lately:

that's a special birthday, that is

To get the pennants - which are stickers from Echo Park - to stand up, I first stuck them onto some paper, just up to the point where I wanted to curl them away from the card, and then adhered them by the remaining sticky part.

just like they're fluttering in the breeze
And I employed the old paper-weaving technique again for a friend's birthday card. A friend who plays the bass in a band. A hippy living, reggae loving friend.

that's another quite special birthday

Paper Piecing
Just a quick share of something I worked on for a certain wedding anniversary last year:


Stuff Going On
Don't forget the Gauche Alchemy DT Call, running till the end of the month. And don't forget the March Madness at Scrapbook Challenges - we're taking bets now, and the competition starts tomorrow! You gotta be in it to win it!


Intelligent Product Packaging
I really appreciate it when a manufacturer thinks about their packaging. Check out this freebie I got from Revlie's class:

ooh, canvas flowers!
And then you look closely, and see that they've also given you a nice thick acetate sheet with beautiful white doily patterns on:

I like acetate with patterns on. A lot.
Has anyone else come across really intelligent packaging of scrapbooking products? I want to hear about them! And why do you like them? Because they're green? Because you can reuse them? Do share!

Thursday, 26 January 2012

Bobbing and Weaving, Ducking and Diving, Picking and Choosing

What feels like a really long time ago I made this tray – for me. There was a second tray, destined for the husband’s lap, which never got altered.

Until now.

Over at Scrapbook Challenges it was my turn this month to post a technique challenge – so, thought I, the perfect opportunity to finish this two-part tray project!

My technique? Paper weaving. I thought about repeating the sunburst effect on his tray, but since good old checkers are really his thing, the paper weaving idea fit much better:

he loves the black and white
It's not finished - I need to add his name, laminate it and varnish the frame, so I'll post a nice picture when I've done all that.

But I liked it so much I did some more on a birthday card for our friend:

the birthday boy's gonna so totally, like, flip over this

If you want to see in-progress pictures of me weaving paper, get onto the Scrapbook Challenges forum!

***                   ***                   ***
In other news, the Gauche Alchemy mamas challenged me in December to make a video showing how to make a scrapbook layout with their mixed media products - for anyone who is stuck in mixed media canvas mode but wants to switch to layout mode and doesn't know where to start. Now, I want to add a little disclaimer here for the video quality: December was a tough month for me – it seems that I ate everything in my path, including all the hours in all the days, and I just couldn’t get to doing anything as properly as I wanted to. This project included. But to go with this GA blog post, here is the video nonetheless – and a promise that next month’s will be altogether more… together!


***                   ***                   ***
Finally, my trusty assistant, DJ the Dog, helped me pick out two winners for the SC blog hop RAKs here on AndHandmadeToo:


Winners, PM me your addresses – there’s a long-awaited trip to the post office I have to make anyway, so I may as well send all the packages in one go!

Friday, 16 December 2011

Scrapbook Challenges Sketch 273

It's been a long time since a Scrapbook Challenges sketch came about. The transition from Ning to SC's own site has been a priority though, and well worth it.

The sketches are back now, and number 273 has produced some brilliant interpretations from the DT. The sketch:

Scrapbook Challenges Sketch #273

My interpretation is... well, autumnal (just coming out of summer). That's the mood and season I was in when I made it - and that's how long it's been since an SC sketch! So nothing very Christmassy here, but inspiration nonetheless, I hope:

a rare photo of my dad
I used a rare photo of my dad from Father's Day this year - he's holding a chocolate orange (his favourite) cupcake that I made for him (and that I have to admit were even too sickly for me).  I used a lot of different brands on this page - Websters', Cosmo, Lily Bee, Basic Grey, Crate, Sass - because I wanted to get that brightness of colours going.

still loving those circles
Here, I punched a circle in the base layer and adhered some patterned paper to the other side to show through the window.

OK - over to you! Go to Scrapbook Challenges, sign up if you're not already a member, and find the inspiration!

Sunday, 20 November 2011

Christmas Already?

Time sure flies.

The flurry of post-wedding sorting, tidying, organising and documenting has only just started to calm down, and I find myself half-buried under an avalanche of card-making materials.

But it's the life I signed up for, I guess! Actually, this year, without a wedding looming in the near distance I feel very relaxed about Christmas preparations. Good thing, too, since I have nearly 100 cards to make for customers! The first batch has already gone, and I'm working on the second next week.

rolled paper scraps make a great Christmas tree
and give such interesting dimension to a card
the brief was traditional, but I like to add my own twist
again, great dimension from these baubles

and reusing last year's gift tags? genius!

 How about you? Have you started with Christmas yet? 


Friday, 18 November 2011

Punky Recipe - the Star of the Show

It's time for another Punky Scraps challenge! Don't try to resist, because this one is too good to miss.

Make a page from the following ingredients:
  • Stars
  • No patterned paper
  • Masking
  • Staples
  • Exposed cardboard
  • Book page
  • Bottle cap
  • Washi tape
Credits can only go to Inkadinkado and Tim Holtz for the star stamps
Not using any patterned paper was the biggest challenge for me - the biggest to date. (At least I know the need to use patterned paper will prevent my stash from ever getting out of control.)

I used everything on the list EXCEPT for the bottle cap because I FORGOT it. I had a Newcastle Brown Ale bottle cap somewhere (it has a star on it - perfect) but I only remembered it after I finished the page.

Love stars? Love ripping up cardboard? Look no further...
Again, as I mentioned in my previous post, I spent a LOT of time thinking about this page. I left it till the very last minute, and then woke up on the last day before deadline with the idea in my head. This time, the ingredients were decided for me; it was the laying out of the page that was taking time to come into focus.

I would LOVE to see people playing along with this challenge especially, so please pop over to Punky Scraps and check out the inspiration from the DT.


Thursday, 21 July 2011

Stars in Their Eyes

I can't resist quickly celebrating the fact that I've been selected again for publication in the Scrapbook News and Review magazine - out now - with the page I made about my brother a while ago.

Things are moving very quickly for me at the moment and it's hard not to get dizzy with it all. It's an exciting time!

Some celebratory stars:


I made these by printing a template directly onto the card, cutting them out and ensuring there were flaps on the outside edges, and scoring them so they bend outwards. I cut out the accent parts and stuck them on. Then I proceeded to remove my fingerprints by gluegun, sticking two 'halves' of a star together back-to-back, and pressing down on the points so they bent at the scored  lines and the stars became 3D. They'll hang by fishing wire, from the ceiling of the dance hall at our wedding venue.

Thursday, 14 July 2011

Flowers coming out of my ears

quite.

Wedding flowers, beautiful wedding flowers. Beautiful handmade wedding flowers. I've just made the bouquets for the bridesmaids, and I can't wait any longer (I can't wait at all, it seems) to share them with you.

I was so unsure for so long how I wanted the bouquets to turn out... I had one idea, then another, then went back to the first, then had a third, a fourth, and so on. Then we changed our minds about the bridesmaids' dresses, and that totally threw all bouquet plans up in the air.

But a late April visit to bluebell-carpeted woods convinced me that uniformity would be most visually impressive. And so I got to work. The result is a simple, understated and elegant little bouquet which should hold up pretty nicely against the bridesmaids' dresses.


Now just to solve the problem of my own bouquet...

Tuesday, 12 July 2011

Wedding Trees

What feels like a long time ago I posted about trees. I've been thinking a lot about them since then (and I still have to scrap that photo I took) - in the context of a wedding celebration.

Trees fascinate me, and how people live with them and use them all over the world sometimes just blows my mind.

Tree bridge at Cherrapunji, India (source: www.world66.com)

Treehouse in somebody's garden, NY State (source: www.treehouseworkshop.com)

Wishing tree in Phuket, Thailand (source: www.travelerfolio.com)

I love wishing trees as a way of bringing people together for a common reason. For that reason, I'm choosing to feature trees in the wedding. But I'm going to be mean and only share sneaky peeks of them right now.


Actually, they're quite generous, as far as sneak peeks go, don't you think? The first one is mine, the second one my mum made. I'll elaborate on them soon....

Monday, 4 July 2011

Red, White and Blue

Independence Day in the USA means a celebration in red, white and blue; a European in a multi-cultural city makes something in those colours, but for a different reason.

A couple of friends of ours announced their engagement last week. They live in Delft, in the Netherlands. A windmilly, red, white and blue Congratulations card is snailing its way to them as we speak.


Thursday, 23 June 2011

Wedding Flowers

This week I've been busy on the beginnings of bouquets for my bridesmaids.

Here's a little peek of something I've made so far:


And here's a peek of some of the flowers my mum has made:


I'm still trying to pin down all my ideas for my own bouquet. They're all still flying around in my head. If you have a tip, an idea, or a link to a bouquet that made you go 'ooooh', please let me know!

Thursday, 16 June 2011

My Heart Belongs To Daddy

Although I can't claim I ever was a daddy's girl (nor much of a mummy's girl, for that matter), I can say with certainty that as I've grown up my relationship with my dad has also grown. I now see him as full of wisdom, happy to give advice if I ask for it, supportive and then some, relaxed enough to trust my judgement on things, uncomplaining, and accepting of those traits I have which set me apart from the rest, and from him.

I know this post is kind of coming a few days early, but it's because I want to share a little tutorial for the card I made for this month's Scrapbook Challenges card feature and Fathers' Day.

I made a card that combines the fashionable accordion flower with the more old-fashioned rosette.

So, grab your materials: cardstock, concentrically sized circles, and a strip of paper to score into the accordian flower. I embossed the lighter blue cardstock with a woodgrain folder to give the card more masculinity.

 
Ink all the edges of all your shapes, fold the cardstock into a card and stick the embossed part onto the cardbase. Then start to make the flower.

Score the strip of paper (30cm in length; the width should measure half the diameter you want the flower to be) at 1cm intervals and then fold alternately (mountain and valley folds for origamists). Stick together with double-sided tape (this is what you see in the picture above).


Push one edge of the flower in towards the centre. This is really where the magic happened for me - the first time I made one, it all suddenly just popped  into place. Hold it down with one hand, and stick your largest circle on to hold it in place. I'd recommend using a hot glue gun for this.


Then stick on the medium circle and then the small circle. It's a good idea to punch an extra one to stick on the back so it's easy to stick the flower to the card.


Then cut two ribbon-shaped  strips (or, yes, use ribbon!) and stick them onto the back before sticking the flower onto the card (again, with a glue gun).


Finish off by cannibalising some wrapping paper, or using specific scrapbooking fathers' day embellishments.

A quick reminder: remember this page I made recently? Well, it's up for lifting on the True XOXO Girls blog - get your entries in in the next two weeks to be in with a chance of winning some goodies!

Oh, and before I go... check me out for getting featured on Paper Issues!

Sunday, 1 May 2011

Question: What's Red, Frilly and Spanish?

Answer: a flamenco dancer!


I've always admired fashion designers, not only for the clothes they make, but specifically for the simple, elegant lines they use when sketching their models and ideas. You might remember I posted here about trying to draw. Well, I tried again, and I combined it with a little paper piecing, a little Copic colouring and a lot of tiny rolled flowers, and I got this.


I tried to employ that fashion designer style of sketching - underneath the bold black pen were many pencil lines, until I committed and rubbed them out. I kept her face simple, her arms simple but with a bit of perspective, and even braved a foot this time.


I like her. I think she's pretty. And I love her hair. And the fact that I made her.

Tuesday, 5 April 2011

A Lady and Her Dress

I discovered something at the weekend - I can draw a bit. I was sketching and I thought to myself, wouldn't it be nice to be able to draw like a fashion designer? So I sketched some more, and then got all brave and took out a black Copic pen and committed. I drew strong lines over my pencil sketches and did not look back.

This is not what my wedding dress looks like by the way.

Then the trusty Copic markers came out - they're really quite good - and a bit of paper shaping, and voila - a lady and her dress.

A teeny smudge or a snub nose? You decide...

It's a postcard, which means I haven't given up on my Postcard a Week challenge. But it's a departure from mail art for sure, into the realms of I-know-not-what-I-can-do. It's inspired by the fact that a couple of weeks ago I collected my wedding dress from England, and it now sits in my wardrobe to be peeked at (only by me though) every other day. Which is all Rather Exciting. Especially as I also have all but one item of the rest of my outfit, meaning that I am going to be trying it all on about once a week from now until September.

I'm not brave enough to draw feet yet. But it was important to get the crinoline in there! 

I'll be working on catching up with the postcards this week - after this, who knows what I'll come up with?

Tuesday, 1 March 2011

Thoughts on Trees

Trees are pretty incredible, if you stop to think about them. I rarely have time to pause and appreciate their beauty, strength and resilience, let alone their place in time and in the cultural history of humanity. Even less so their calming, quieting effect. But here I find a brief moment of tranquillity, as we begin a new month, to wonder and to be awed by them.

At the weekend we went to the forest again - a favourite place for us and for our dog. It's actually an arboretum, so we get to admire trees from all over the world as we hike around. It's the place we've always been able to wedding plan without the stress or distractions of external factors. At the weekend we needed to get away from these stresses and distractions a little more than usual. A few hours later, we were back home for lunch with lightened hearts and a solution.

So my postcard this week was a built from this - a little collage of a tree made from a leaflet that was advertising a wedding show.


An addendum: even though the arboretum is impressive, the most breathtaking tree that I've seen lately lives in a park just down the road from us.


Each time I see it I'm struck by its massiveness. How old it must be! This one really is an incontrovertible symbol of life. And just to put it into perspective:


It's got me to thinking how we'd both love to incorporate The Tree as a symbol into our wedding. Watch this space...

Thursday, 10 February 2011

Let's Have a Little Heart-to-Heart

The February scraplift challenge on the True XOXO Girls blog is up, this month with this fantastic prize sponsored by Candy Shoppe Designs:


For February I decided to make something a little different. I gave you a little sneak here. I was playing around with paper and I thought, hey, since I won't be sending my valentine a card in the post (because I live with him), why not make a card that can absolutely not be posted? This is what I came up with:


And just because I was feeling like sharing the love, I made a little tutorial for this card so you can have a go yourself.

Step 1: Take a piece of card (not too thick) that is 30cm long and as tall as you wish (I think I went for about 18cm but it depends on how much 'heart' and how much 'flat' you want). Mark as below (in centimetres, at intervals of 7.5, 3.75, 7.5, 3.75 and 7.5).


Step 2: Cut where the dotted lines are and fold where the bold lines are, so you end up with this:


Step 3: Stamp on, or add patterned paper to, the middle part of the card. You will cover most of the pattern, but that's OK:


Step 4: Turn the card over and decorate the 'wings' (I stamped on mine because sticking another layer of paper would make them too bulky when it comes to the manipulation stage) and the sides of the card. The middle part should stay blank as this will be the card base:


Step 5: Roll up the corners:


Step 6: Turn the card back over and strategically position double sided tape, like this:


Peel off the backing tape and stick down, following the direction of the folds.

Step 7: Turn the card back over and add some double sided tape to the patterned edge of the wings, but don't peel off the backing just yet:


Step 8: Start to bend (NOT fold) the two wings, by bringing the edges together up high and then pushing down gently:


Step 9: Open the wings up again, add an a final strip of double sided tape along the inside middle of what is going be the heart:


At this point you'll need to take a little strip of card and roll it into a tight tube. I don't have a photo for this but you'll see why in step 11.

Step 10: Peel off the backing from the tape on the inside middle part of the card. Now fully bend the wings and push them down to make contact with the tape. It should be just enough to hold them in place while you take care of the rest:


Step 11: Peel the backing from the tape on the wings. Holding your little paper tube in place, bend the wings for a final time and stick them to each other, with the tube stuck in the middle. You'll need to reach inside the heart with your fingers and squeeze (ignore the disturbing metaphor there!):


Step 12: Make some hearts (I lost my photos for this). Add a length of floristry wire to each one (for the flat hearts I cut two of each and then stuck them together, thus concealing and holding in place the wire). You can then insert them into the little paper tube 'vase' stuck in the middle of the heart. If they're not too heavy, they'll stand up!


And that's it! If you do make this yourself, let me know because I'd love to see what people come up with. I'll be back on Sunday with more love. Until then, to borrow an apt phrase from a blogging friend of mine, scrap to your heart's desire!