Showing posts with label technique. Show all posts

Monday, 26 March 2012

Metal Breakdown

That mini album I made for Dublin – the one with no photos – gave rise to not one, not two, but three video tutorials for Gauche Alchemy. The first one showed the structure of the mini. I think we missed the second one, about getting messy with paint and textures of backgrounds. (You can see them all here.)

And then there’s the third, about how to achieve a faux metal look from foil paper:


The Gauche Alchemy team is riding high at the moment – there are lots of achievements, great techniques and fabulous little projects going on, so if you’re feeling stuck for inspiration or fancy trying something new, pop over to the GA blog.

That's all for now!

Friday, 23 March 2012

A Litte Misty-Eyed

Last week I mentioned Revlie's class and how great it was to be in that freedom-to-create-without-boundaries environment... I also mentioned how I was a long way off finishing either of the projects...

...yep, OK, you guessed what's coming - I finished one of them!

love is... embracing the new
This mini album was made with a focus on Tattered Angels products in mind.
I don't know how many layers
I am so very, very happy with this project and I want to tell you why:
  • During the class, Birgit did some demos for us and then we'd go away and recreate a page with her techniques. It was so useful to actually see first hand how layers can be built up. (What was also very sweet was that some of the ladies were translating into my ear as we crowded around to watch Birgit... who was speaking Dutch, of course, since we were in the Netherlands.)
yep - it's punchinella making another appearance!

  • Having the free run of the whole product selection was a joy - but more importantly, it made me realise the gulf in quality between these mists and the ones I currently own (Cosmic Shimmer Mists). Tattered Angels' mists still clog sometimes, but the fineness of the glitter, the smoothness of the spray and the blendability of the colours is far, far better than anything I've used before. (Interestingly, I've just ordered some Dylusions, so we'll see how they compare. In fact, I am going to go and buy a Tattered Angels pack from the art shop down the road once I get paid, so maybe I can do a product comparison video...)
I really have fallen in love with these products

  • I was so happy during the class just to be creating, with no pressure from anywhere. One attempt that I wasn't happy with even got redone (my attention span is such that I am hardly ever (read: never until now) able to redo creations).
  • It has opened my mind to lots of other products, to techniques, to different canvases and to the option of using colours and motifs that I usually avoid.
pink AND a butterfly, on the same page? Who are you and what have you done with Cheryl?

  • It made me realise that it is actually pretty comfy outside of my comfort zone.
in for a penny...
Basically we did our work on a sheet of paper, and once it had dried, we stuck it onto a sheet of cardboard (cut from a box), and then punched holes and fixed the pages together into a book.

So what did Birgit teach me?
  • I learned how to employ screens with spray, ink and sponge, gesso and credit card, Glimmer Glam and Glimmer Glaze.
the swallow is a screen that was painted with Glimmer Glaze, stamped onto the page and then left to dry before misting over. It acts as a resist and comes in a large range of shades.

  • I learned how to use gesso and Glimmer Mists together.
  • I learned how Chalkboard Mists and I are a match made in heaven.
  • I learned that all of that mist and glaze and ink is pretty hard to clean off hands and nails.
  • I learned how to forget about patterend paper.
  • I learned how to start thinking properly about mixed media art.
  • And, most important of all, I (re-)learned how to have fun. I've been putting too much pressure on myself lately, and now I know I have to sit back and have fun sometimes.

Watch this space for news on the Tattered Angels vs Dylusions face off. If anyone wants to throw in some Mr Hueys too, feel free!


Tuesday, 28 February 2012

I Go Out Walking...

A little while ago I showed the sneakiest of peeks of a project I’m going to be working on all year. Well, today’s the day for the big reveal over at Gauche Alchemy!

I always knew I was collecting postcards for a reason. (Apparently I have a bit of a thing for them.) Turns out this is it. I used to have hundreds covering my bedrooms walls at university – you know, the kind they give out as flyers or adverts or art – but they were long gone, recycled in one of my fits of ruthless cleaning over the years. Now, each time we go to a bar or museum or someplace similar we pick up the interesting ones, and the collection was starting to add up again. So now is my chance to give them all a reason to exist! Read on…

My aim for this year is to make up a mini book, filled with 52 postcards, each of which is scrapped with a photo taken during a weekly walk, with each photo inspired by a weekly prompt. The idea’s not new, I know, but I did think that the Scrapbook Challenges forum could benefit from a year-long project like this, so that is where you can find the prompts and members’ responses to those prompts if you’re interested in playing along (some catching up will be required by now, but the load is not too much. Besides, the prompts are guaranteed to get you thinking!).

I WILL stick to this project
this Gauche Alchemy boot wasn’t made for walking, it was made for adorning my mini book

go out walking - you might find dinosaurs (or other exciting stuff)
I’ve been keeping to the programme on the photograph front, and I’m almost up to date on the scrapping, too. Here’s what I’ve done so far, photograph-wise:


Thanks to Gauche Alchemy and their eclectic array of products, I was able to pick and mix and create a cover for this mini book that was perfectly suited to the theme of going on walks and taking photos. Here’s how the cover came together:


Products I used (all from Gauche Alchemy)
Color Kits – It’s All Gravy, Blue Streak, Purple People Eater
PVC Punchinella
Ouchless Cardboard
Mail Art kit
Nearly Nekkid kit
Regular Punchinella

I can’t tell you strongly enough how easy it is to come up with projects from the GA Color Kits – with them, a project pretty much makes itself. For example, I’ve nearly used up the whole Banana Hammock kit (even though it’s a difficult colour for me), and I’ve got a project in the pipeline using the (peach?) kit which is a colour I NEVER thought I’d use. On top of everything they’re great value because you get a lot of bits and pieces and some really unusual items in them. (I’ll tell you a secret… when I applied to be part of the Gauche Alchemy DT, they asked me which of their products I liked the best. I spent a paragraph gushing about how inspiring these Color Kits were – and that was just from the product photos in the GA Artfire store! Now I’ve got my hands on them – wow. I have not been disappointed!)

Thursday, 26 January 2012

Bobbing and Weaving, Ducking and Diving, Picking and Choosing

What feels like a really long time ago I made this tray – for me. There was a second tray, destined for the husband’s lap, which never got altered.

Until now.

Over at Scrapbook Challenges it was my turn this month to post a technique challenge – so, thought I, the perfect opportunity to finish this two-part tray project!

My technique? Paper weaving. I thought about repeating the sunburst effect on his tray, but since good old checkers are really his thing, the paper weaving idea fit much better:

he loves the black and white
It's not finished - I need to add his name, laminate it and varnish the frame, so I'll post a nice picture when I've done all that.

But I liked it so much I did some more on a birthday card for our friend:

the birthday boy's gonna so totally, like, flip over this

If you want to see in-progress pictures of me weaving paper, get onto the Scrapbook Challenges forum!

***                   ***                   ***
In other news, the Gauche Alchemy mamas challenged me in December to make a video showing how to make a scrapbook layout with their mixed media products - for anyone who is stuck in mixed media canvas mode but wants to switch to layout mode and doesn't know where to start. Now, I want to add a little disclaimer here for the video quality: December was a tough month for me – it seems that I ate everything in my path, including all the hours in all the days, and I just couldn’t get to doing anything as properly as I wanted to. This project included. But to go with this GA blog post, here is the video nonetheless – and a promise that next month’s will be altogether more… together!


***                   ***                   ***
Finally, my trusty assistant, DJ the Dog, helped me pick out two winners for the SC blog hop RAKs here on AndHandmadeToo:


Winners, PM me your addresses – there’s a long-awaited trip to the post office I have to make anyway, so I may as well send all the packages in one go!

Sunday, 22 January 2012

Guest Creative Scrapper

And so for the exciting news!

Kristine at Creative Scrappers contacted me last year to see if I wanted to be a guest on their blog... and of course I said yes. Why would I say no when the blog is just about my favourite source of sketch and layout inspiration?

You can read my guest post on the Creative Scrappers blog but I'll show you what I made with sketch #192 here:

Creative Scrappers sketch #192
Our first engagement photoshoot was uncomfortable for me. I am not great at posing and really needed to be directed more strongly. Out of 500 photos there were about 50 I liked, and about 30 made it into the final collection. Which all makes me more happy that we got this one - full of attitude, looking totally comfortable and acting quite the poseurs.

rockabilly say yes!


The page is a memory of our discussion about props: he had his hat, I had my handbag... and then at the last minute I said 'Bring your guitar!'.

me and him, in object form
Echo Park collections make up the majority of this layout - I seem to have kept scraps from Life is Good and For the Record which match well with Happy Days. You'll also find some Lily Bee, Crate and Jenni Bowlin in there. Credit also has to go to Basic Grey for their postal stamp... don't you just love the black on black of the heat embossed postmark?

I'll be using this technique again
A big thanks to Kristine for asking me to be part of the Creative Scrappers scene! If you haven't heard of them already, you should go check them out now. They are really very, very good.

Tuesday, 27 December 2011

Just a Note

Well, I hope everyone had a wonderful Christmas. We certainly did.

I have a little story to tell today. It's about the time when I got married, and I forgot to bring my vows with me to the ceremony.

I had been thinking about what to say for months, rewriting, deleting, starting again... I never thought I would have such trouble. I've always been able to express myself in writing - much better than in speaking. Anyway, I was planning to write them out by hand and take them with me. But in the rush of things (you can read about my veil incident here) I clean forgot. It's not like I'd committed them to memory or anything - I needed those vows!

I remembered just in time to quickly scribble from memory a few of the things I wanted to say. But for the most part I was so mad at myself, and felt like I was doing the husband an injustice, that I rushed through them and failed to make the moment what it should have been. At least, that's how it felt, but he will say otherwise.

So to make things up to him, I have now written out the vows in full. I popped them in an envelope and gave them to him on Christmas morning. I also gave him this:

music, cake, love - our wedding in a nutshell
It's a Tagxedo representation of my vows, rendered in the wedding colours and framed for posterity. He loved it (of course!).

Tagxedo makes you feel clever

I'm still annoyed that the one time I really truly needed to express how I felt, I fell down. But it could've been worse, and it certainly doesn't mean that I don't feel what I tried to say I felt. This print, though, makes me feel a lot better. It's added the full stop to my sentence, the vow saga is now over, and I feel complete.

And on that note, I'll announce here that I'm going to take a little break from blogging - just a week or so while everyone recovers from Christmas. See you in the New Year!

Friday, 16 December 2011

Scrapbook Challenges Sketch 273

It's been a long time since a Scrapbook Challenges sketch came about. The transition from Ning to SC's own site has been a priority though, and well worth it.

The sketches are back now, and number 273 has produced some brilliant interpretations from the DT. The sketch:

Scrapbook Challenges Sketch #273

My interpretation is... well, autumnal (just coming out of summer). That's the mood and season I was in when I made it - and that's how long it's been since an SC sketch! So nothing very Christmassy here, but inspiration nonetheless, I hope:

a rare photo of my dad
I used a rare photo of my dad from Father's Day this year - he's holding a chocolate orange (his favourite) cupcake that I made for him (and that I have to admit were even too sickly for me).  I used a lot of different brands on this page - Websters', Cosmo, Lily Bee, Basic Grey, Crate, Sass - because I wanted to get that brightness of colours going.

still loving those circles
Here, I punched a circle in the base layer and adhered some patterned paper to the other side to show through the window.

OK - over to you! Go to Scrapbook Challenges, sign up if you're not already a member, and find the inspiration!

Wednesday, 16 November 2011

My Creative Process

I've had a few questions lately about my creative process, so I wanted to talk a little about that today. I've been asked whether I plan everything on a page or just go with the flow. I'll focus on layouts today.

Usually these days I start off with a sketch - Scrapbook Challenges and Punky Scraps DT duties provide me with most of them, but I also like to look at Creative Scrappers and others that come up along the way.

Punky Scraps Challenge 34 sketch
my take


Then I spend a good few days thinking about the theme of the layout - I'm finding I like to tell a story on a page, but not necessarily with words. My journalling is usually on the back of the page these days, or hidden in an envelope or pocket somewhere on the page. So I think about the story, and which embellishments I have that can help me tell that story. Gauche Alchemy kits are great for finding the right bits and pieces.

I'll usually re-draw the sketch myself, adding notes about layers, embellishments, techniques and so on.

Next - and I find this Absolutely Important - I select the Most Appropriate background paper (I'm making 12x12 and A4 layouts at the moment). This is the true beginning. I have often made the wrong selection. I rarely go back and redo a page if I've already finished it. But if I haven't yet begun, or have only just begun, I will go back and select the right paper.

From this, the colours and textures will start to flow. Keeping the sketch in mind, I think about the page layer by layer - do I want the rub-on under the paint? Should I mist and mask the base paper? Can I stamp over that series of paper strips? Can I stamp over that stamp already there?

And then I get started. I roughly follow the sketch, but don't get panicked if things start to go off course. It's an organic process, and a page may turn out looking very different to a sketch in the end. I make mistakes, and accept them. I commit.

I've made a few 'test' pages, practising techniques and so on, but I've never been happy with them. I seem to be happier experimenting as I go. And it's this experimenting that is helping me develop my skills and broaden my repertoire.

Take, for example, the punchinella that comes from Gauche Alchemy. There has to be more to it than just layering it underneath something, right? Play with it! Test it! Push it to its limits! There are LOADS of things you can do. See for yourself:


And a bonus this month:


the card I made with the punchinella resist technique

Experimenting is so important for the creative process. You can decide what you like doing, what you don't like doing, what you're better at, what you want to investigate more.

Go experiment!


Saturday, 24 September 2011

Watching the Seasons

The final September challenge over at Punky Scraps is up and running - and it's a beauty. Team B picked an element each and Team A had to make a page up from this list.

Michelle - Use canvas (anything canvas)
Nat - use this picture to inspire you:
Elin - use chipboard
Camilla - use 3 staples
Mandy - B&W photo or image
Maureen - make it monochromatic

 For the canvas I used part of a Pink Paislee canvas number border; I used chipboard letters; 3 staples in the top right-hand corner; a sepia-tone photo for the B&W; and tried my hardest to make it monochromatic whilst still being inspired by the image.


The photo on this page is a picture of a watercolour painted by my mum. In the envelope is a story about how I come to have a photograph of this painting.

So what did I do on this page? Because there's a hell of a lot going on! Well... I stamped some Inkadinkadoo leaves onto a page from an old book and cut them out so that I could layer them up. I mixed a little water with acrylic paint and let it run down the page. I coated the inside of an embossing folder with texturised paint and ran a piece of plain paper inside it through the Big Shot to achieve the woodgrain effect (still LOVING woodgrain!). 


 And I used lots of bits and pieces - from Echo Park's For the Record, from Webster's Pages, from October Afternoon, Graphic 45 and Artemio.

Go join in - there's still a week to take part!


Tuesday, 19 July 2011

It Must be Alchemy

I have some great, great news to share!

I'm getting married!

....oh, wait, we already knew that. For, like, three years.

So what is it then?

***

We-ell... a little while ago I made a video tutorial as a job application:


and I got the job!

From September, I'm going to be one of Gauche Alchemy's two video tutorial masters! You can read all about their new DT here. I am so excited to be an Alchemist, to work with all those talented artists, and to be able to display this badge on my blog:


Here is a still of the layout that was the product of the video:


From September, look out for more awesome video tutorials from me which will feature lots of yummy products from the Gauche Alchemy store!

Sunday, 19 June 2011

Punky Scraps Challenge 20: 5,4,3,2,1...


Challenge number 20 is up at Punky Scraps: to create a page using the following:

5 photos
4 alphas
3 patterned papers
2 colours of mists/pain
1 stamp
and also incorporate the colour blue.

My layout for this challenge looks like this:


Five photos - yes! I've been collecting these over the years and so badly wanted to use them on a page but am scared these days of using too many photos on a page. Perfect timing the challenge! Four alphas - yes, if you count either a different colour (white and black Thickers) or my own handwriting. Three patterned papers - yes: the background and two little flags on the right. Two colours - well, I used a blue home-made paint mist (and it worked!) and some white gesso. One stamp - that's the little star imprint in the gesso.

Oh, and blue - well, yes :-). The little piece of ephemera is actually a part of the most awesome event leaflet I've ever seen. It's a few pages full of really old circus-style adverts for events going on at one of our favourite local venues, aptly named (for this layout) 'Magic Mirrors'. It's where we go dancing - it has a proper wooden dance floor and a glass dome in the ceiling that splits sunlight into rainbows on the inside - no need for a glitterball in the summer when it's still light at 10.30pm.

My home-made paint spray. Proud!


I actually used a Scrapbook Challenges sketch for this one: number 256, which looks like this:


Go and get Punky at Punky Scraps by joining in the challenge. You know you want to!

Thursday, 16 June 2011

My Heart Belongs To Daddy

Although I can't claim I ever was a daddy's girl (nor much of a mummy's girl, for that matter), I can say with certainty that as I've grown up my relationship with my dad has also grown. I now see him as full of wisdom, happy to give advice if I ask for it, supportive and then some, relaxed enough to trust my judgement on things, uncomplaining, and accepting of those traits I have which set me apart from the rest, and from him.

I know this post is kind of coming a few days early, but it's because I want to share a little tutorial for the card I made for this month's Scrapbook Challenges card feature and Fathers' Day.

I made a card that combines the fashionable accordion flower with the more old-fashioned rosette.

So, grab your materials: cardstock, concentrically sized circles, and a strip of paper to score into the accordian flower. I embossed the lighter blue cardstock with a woodgrain folder to give the card more masculinity.

 
Ink all the edges of all your shapes, fold the cardstock into a card and stick the embossed part onto the cardbase. Then start to make the flower.

Score the strip of paper (30cm in length; the width should measure half the diameter you want the flower to be) at 1cm intervals and then fold alternately (mountain and valley folds for origamists). Stick together with double-sided tape (this is what you see in the picture above).


Push one edge of the flower in towards the centre. This is really where the magic happened for me - the first time I made one, it all suddenly just popped  into place. Hold it down with one hand, and stick your largest circle on to hold it in place. I'd recommend using a hot glue gun for this.


Then stick on the medium circle and then the small circle. It's a good idea to punch an extra one to stick on the back so it's easy to stick the flower to the card.


Then cut two ribbon-shaped  strips (or, yes, use ribbon!) and stick them onto the back before sticking the flower onto the card (again, with a glue gun).


Finish off by cannibalising some wrapping paper, or using specific scrapbooking fathers' day embellishments.

A quick reminder: remember this page I made recently? Well, it's up for lifting on the True XOXO Girls blog - get your entries in in the next two weeks to be in with a chance of winning some goodies!

Oh, and before I go... check me out for getting featured on Paper Issues!

Sunday, 20 February 2011

Tester Page

OK - this is a tester page. It's a layout using many different techniques and styles - a horrible mish-mash of things. I don't like it, but I wanted to try a lot of different approaches and I'd rather have one whole page I'm not happy with than seven pages which I mostly like but contain little bits I'm not happy with.


Some thingsI tried were mixing (if not matching) paper patterns, masking/misting, covering doilies with Cosmic Shimmer Mist, making flags with ribbon and sticks...


 ... heavy embossing on white-backed paper...


 ... lots of paper layering...


... building up layers on nice bought chipboard shapes (these ones from the Restoration collection)...


.... and painting and stamping on plain chipboard...


This page was a result of me editing a long document for many hours (days, in fact) and every now and then remembering this thing I once did called scrapbooking... and pining for a chance to stick and cut and stamp and paint, and then going totally overboard once I finished working on the document. Like a kid in a candy shop, you might say. So, I'm not happy with it (I didn't even give it a title), but I'm sharing it to show how important to me planning and spending time thinking about a page is. I actually made another layout straight afterwards, but it was one that had been brewing for a few weeks, and I'm infinitely happier with it. I'll share it in a fortnight or so, when the XOXO March challenge is up and running.

Thursday, 10 February 2011

Let's Have a Little Heart-to-Heart

The February scraplift challenge on the True XOXO Girls blog is up, this month with this fantastic prize sponsored by Candy Shoppe Designs:


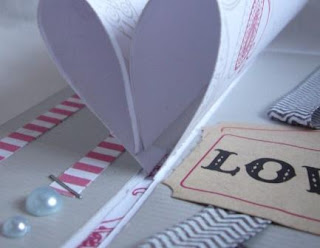
For February I decided to make something a little different. I gave you a little sneak here. I was playing around with paper and I thought, hey, since I won't be sending my valentine a card in the post (because I live with him), why not make a card that can absolutely not be posted? This is what I came up with:


And just because I was feeling like sharing the love, I made a little tutorial for this card so you can have a go yourself.

Step 1: Take a piece of card (not too thick) that is 30cm long and as tall as you wish (I think I went for about 18cm but it depends on how much 'heart' and how much 'flat' you want). Mark as below (in centimetres, at intervals of 7.5, 3.75, 7.5, 3.75 and 7.5).


Step 2: Cut where the dotted lines are and fold where the bold lines are, so you end up with this:


Step 3: Stamp on, or add patterned paper to, the middle part of the card. You will cover most of the pattern, but that's OK:


Step 4: Turn the card over and decorate the 'wings' (I stamped on mine because sticking another layer of paper would make them too bulky when it comes to the manipulation stage) and the sides of the card. The middle part should stay blank as this will be the card base:


Step 5: Roll up the corners:


Step 6: Turn the card back over and strategically position double sided tape, like this:


Peel off the backing tape and stick down, following the direction of the folds.

Step 7: Turn the card back over and add some double sided tape to the patterned edge of the wings, but don't peel off the backing just yet:


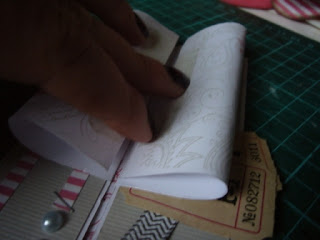
Step 8: Start to bend (NOT fold) the two wings, by bringing the edges together up high and then pushing down gently:


Step 9: Open the wings up again, add an a final strip of double sided tape along the inside middle of what is going be the heart:


At this point you'll need to take a little strip of card and roll it into a tight tube. I don't have a photo for this but you'll see why in step 11.

Step 10: Peel off the backing from the tape on the inside middle part of the card. Now fully bend the wings and push them down to make contact with the tape. It should be just enough to hold them in place while you take care of the rest:


Step 11: Peel the backing from the tape on the wings. Holding your little paper tube in place, bend the wings for a final time and stick them to each other, with the tube stuck in the middle. You'll need to reach inside the heart with your fingers and squeeze (ignore the disturbing metaphor there!):


Step 12: Make some hearts (I lost my photos for this). Add a length of floristry wire to each one (for the flat hearts I cut two of each and then stuck them together, thus concealing and holding in place the wire). You can then insert them into the little paper tube 'vase' stuck in the middle of the heart. If they're not too heavy, they'll stand up!


And that's it! If you do make this yourself, let me know because I'd love to see what people come up with. I'll be back on Sunday with more love. Until then, to borrow an apt phrase from a blogging friend of mine, scrap to your heart's desire!