Tuesday 22 June 2010

Pretty in Pink

Today was a close friend's daughter's christening in London. I wanted to make something special for baby Rosetta, or Rosie, something that she wouldn't get from anyone else. So I purchased a box frame, a few embellishments, and prepared to go pink.


First of all, I painted the outer frame in a dark pink and the inner frame in a lighter pink. Then I cut a square of patterned paper (I can't remember what it is or where it's from, I've had it so long) to fit in the recess. I cut a big letter 'R' for Rosetta from pink cardstock, and a slightly smaller one from a sheet of paper from the Basic Grey 'Bittersweet' collection.


After sticking down some flowers and buttons I adhered the letter to the background with foam pads so that it stands out.


Two of the embellishments I bought were a tiny basket and a bunch of tiny pink roses. I arranged these in the bottom corner of the frame, keeping one aside for decorating the letter. I tied the rose to the letter with some pink ricrac.


And added some buttons to finish of the decoration of the letter. To decorate the frame, I simply stamped a line of flowers along one side.


I finished off the frame with a tiny wooden pram, stained white. That's it. I hope mummy likes it. And I hope it'll stick around long enough for Rosetta to know it!

Thanking a Man

This is a card I made for one of my fiance's students. As a thank you and goodbye present, the student brought in some good wine, which deserved a thank you card. I used pages from an old book to create the bunting, and flyer for a music event that someone handed to me on the street.

Craft Classes: Success!

So, yes, they were a success, and I got to teach words the students'll be able to surprise their teachers with - like 'bling', 'squidgy', and 'glimmer' :-).

Just to recap, the aim was to make a 30x30cm piece of paper into a folded mini-album, like this one:


After initial shyness on the first day, I began to see a lot of creative cogs moving in the girls' minds, and considering most of them said they hadn't done anything like this before, it was very rewarding. The work they produced was outstanding! Here they are, hard at work:


A number of the girls also came out of their shell and spoke a lot more English to me as the week progressed. The two who were the most shy in the beginning were quit chatty at the end, and produced some really good work:


And this is everyone with their finished mini-albums:


I had a great time, and learned A LOT about giving classes, both in terms of crafting and language teaching. It was really fun! I'm pretty sure they all felt the same! Thanks girls, and thank you, Susan, for giving me the opportunity to give these classes! Here's to more in the future... Once more, for posterity:

Monday 21 June 2010

Sneak Peek: Square Mini

Hey there. So, totally characteristic of me, I'm ignoring the urgent things and the top-of-the-to-do-list items and getting lost in something entirely different. But it has a purpose, I tell myself! I've constructed a mini-album to store the photos of our impending UK visit (which will not feel anything like a holiday due to us manically running around and seeing as many people as possible), so that the photos, upon our return, won't get relegated to the bottom of the to-do list as so often and sadly happens. This is a sneak peak of the blank album; I'll post again once I've filled it in a few weeks.

So, what I did: I cut from an old cardboard box a long rectangle, scored and folded it, and cut a square in the spine, to make it like a book cover. Stupidly (because I was excited about covering it) I forgot to take pictures of this part... so here it is already covered:


Then I chose some coloured cardstock, cut slightly smaller rectangles and folded them in half to make squares. These will form the pages of the book:


I punched holes in each of the pages and inserted eyelets to strengthen the holes:


Next, I took two pieces of string and tied them around the top and bottom part of the spine, feeding them into the square hole and through the top and bottom eyelets of the page:

I secured the page with a knot at each eyelet, on the inside:


I repeated this for all the pages (I chose to have nine):

I really like the 'window' in the spine when all the pages are in place:


Then, just because I couldn't wait until I get the photos in there, I added the fastening. Using a brad, and some more string, I made a loop to hook over the brad at the front:


And punched a hole in the back and tied another knot in the string:

OK, that's it for now. Back to craft classes, finishing my friend's card collection request, and packing suitcases. Can't wait for the photos so I can post the finished article!

Friday 18 June 2010

Going Postal

Well... not quite. In fact, postcards. A brilliant suggestion from my fiance, who naturally hadn't seen this competition, just at a time when I was stressing about not having enough days left before our UK visit to complete the card sets I'm making for a friend. She said that most often she just wanted a blank card, to send to someone not for any particular occasion other than to say hello. So I've made a whole load of postcards for her instead.


They're intended to go in an envelope, as there are bits stuck on them. I love the idea so much - it's a different canvas, inspiring different ideas, and I'll be making lots more in the future, really experimenting with designs.


Craft Classes: Test Run

I've been busy planning my craft classes today! I've worked out all the timings for the 4 days I'll be giving classes, and what we'll get done on each day. I have 4 to 6 hours in total per class, which should be plenty of time, taking into account the fact that I'll be teaching vocabulary as we go along (it's a summer school for kids who are learning English).

I've also carried out the test run, using only the materials which I'll be providing to the girls, and this is the result:


I actually found it oddly liberating to have strict boundaries on what I could and couldn't use: for a project I do usually collect all the paper, ribbon, buttons, bling, stamps and so on I'm going to use and put it in a box before starting, but inevitably find myself running back to my main stash and grabbing other bits and pieces, or not using everything I've selected. The boundaries forced me to find more creative ways to use the things at my disposal.


I am going to showcase elements that seem to be quite in fashion at the moment - tags, flags and edge-inking - and will take them through the steps to making their own flower, amongst other things. Really looking forward to it now!


Just a few last preparations to do!

Thursday 17 June 2010

Craft Classes: Prep, Prep, Prep!

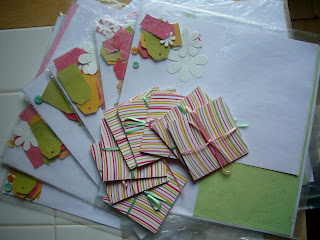
Hello all! As I mentioned a few posts ago I'm giving some craft classes next week as part of a summer school. I've found out now my class will consists of 8 girls (yay - makes things much easier!) from 12 to 14. I've been toiling away putting their kits together and reckon (fingers crossed) I'll just about have them all ready on time:


I've been cutting the paper (from Toga's du Papier à Gogo collection) into squares ready for our project:

I've also used the Cricut ALOT and cut out various shapes (tags and arrows are shown here) and a set of alphas for each girl (MUCH cheaper than buying them!).


I'm off to make the test run project now, then back to prep, prep, prep tomorrow!

Monday 14 June 2010

No...Not More, Surely?

Um...yep, I made some more. Orange flavour with orange blossom frosting.


Because it's my fiance's last week of term and he wanted to bring his students something, he asked me very nicely to make some more. Ain't we both sweethearts?

Sunday 13 June 2010

I Love Bunting


I love bunting. I want bunting everywhere, all the time. Today I'm posting some bunting I made last December for my fiance's birthday, which somehow I didn't get an photos of at the time.

I made one set in our favourite colours - red, black and white, that said 'Adam is 30'...

And another set in green that said 'Happy Birthday'. This one was really long (lots of letters!):


I kept it quite simple and let the colours speak:

I guess we can use the green one again, but unless I change the number every year, the red one is consigned to the Decorations Box, never to emerge again!

Friday 11 June 2010

I'm Seeing Stars

Thanks to Ally and her brilliant tutorial, I have made some teeny tiny cute little origami stars!


I've got a few hundred more to make before I fill the glass jar I have in mind for them... but I'll get there. Thanks again Ally!

Thursday 10 June 2010

Working out by Scraplifting

Although I prefer challenging my own creativity in order to come up with different layouts, designs and ideas, the other day I saw this incredible card on the very talented Wendy's blog and, well... simply, I wanted one for myself. To put on my shelf and just look at.

I don't have the acetate yet so I've used plain ol' card. And different motifs, but with the same ideas. Thanks Wendy!

Monday 7 June 2010

...and then Realising Cupcakes


...yep, so I made some more. For the picnic. Yummy!