Showing posts with label stars. Show all posts

Monday, 5 December 2011

Off Celebrating

It's the husband's birthday weekend, and somehow it's turned into a four-day celebration. Lucky he took Monday and Tuesday off work. Unlucky for me: I'm ill, ill, ill.

His card this year is a good reflection of how I was feeling when I made it. I was just beginning to see a bit of colour again, but my head was all over the place: buzzy, frenetic, wishing my cold would fly away.

this is me, ill, in card form - could be worse, I suppose!

I used some Gauche Alchemy stuff of course - perfect for this kind of mood. New punchinella from India, ouchless cardboard and pages from an old dictionary and a music book. Most surprisingly of all, though, was the fact that I busted out my watercolour pencils after years of neglect - and I'm so glad I did. (Even if the red did turn out a bit pink - sorry, husband!)

watercolours, oil  paint and Cosmic Shimmer Mist make up this eclectic background
I sealed it all together with a home-made envelope:

that's the man's name
Happy Birthday, Husband!

Tuesday, 29 November 2011

Creatively Scrapping

I'm on a bit of a roll with layouts lately. Perhaps I'm subconsciously trying to hit 50 before the year is out.

Creative Scrappers gave me a hand with this one. They're on a stars fix at the moment, which suits me just fine. This is how my thought process went: stars - nautical stars - nautical - boats - harbours - the harbour on honeymoon. And a layout was born.

Creative Scrappers sketch #184

I'm loving this streak - I'm using up scraps, using paper that I bought ages ago and can't remember why, and combining it all with newer bits and pieces too.

ah, stars! how I love you
Why not go join the fun at Creative Scrappers? They're very, very, very good. You'll see.

Friday, 18 November 2011

Punky Recipe - the Star of the Show

It's time for another Punky Scraps challenge! Don't try to resist, because this one is too good to miss.

Make a page from the following ingredients:
  • Stars
  • No patterned paper
  • Masking
  • Staples
  • Exposed cardboard
  • Book page
  • Bottle cap
  • Washi tape
Credits can only go to Inkadinkado and Tim Holtz for the star stamps
Not using any patterned paper was the biggest challenge for me - the biggest to date. (At least I know the need to use patterned paper will prevent my stash from ever getting out of control.)

I used everything on the list EXCEPT for the bottle cap because I FORGOT it. I had a Newcastle Brown Ale bottle cap somewhere (it has a star on it - perfect) but I only remembered it after I finished the page.

Love stars? Love ripping up cardboard? Look no further...
Again, as I mentioned in my previous post, I spent a LOT of time thinking about this page. I left it till the very last minute, and then woke up on the last day before deadline with the idea in my head. This time, the ingredients were decided for me; it was the laying out of the page that was taking time to come into focus.

I would LOVE to see people playing along with this challenge especially, so please pop over to Punky Scraps and check out the inspiration from the DT.


Monday, 14 November 2011

Happy Days

We'd already been planning our wedding for a long time when Echo Park's Happy Days collection came out. To be honest, I was so consumed with making wedding decorations that I hadn't really thought ahead to what the post-wedding scrapbooking would be like. Echo Park saved me the trouble, in the end. More than that - it was a match made in heaven.

Of course, recently I've been getting stuck in to that post-wedding scrapping, recording our happy day.

This layout you've already seen:

Materials used: American Crafts Thickers (Rainboots in Aqua Glitter Foam); Bazzill White cardstock; Echo Park: Dots and Stripes in Concrete, Happy Days chipboard accents, Happy Days element stickers, Happy Days journalling cards, Happy Days paper (Checker Board, Little Flowers reverse side); My Mind's Eye paper (Lost and Found Union Square Perfect "Happy"); Tim Holtz Bitty Grunge stamp set.
{Scrapbook Challenges Sketch #271}

I stitched and stamped before sticking down the paper strips. Then I added a printed swallow, a Cricut-cut nautical star and an RSVP - all from the wedding invitations - as extra memories. Finishing off with Happy Days chipboard shapes and Thickers was a doddle.

Why so easy? Well, Echo Park has pretty much decided my theme for me - I still want to be quite free and 'different', but I do want to have some main colours and motifs running through the pages. And Happy Days is perfect - you've seen the photos of the wedding. It should help me reach that subtle theming I'm after.

I made another Happy Days layout last week - taking into account this layout too, do you think I've achieved continuity?

Materials used: Bazzill Dragonfly cardstock; Echo Park: Dots and Stripes in Concrete, Happy Days alpha stickers, Happy Days element stickers, Happy Days journalling cards, Happy Days paper (Checker Board reverse side); Gauche Alchemy Punchinella;Tim Holtz Bitty Grunge stamp set; Toga alphas; vellum.
{Creative Scrappers sketch #181}

For the border, I cut up the remains of this chequered vellum I've had for years and machine-stictched it on, then drew a couple of extra outer lines with a black pen. To make the chevrons, I cut a strip of the reverse side of Happy Days Checker Board paper, and then cut this strip into squares. Keeping the squares in a line, turning every other square 90 degrees gave the rough pattern; then it was just a question of lining the stripes up and trimming the edges. I did the same with the Dots and Stripes paper.

yummy!

Since we went for cupcakes as the wedding cake, the Happy Days element stickers had to be used: cupcakes, layer cakes and sundaes - yummy! I cut around the cake on the journalling card a little so it could stick out over the photo. Then the title - punchinella, more chevrons, and lovely pure alphas.

And finally, my piece de resistance this month...


....take one deep photo frame from a well-known supermarket chain, take it apart, and make it your own!

Materials used: Echo Park: Happy Days alpha stickers, Happy Days chipboard accents, Happy Days element stickers, Happy Days paper (Ads, Retro both sides); Gauche Alchemy Punchinella and various Mixed Media Color Kits elements.

The frame comes with a super-thick inner mount that is quite wide, providing a great working surface. I drew around the mount directly onto the patterned paper and then simply cut out the shape I wanted to partially cover the mount. I did a teensy bit of fussy cutting to get the Retro flowers; glued some GA elements onto some thin wire and stuck them down behind the big chipboard title; and then just layered the rest up.

because the frame is so deep you can really go to town on the layering

on the subject of matches made in heaven... look at this Echo Park Happy Days chipboard accent with a vintage mini film negative from a Gauche Alchemy Mixed Media Color Kit


Tuesday, 25 October 2011

Caddy Love

Lily Bee Designs are starting to offer sketches for inspiration - and they're good.

I joined in with the first one by creating the second ever page of my wedding album. This was the sketch:


For over two years we had known which car we wanted for our wedding. And for over a year it had been booked. It was a 1956 Cadillac Sedan de Ville... this 1956 Sedan de Ville:

*sigh*

Why the sigh? Because at midday on the day of our wedding, I received a phone call from the car company, saying that the Sedan de Ville wouldn't start.


look! look how calm I am!

I went into Seriouser than Serious mode. The company offered me, instead, a Rolls Royce in silver or a Jaguar in British racing green. There was no way I was letting this slip away from me - the car was a big part of our vision, and my underlying desire was always only for everything to be coherent - so of course, I simply said that no, neither of those options were any good. That's when the company told me that they might have another Cadillac... it was from 1960, just about on the edge of what would work for me. It was also from the higher price range, but they would provide it at no extra cost. Naturally, I said. Then I heard the word 'tailfins' in my ear, and I was sold. Relieved, too.

Less than an hour later, the Caddy turned up. It was only at this point - while I am having my hair painstakingly put in place - that we discovered it had no roof. Now, I can look back and laugh at how I've always liked the windswept look. But on that day, at that moment, the journey to the Town Hall (we were running late, and there was an annual Beer Festival taking place which meant road blocks and diversions on top of that) was the most stressful of my life* because the wind in your hair is nice and all, but not what you want on your wedding day.

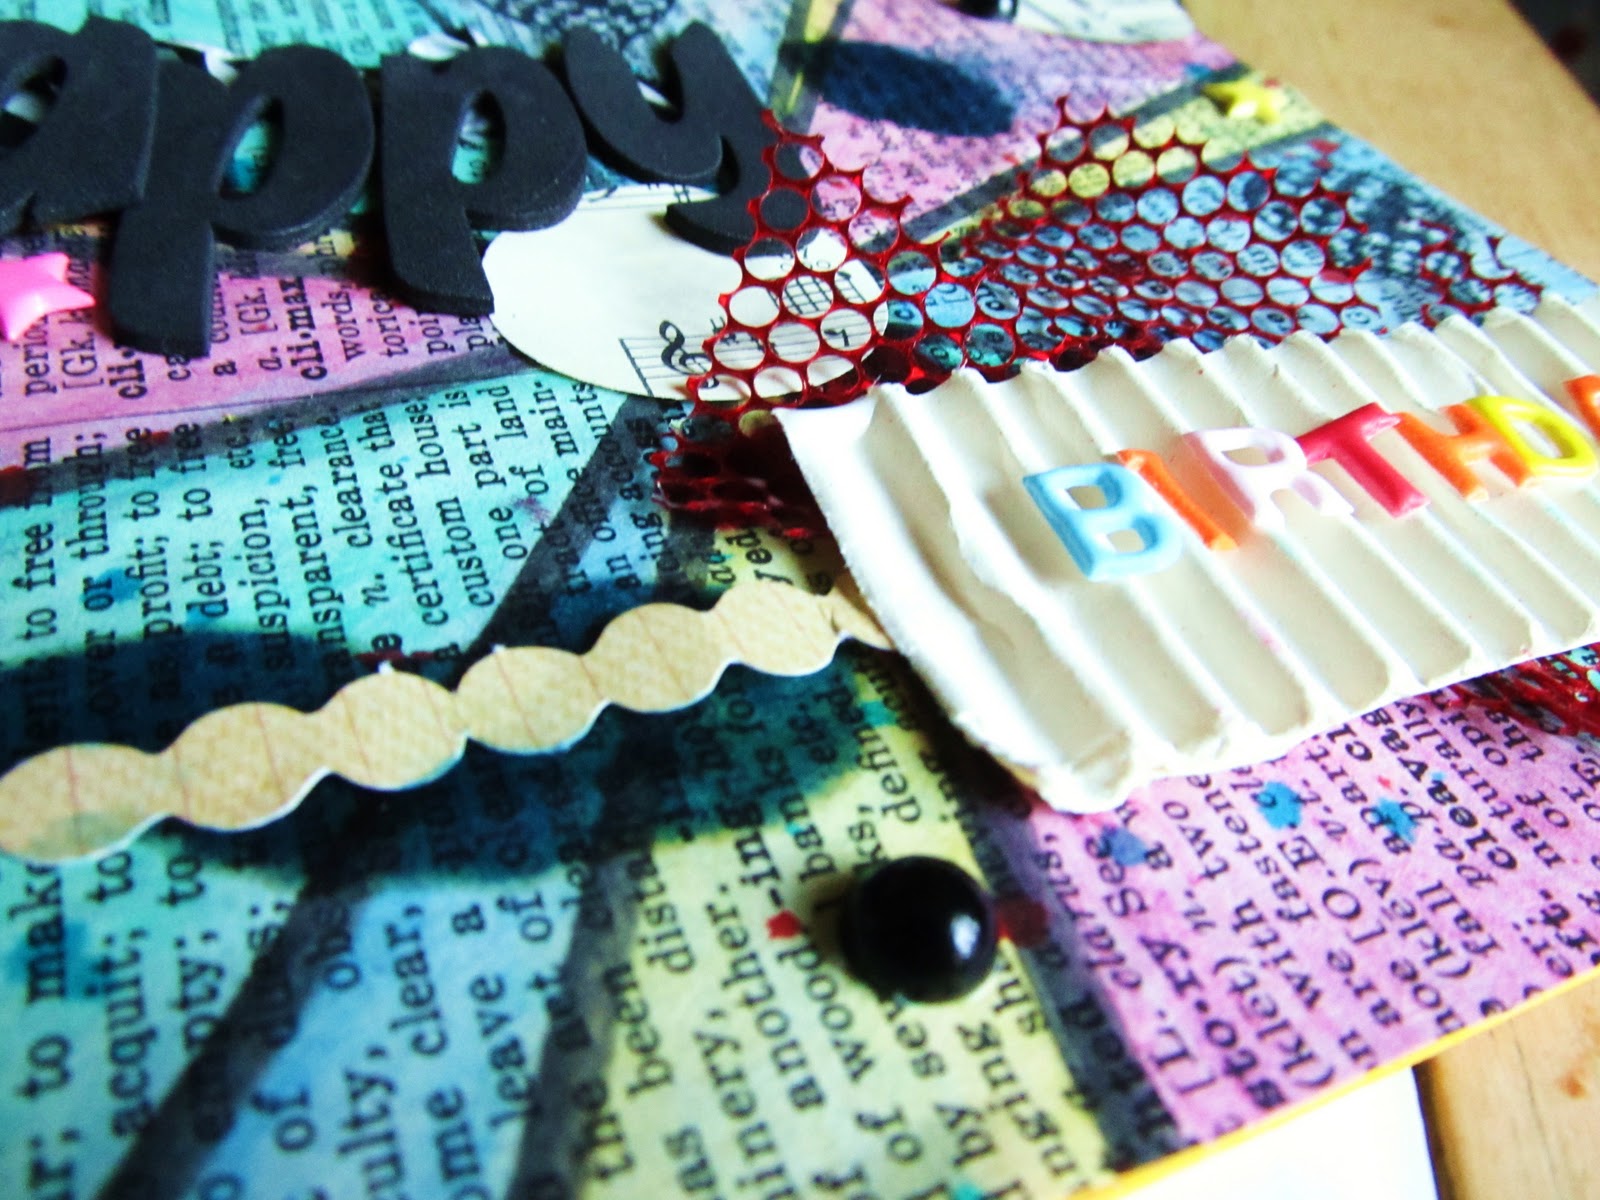
Anyway, back to the layout. I wanted to stitch on my page. I've cleared the way to the sewing machine again so I can stitch on my pages once more. But for me, to stitch the circles would've been too obvious. So I brushed on some acrylic paint, didn't like the look of it, and smudged it with a cotton wool pad. And then I was happy.


see them circles and stars again...
I used some paper and stickers from Lily Bee's Picket Fence collection, and combined them with Echo Park Happy Days bits and pieces, with some sparkly Thickers thrown in and Tim Holtz stamps.

still loving those nautical stars I made for the invitations
I didn't win the sketch competition, but the sketch was a great starting point for a layout that I'm happy with. 

The official photos have arrived now so I'm planning, planning, planning... how many pages can you fit into a post-bound album?

*coming in a close second is the one on which we transported my fish in their bowl from Norwich to Brussels by car. They learned about tidal pull that day; not to mention a little surfing. One of them was so traumatised it jumped right out of the bowl that evening after we'd arrived and went to fishy heaven (which was either somewhere under the sofa or in the doggie's stomach).


Saturday, 8 October 2011

The Wedding of Awesomeness: Part 2

It feels really weird to write this, but there were more than two hearts at our wedding.

What you saw when you looked up

Those hanging paper hearts are, and have been, all over the internet and especially Etsy for some time. But I still had to have them. I made them back in February, and I was damned if I wasn't going to use them! Cherry paper and everything!

The magical bunting was a labour of starchy love. My mum made over 50 metres of it, having chosen a whole range of fabrics that would match with the outfits and colours and styles of the wedding. I don't have the precise data, but I think it took a good couple of days to starch all of those triangles.

And the nautical stars - well... I made those a couple of weeks before the wedding, deciding one day that there was not enough nautical star in the whole picture. After the little star on the invitations, there had to be more!

These little ones were fiddly to put together

The hanging stars are 3D. I can tell you how I made them, if you like. It's quite easy.

1. I printed a large star template, and added tabs onto each outer line in pen. Then I used the template to cut out two stars from a piece of card, complete with tabs. I drew all the inner lines on in pencil with a ruler, including the ones separating the tabs from the main body of the star, and then scored along all the lines.

2. I manipulated each star so that the long lines coming from the centre to the points were mountain folds, and the shorter ones coming from the centre to the dips were valley folds. I folded all the tabs inwards.

3. This is where you decorate the star as you wish. I used the folds and lines to measure and cut out contrasting half-points to give it that nautical look.

4. Then I used PVA glue to stick the tabs of each star to each other. This was quite slow, as I needed to pinch and hold each part so that it adhered fully and began to dry before I could move onto the next part.

5. Once dry, the star - if you've made it, like I did, from thick card - is very sturdy, and holds up to more manipulation. Squash it down a bit, to make the folds and valleys really pop and dip.

6. Finally, hammer an eyelet through the top point and string it up.

They're equally good for Christmas... and that's just around the corner!

I'll leave you with a picture of me and my family.

Stylish, no?

Sunday, 24 July 2011

One Love

Yesterday I had a hair and make up test run for the wedding. I felt pretty special. A tiny part of me felt a bit silly, going to such showy lengths, but mostly I am just so excited now - it's drawing closer, everything seems to be under control, and we are gonna have such a great party!

I know I'll have a thousand photos to scrap after the wedding, but that doesn't mean I'm holding off on wedding layouts until then.

There was a sketch released earlier this month on the Creative Scrappers site - number 164 - that spoke directly to me. It looks like this:


I needed to scrap it. But I needed a good reason to scrap it. It had to be special.


Then the challenge over at Punky Scraps this week was given to us on the DT, and I knew exactly what to do. If you want to join in, you need to use the following ingredients list to create a layout:
  • Photos of items, not people
  • 3 circles
  • Turquoise
  • Stitching
  • Red
  • 2 or more staples
That first one on the list is what sparked off this whole page.


I'd been working on my photography and took a photo of our rings that I was just so happy with, I had to scrap it. I know people shouldn't really be seeing them yet, but I couldn't resist. In trying to keep things fairly simple I didn't used as many layers as I'd have liked, but I did get to use the beloved Heidi Swapp Ghost Alphas again:


Love that red stitching! Thank you, Creative Scrappers, for such a great sketch; and thank you, Punky Scraps, for a great ingredients list.

Thursday, 21 July 2011

Stars in Their Eyes

I can't resist quickly celebrating the fact that I've been selected again for publication in the Scrapbook News and Review magazine - out now - with the page I made about my brother a while ago.

Things are moving very quickly for me at the moment and it's hard not to get dizzy with it all. It's an exciting time!

Some celebratory stars:


I made these by printing a template directly onto the card, cutting them out and ensuring there were flaps on the outside edges, and scoring them so they bend outwards. I cut out the accent parts and stuck them on. Then I proceeded to remove my fingerprints by gluegun, sticking two 'halves' of a star together back-to-back, and pressing down on the points so they bent at the scored  lines and the stars became 3D. They'll hang by fishing wire, from the ceiling of the dance hall at our wedding venue.

Sunday, 19 June 2011

Punky Scraps Challenge 20: 5,4,3,2,1...


Challenge number 20 is up at Punky Scraps: to create a page using the following:

5 photos
4 alphas
3 patterned papers
2 colours of mists/pain
1 stamp
and also incorporate the colour blue.

My layout for this challenge looks like this:


Five photos - yes! I've been collecting these over the years and so badly wanted to use them on a page but am scared these days of using too many photos on a page. Perfect timing the challenge! Four alphas - yes, if you count either a different colour (white and black Thickers) or my own handwriting. Three patterned papers - yes: the background and two little flags on the right. Two colours - well, I used a blue home-made paint mist (and it worked!) and some white gesso. One stamp - that's the little star imprint in the gesso.

Oh, and blue - well, yes :-). The little piece of ephemera is actually a part of the most awesome event leaflet I've ever seen. It's a few pages full of really old circus-style adverts for events going on at one of our favourite local venues, aptly named (for this layout) 'Magic Mirrors'. It's where we go dancing - it has a proper wooden dance floor and a glass dome in the ceiling that splits sunlight into rainbows on the inside - no need for a glitterball in the summer when it's still light at 10.30pm.

My home-made paint spray. Proud!


I actually used a Scrapbook Challenges sketch for this one: number 256, which looks like this:


Go and get Punky at Punky Scraps by joining in the challenge. You know you want to!

Tuesday, 14 June 2011

At Last

As you may remember, I had (like most other people out there) some computer issues a couple of months ago. Namely, my computer showed a dislike of wine and shut down with a flicker and a huff, and wouldn't wake up again.

Apparently, though, it is possible to dry them out. After purchasing a shiny new laptop, I eventually braved the on button of the old one... and whaddaya know? It works. Just like it did before.

So, at last, I can share the original photos of our wedding invitations.

cute, no?

This is but one of the piles of them:


And here is what they look like on the inside:


You simply slide off the outer band, and you have three cards - the invitation proper, some info and an RSVP:


We used Bazzill swiss dotted white cardstock for the sleeve and some paper from MME for the cards (Lost & Found Union Square "Happy" paper). I did a little bit of letterpressing for the "&" circle, some fussy cutting to get the printed swallows, and employed some good old Cricut action for the hearts and stars. Oh, and a circle punch for the sleeve.


Now, although I didn't think I was doing any jumping, there really is a bandwagon. And not in a bad way. Over at Paper Issues there is a linkup opportunity for wedding projects. Yes, I've already played linky a few times this month, and there will be more linkups before the month is over!

Tuesday, 3 May 2011

Just for the Record: I'm Lifting Again

Look at that. I'm getting good at this headline-creating business.

It's layout time. More specifically, it's gorgeous spring yellow, For the Record time.

A blogospherical friend of mine who is rather good at making layouts (not to mention dresses, and cards, and mini albums) made a page a while ago that I kept thinking about. In creating my most recent layout I managed to lift her and use masses of the amazing collection that is For the Record. It's so versatile, with so many different potential 'looks' - I can't stop praising it.


What I'm loving about this page, other than For the Record: clouds, journalling, masking tape and Versamark stars. Thanks to Sabr for the inspiration!

Wednesday, 30 March 2011

Feeling a Bit Sketchy

I've been feeling a bit sketchy for the last couple of months, and a lot sketchy for the last couple of days. Not sure what's been wrong with me, if anything - just a general physical and mental lethargy. Maybe it's as simple as my body needing some sunshine. Thankfully, there was some of that yesterday, and the warm sun on my skin must've helped a bit, because I completed two layouts yesterday evening.

One of them, inspired by a Creative Scrappers sketch, celebrates my relationship with my brother: few words pass between us, and even though he's six years my younger, he never stopped growing; he's more like a big brother.


Supplies used: Echo Park Little Boy paper (Rock Star), Echo Park Sweet Summertime alphas, Thickers, Tim Holtz stamps, bakers' twine and a couple of miscellaneous items.

Sunday, 16 January 2011

Scrapping in a Punky Kinda Way

One of the Scrapbook Challenges DT members, Natalie, also has a little challenge blog of her own. It's called Punky Scraps, because she's a punky kind of girl. She offers sponsored prizes every month and sketch challenges every week, and in short she's a girl after my own heart - to steal my university's old motto, we like to 'do different'.

I made a layout for last week's sketch, using scraps of paper in colours I would never normally dream of using. It's a fun, bright little page with some hidden journalling and some paint splodges. And that's about it!


The hidden journalling tells of how, at my cousin's 80s-themed party, my family dressed up to the nines and when I saw the photos I was struck by how young my mum looked - the outfit, the makeup, the hair all took 20 years off her. Of course, she still looks young now (and yes, she does read this blog), but really, she looked younger than me! This is the 80s word I used to describe her and title the page:


Nostalgic, anyone?

Friday, 11 June 2010

I'm Seeing Stars

Thanks to Ally and her brilliant tutorial, I have made some teeny tiny cute little origami stars!


I've got a few hundred more to make before I fill the glass jar I have in mind for them... but I'll get there. Thanks again Ally!