Showing posts with label love. Show all posts

Monday, 5 March 2012

The Handmade Wedding

You've all seen by now all the handmade things the wedding brought along - now it's time to scrap about it all!

The sketch this week at Scrapbook Challenges made me so happy about sketches and scrapbooking. It was one of those moments when you've been waiting to scrap a certain idea or certain photos for a long time, and one day the answer just pops up.

The sketch looks like this:


And after I put my page together it looked like this:

Scrapbook Challenges sketch #285
What I used for this page: Doodlebug Love Potion patterned paper, Echo Park Style Essentials Upscale Black Quatrefoil and Grey Dots & Stripes patterned paper, Echo Park Happy Days patterned papers & alpha stickers, Rayher wooden hearts and bobbins, Toga chipboard alphas.

Quite to my surprise, I'm building up our wedding album pretty quickly. And it's looking pretty sweet.

Get over to Scrapbook Challenges for this sketch, and all of the March Madness going on this month. As ever, you could win something for your participation!

Thursday, 16 February 2012

Home is...

A looooong time ago I bought a sort-of printer’s tray in a funny shape. A specific shape, considering what I wanted to do with it - I wanted to celebrate the concept of 'home', which, for me, isn't a house, a town, a country; it's less tangible than that. It's a feeling.

Anyway, I’ve been working on it slooooowly and thought I’d finally share some of my progress.

I've used some of the ancient letterpress kit I found that same day to embellish
First I asked my husband nicely to sand it for me and stain it that dark red colour. Then I started collecting bits and pieces that I’d like to add to it. I cut some shapes for the wallpaper of the little ‘rooms’, and selected some photos to fill the spaces with.

'home is where the heart is' is so true for me
And that’s as far as I’ve got. Maybe in another 18 months it’ll be completed. When it is, I promise I'll share it fully.

it was a great idea, but I've been slow at completing it

Tuesday, 14 February 2012

I'm in the Mood for Love

About a year ago, we started trying to decide on a song for our first dance. We didn’t necessarily want a first dance, but as we’d been taking swing dancing lessons (Lindy Hop, to be exact), we admitted that we were certainly going to dance, and that one of the dances would naturally have to be the first one. So we threw ourselves full swing (hehe) into the search.

Now, between us we have a lot of music. And when I say a lot, I mean a lot. Not just in sheer volume, but also in the range of eras, genres, levels of fame and success, and sources and styles. Choosing from that seemed an impossible task. In total we were searching for 5 songs – 1 for our first dance, 3 for the town hall ceremony (entrance, signing and exit), and 1 for our own personal ceremony after dinner. The song for the first dance we thought we’d decided on by the time May came around (the others were finally settled on during the week before the wedding…how that stressed me out I can’t tell you). And it is the little story behind this song that helped me make my valentine’s card this year.

My parents came to visit at the end of May and, naturally, we told them about the song. We talked a bit about the artists and how we’d come to know them, and then practised our dance a little.

Cut to the moment on our wedding day after our first dance, when we were called aside by my parents and given a very special gift: the album on which the song appeared, on original, unplayed vinyl – signed by the surviving female singer. This surprise was an even bigger one than seeing my parents jiving – Where? How? When? – of course, we were amazed.

They told us that at a vintage fair they’d gone to in July, Keely Smith had been there signing autographs. She was old, and frail following an illness, but she was there and full of the edge she showed when she performed on stage with Louis Prima. My parents headed for a record stall, looking for one thing only – and found it. She was happy to sign, apparently punching my dad on the arm for giving her a pen that didn’t quite work, and happy to hear that some ‘young people’ were still interested in her music. My parents went home triumphant and full of glee.

Since all the DT at Scrapbook Challenges have been challenged to incorporate a love song into their projects this month, I’ve made an easy decision and gone for this one.

first card I've been happy with in a loooong time!
Don't forget, if you haven't already, get on over to SC, sign up, and get your share of the scrappy love!

Tuesday, 7 February 2012

Interpretation: The Debate Continues

Following on from my previous post on the Inspiration Debate, I’m going to talk a little bit today about Interpretation, since it’s loosely related to those aforementioned copyright laws and the difficulties involved with intellectual property rights, the internet and so on.

It is very often claimed that any given creation is not a copy of another, it’s an interpretation, which is pretty much like saying ‘it’s OK, I’ve put my own spin on it’. This is OK, until the claims start to be made over creations that are  in fact copies, or uncredited, or both. The problem is that all of this is subjective. You might think something is a rip off of something else, but I might not be able to see it. I absolutely don’t have any answers to this one. Again, it’s a situation that is developing every day, and we are just trying to keep up with the fast-paced changing world of instant online connectivity.

So to completely go the other way and run from the debate, I’ve kind of done the opposite with the layout below. It’s made from a sketch, but it is very loosely based on the sketch. For many reasons (two of them being printer related, causing me to feel like this) I switched things up and did my own thing.

In the past, before I was scrapbooking regularly, I did sometimes look at a layout that was supposedly based on a sketch and wonder how the artist got from sketch to layout, as I couldn’t see any resemblance. Now that I’ve been more active in scrapbooking circles, I see the interpretation process a lot more clearly. And frankly, these days I’m disappointed if a layout is too closely, too precisely based on a sketch – what I find inspiring, like the majority of us, I’m sure, is seeing different people’s different interpretations of a sketch (yep, I used 'different' twice there intentionally). More than that, I find it fascinating that a small group of people like a design team can come up with different layouts for a sketch and no two are even remotely alike.

This is the main reason I love sketches so much these days. Not so much because it takes out of my schedule that extra step of thinking up a design, saving me time; more because the process of getting from sketch to layout is an art in itself.

Look at what I’ve done with Scrapbook Challenges’ sketch this week:

hi, my name's Cheryl and I can't multi-photo scrap

Mine doesn’t look like that. It looks like this:

Scrapbook Challenges sketch #281

I turned the sketch 90 degrees, moved the title position so it diagonally mirrored the original, opted to go for one photo chopped up instead of multiple photos, tried to play around with the title in place of the journalling, and used wavy (literally!) lines instead of straight, moving them from the outside in.

trying to be too clever?
For the title I tried to do something a bit different. (In case you can’t see, there are Heidi Swapp Ghost Alphas on there that spell out ‘Dubrovnik’). It’s (supposed to be) a multi-way title, so you can read it as ‘I love Dubrovnik’, as ‘in Dubrovnik’, as ‘in love’, or as ‘in love in Dubrovnik’. I think I’ll try this again in the future as I didn’t quite get the positioning right on this one (the ‘in’ needed to be closer to the ‘love’, for example, and perhaps I needed to use smaller letters for the ‘Dubrovnik’).

What are your thoughts on interpretation? How far do you like to take a sketch?

If you want to see what the other DT members did, and submit your own layout for a chance to win a prize, visit Scrapbook Challenges. This month, because we feel like sharing the love, there are also extra prize-winning opportunities for new members, so come over and sign up!

Tuesday, 24 January 2012

Our Brilliant Stars

When we were planning our wedding, we knew from an early stage that more than mere observers, we wanted people to be involved in the wedding. So in our intricate detailing of how our day was going to pan out, we included a lot of people, and from those people, we asked for quite a lot of things.

I’m sure it’s fairly normal to ask family members to help out – all of my family decorated the venue for us on the day, my mum made all the cakes the day before, and his close family hosted welcome drinks for guests the night before – and when it comes to the bridesmaids and groomsmen, there are pre-set, etiquette-driven, certain particular tasks that fall into what you would call the ‘normal’, ‘standard’ or ‘to be expected’ category. But what we asked of our bridesmaids and groomsmen went beyond the norm – then again, our whole day did, too.

We assigned certain responsibilities to each of them, such as asking one of the boys in braces to be the music monitor; we got the polka dot princesses to manage the quiz during dinner by collecting and marking the answer sheets; they all ushered the tables into the ceremony room for our own personal ceremony after dinner; and they each invented and asked vows to the bride and groom to make sure we were going to look after each other. They did a lot more besides this – an awful lot. For that we are eternally grateful, and so touched by the distance they went for us.

It’s for this reason I wanted to make this layout a fairly uncomplicated page: to show off the simple fact that we are so thankful for these friends and what they shared with us on our wedding day; they really were superstars. The true meaning of friendship came out on that day and we will not forget the feeling of immense pride and joy at having these people present at our wedding.

It’s another Scrapbook Challenges sketch – up this week on the forum – in fact, I designed this one myself (except Brynn, SC Queen Bee, jazzed it up and made it look all snazzy like that):

it didn't look this good when I handed it in
The double-page version looks like this:

i tried smooshing it all onto one page, but it's better on two

And a rare double-pager from me looked like this:

Scrapbook Challenges sketch #279
Using only Bazzill cardstock and MME Quite Contrary patterned paper, a few snips of Happy Days paper, alphas and journaling cards, some Happy Days and For the Record stickers, AC Thickers and Bitty Grunge stamps from Tim Holtz to get the circles into the layout, I created a panorama of what I hope is love, gratitude, awe, respect and happiness.

they really were superstars!
Thanks, you lot, for helping to make our wedding day so awesome. We will not forget. x x x

Friday, 18 November 2011

Punky Recipe - the Star of the Show

It's time for another Punky Scraps challenge! Don't try to resist, because this one is too good to miss.

Make a page from the following ingredients:
  • Stars
  • No patterned paper
  • Masking
  • Staples
  • Exposed cardboard
  • Book page
  • Bottle cap
  • Washi tape
Credits can only go to Inkadinkado and Tim Holtz for the star stamps
Not using any patterned paper was the biggest challenge for me - the biggest to date. (At least I know the need to use patterned paper will prevent my stash from ever getting out of control.)

I used everything on the list EXCEPT for the bottle cap because I FORGOT it. I had a Newcastle Brown Ale bottle cap somewhere (it has a star on it - perfect) but I only remembered it after I finished the page.

Love stars? Love ripping up cardboard? Look no further...
Again, as I mentioned in my previous post, I spent a LOT of time thinking about this page. I left it till the very last minute, and then woke up on the last day before deadline with the idea in my head. This time, the ingredients were decided for me; it was the laying out of the page that was taking time to come into focus.

I would LOVE to see people playing along with this challenge especially, so please pop over to Punky Scraps and check out the inspiration from the DT.


Thursday, 10 February 2011

Let's Have a Little Heart-to-Heart

The February scraplift challenge on the True XOXO Girls blog is up, this month with this fantastic prize sponsored by Candy Shoppe Designs:


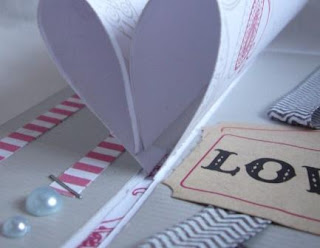
For February I decided to make something a little different. I gave you a little sneak here. I was playing around with paper and I thought, hey, since I won't be sending my valentine a card in the post (because I live with him), why not make a card that can absolutely not be posted? This is what I came up with:


And just because I was feeling like sharing the love, I made a little tutorial for this card so you can have a go yourself.

Step 1: Take a piece of card (not too thick) that is 30cm long and as tall as you wish (I think I went for about 18cm but it depends on how much 'heart' and how much 'flat' you want). Mark as below (in centimetres, at intervals of 7.5, 3.75, 7.5, 3.75 and 7.5).


Step 2: Cut where the dotted lines are and fold where the bold lines are, so you end up with this:


Step 3: Stamp on, or add patterned paper to, the middle part of the card. You will cover most of the pattern, but that's OK:


Step 4: Turn the card over and decorate the 'wings' (I stamped on mine because sticking another layer of paper would make them too bulky when it comes to the manipulation stage) and the sides of the card. The middle part should stay blank as this will be the card base:


Step 5: Roll up the corners:


Step 6: Turn the card back over and strategically position double sided tape, like this:


Peel off the backing tape and stick down, following the direction of the folds.

Step 7: Turn the card back over and add some double sided tape to the patterned edge of the wings, but don't peel off the backing just yet:


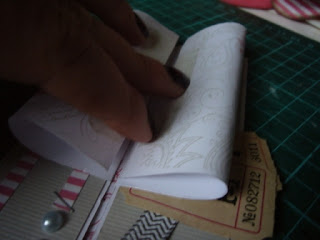
Step 8: Start to bend (NOT fold) the two wings, by bringing the edges together up high and then pushing down gently:


Step 9: Open the wings up again, add an a final strip of double sided tape along the inside middle of what is going be the heart:


At this point you'll need to take a little strip of card and roll it into a tight tube. I don't have a photo for this but you'll see why in step 11.

Step 10: Peel off the backing from the tape on the inside middle part of the card. Now fully bend the wings and push them down to make contact with the tape. It should be just enough to hold them in place while you take care of the rest:


Step 11: Peel the backing from the tape on the wings. Holding your little paper tube in place, bend the wings for a final time and stick them to each other, with the tube stuck in the middle. You'll need to reach inside the heart with your fingers and squeeze (ignore the disturbing metaphor there!):


Step 12: Make some hearts (I lost my photos for this). Add a length of floristry wire to each one (for the flat hearts I cut two of each and then stuck them together, thus concealing and holding in place the wire). You can then insert them into the little paper tube 'vase' stuck in the middle of the heart. If they're not too heavy, they'll stand up!


And that's it! If you do make this yourself, let me know because I'd love to see what people come up with. I'll be back on Sunday with more love. Until then, to borrow an apt phrase from a blogging friend of mine, scrap to your heart's desire!

Sunday, 6 February 2011

Love is in the Air

...or at least, love is in the airwaves. Or blogosphere. For sure in the scrapbooking community. Not wanting to be left out, I've prepared a few things in the run up to St Valentine's Day.


A while ago we visited a village built around and through the ruins of a huge abbey - such an impressive sight. It was when we were still looking for a wedding venue, and we were considering having an outside ceremony in the grounds. We were almost sold by the fact that there was a bride and groom being photographed in the grounds at the time.


Thanks to the camera's timer, we took some pictures of us together. And ten seconds (the maximum time setting) is just enough for my fiance to make it to the pose point.


I wanted to use this photo to make a page which expressed my feelings about him and our plans. I was going to give it a much longer title, but in the end, the short, single word worked much more powerfully. And I felt the addition of the full stop was even more important for driving the point home (I'm a bit like that).


Stay tuned for more love-themed projects in the next couple of weeks.