
The February scraplift challenge on the True XOXO Girls blog is up, this month with this fantastic prize sponsored by Candy Shoppe Designs:

For February I decided to make something a little different. I gave you a little sneak here. I was playing around with paper and I thought, hey, since I won't be sending my valentine a card in the post (because I live with him), why not make a card that can absolutely not be posted? This is what I came up with:


And just because I was feeling like sharing the love, I made a little tutorial for this card so you can have a go yourself.
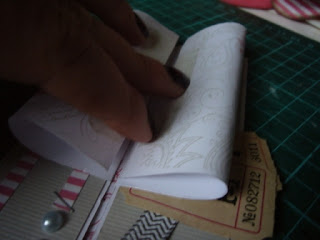
Step 1: Take a piece of card (not too thick) that is 30cm long and as tall as you wish (I think I went for about 18cm but it depends on how much 'heart' and how much 'flat' you want). Mark as below (in centimetres, at intervals of 7.5, 3.75, 7.5, 3.75 and 7.5).

Step 2: Cut where the dotted lines are and fold where the bold lines are, so you end up with this:

Step 3: Stamp on, or add patterned paper to, the middle part of the card. You will cover most of the pattern, but that's OK:

Step 4: Turn the card over and decorate the 'wings' (I stamped on mine because sticking another layer of paper would make them too bulky when it comes to the manipulation stage) and the sides of the card. The middle part should stay blank as this will be the card base:

Step 5: Roll up the corners:

Step 6: Turn the card back over and strategically position double sided tape, like this:

Peel off the backing tape and stick down, following the direction of the folds.
Step 7: Turn the card back over and add some double sided tape to the patterned edge of the wings, but don't peel off the backing just yet:

Step 8: Start to bend (NOT fold) the two wings, by bringing the edges together up high and then pushing down gently:

Step 9: Open the wings up again, add an a final strip of double sided tape along the inside middle of what is going be the heart:

At this point you'll need to take a little strip of card and roll it into a tight tube. I don't have a photo for this but you'll see why in step 11.
Step 10: Peel off the backing from the tape on the inside middle part of the card. Now fully bend the wings and push them down to make contact with the tape. It should be just enough to hold them in place while you take care of the rest:
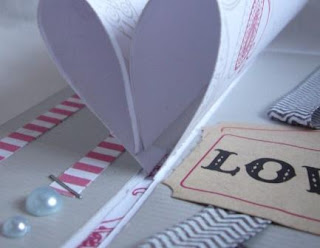
Step 11: Peel the backing from the tape on the wings. Holding your little paper tube in place, bend the wings for a final time and stick them to each other, with the tube stuck in the middle. You'll need to reach inside the heart with your fingers and squeeze (ignore the disturbing metaphor there!):

Step 12: Make some hearts (I lost my photos for this). Add a length of floristry wire to each one (for the flat hearts I cut two of each and then stuck them together, thus concealing and holding in place the wire). You can then insert them into the little paper tube 'vase' stuck in the middle of the heart. If they're not too heavy, they'll stand up!

And that's it! If you do make this yourself, let me know because I'd love to see what people come up with. I'll be back on Sunday with more love. Until then, to borrow an apt phrase from a blogging friend of mine, scrap to your heart's desire!

For February I decided to make something a little different. I gave you a little sneak here. I was playing around with paper and I thought, hey, since I won't be sending my valentine a card in the post (because I live with him), why not make a card that can absolutely not be posted? This is what I came up with:


And just because I was feeling like sharing the love, I made a little tutorial for this card so you can have a go yourself.
Step 1: Take a piece of card (not too thick) that is 30cm long and as tall as you wish (I think I went for about 18cm but it depends on how much 'heart' and how much 'flat' you want). Mark as below (in centimetres, at intervals of 7.5, 3.75, 7.5, 3.75 and 7.5).

Step 2: Cut where the dotted lines are and fold where the bold lines are, so you end up with this:

Step 3: Stamp on, or add patterned paper to, the middle part of the card. You will cover most of the pattern, but that's OK:

Step 4: Turn the card over and decorate the 'wings' (I stamped on mine because sticking another layer of paper would make them too bulky when it comes to the manipulation stage) and the sides of the card. The middle part should stay blank as this will be the card base:

Step 5: Roll up the corners:

Step 6: Turn the card back over and strategically position double sided tape, like this:

Peel off the backing tape and stick down, following the direction of the folds.
Step 7: Turn the card back over and add some double sided tape to the patterned edge of the wings, but don't peel off the backing just yet:

Step 8: Start to bend (NOT fold) the two wings, by bringing the edges together up high and then pushing down gently:

Step 9: Open the wings up again, add an a final strip of double sided tape along the inside middle of what is going be the heart:

At this point you'll need to take a little strip of card and roll it into a tight tube. I don't have a photo for this but you'll see why in step 11.
Step 10: Peel off the backing from the tape on the inside middle part of the card. Now fully bend the wings and push them down to make contact with the tape. It should be just enough to hold them in place while you take care of the rest:

Step 11: Peel the backing from the tape on the wings. Holding your little paper tube in place, bend the wings for a final time and stick them to each other, with the tube stuck in the middle. You'll need to reach inside the heart with your fingers and squeeze (ignore the disturbing metaphor there!):

Step 12: Make some hearts (I lost my photos for this). Add a length of floristry wire to each one (for the flat hearts I cut two of each and then stuck them together, thus concealing and holding in place the wire). You can then insert them into the little paper tube 'vase' stuck in the middle of the heart. If they're not too heavy, they'll stand up!

And that's it! If you do make this yourself, let me know because I'd love to see what people come up with. I'll be back on Sunday with more love. Until then, to borrow an apt phrase from a blogging friend of mine, scrap to your heart's desire!
I have to say I heart this technique :) Lovely!
ReplyDeletebeautiful!!lovely technique
ReplyDeletewow, so totally different! It is amazing. I love the hearts.xx
ReplyDeleteIt's so so gorgeous, thank you for sharing your technique. Such a good idea not to make a "flat" card, like you say, it doesn't need to be posted.
ReplyDeleteSuper original and cute :)
ReplyDeleteOoh it's gorgeous, I love it! Thanks for sharing :)
ReplyDelete